Mr Grumpy

Mr Grumpy

Western Thunderer
Any of you who have followed my thread for a while may remember the MMP coal loading hopper I built a while back. Included in the kit is this nice little bucket grab to remove coal from the wagon and load in to the hopper. Unfortunately, the Commercial Classics crane is no longer available, so the grab will become a rusting scenic accessory to my coal yard.
FullSizeRender.jpg
FullSizeRender-2.jpg
FullSizeRender-1.jpg
 

Mr Grumpy

Western Thunderer
One of my disappointments when deciding to plan Tetbury, was that there was no milk tanker traffic. There were plenty of milk churns, but none of the lovely 6 wheel tankers. When I finally discovered I couldn't fit a pint in to a quart jug, or Tetbury just wouldn't squeeze in to 18'6'', I had to design a fictitious layout which may or may not be called Titbury. Every big grey cloud has a silver lining, and I was able to design in a creamery which will be capable of comfortably holding six 3000 gal tankers.
For a bit of variety and to stop boredom creeping in, I bought 3 ex-LMS and 3 ex-GWR slaters wagons. To add further to the variety, I'm using @jjnewitt Rumney Models exquisite loading platforms on two of the ex-GWR tankers, and all will have his etched name plates. I'm also using sprung etched W irons and CPL screw couplings. I'm also going to experiment with blackening the wheels, couplings and buffers.
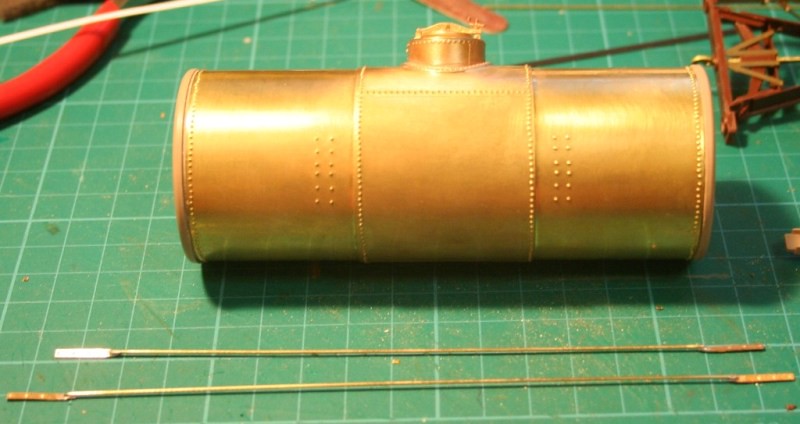
I built a single wagon several years ago and didn't much like the 3 section plastic barrel, which took a fair bit of work to hide the joint seams, so I might consider rolling replacement barrels from brass sheet. I'll have a go with the plastic sections first though.
I was inspired to invest in the tanker traffic after reading Martyn's @3 LINK account of his excellent build. Like Martyn, I will use Halfords aluminium cellulose, although not much of it will be seen of it once I'm finished ;)
 
Last edited:

Rob Pulham

Western Thunderer
Hi Richard,

I couldn't manage to make a decent job of the 3 section barrel for my Slaters 14 ton tank so I rolled one - I did retain the ends which were nice clean mouldings

8995350105_0349f71b37_b.jpg


I don't regret it for a second.
 

3 LINK

Western Thunderer
To be honest I didn't find building the tanks that bad, I used Mek Pak to glue the sections and that glue is quite forgiving in that it gives you time to make any small adjustments.

Look forward to the updates,

Martyn.
 

Mr Grumpy

Western Thunderer
The tanker production line has begun :) Each tank is made up of 3 segments plus the ends. Since the photo, I have all the pieces cut from the sprues and sanded smooth. I was going to use bagged sand as weight for the wagons, but I may nip out and buy some lead curtain weights instead.

Edit: Change of mind...bought a bag of sand :rolleyes:
IMG_7348.JPG
 
Last edited:

Mr Grumpy

Western Thunderer
Richard

This is such a shame as the work you have already completed is of such a high standard.

Lets hope you get this resolved soon.

Richard
Hi Richard,
In modelling terms, it's the biggest disappointment I have had, and has made me come so close to selling on my MOK 9f as I feel out of my depth again. I'm frustrated as I can't see where I have gone wrong. The bogies and chassis run like a dream, and were a real joy to build. The coach body and interior were also great fun to build and look the part.
I will eventually get it sorted, but I need to leave it for a while. I can only imagine that with all the MMP coaches out there that many others must have got it right, so I will need to spend the time double (actually triple ) checking the roof profile.
In the mean time, I have resorted to pre-ordering a couple of Lionheart Mk1s.
 

richard carr

Western Thunderer
Richard

I wouldn't worry about your 9f. The tab and slot technique used by MOK makes building it a doodle compared to building an MMP kit, not that there is anything wrong with an MMP kit, there isn't.
Roofs always seem to be a difficult thing on MMP kits, I had problems with the 40 kit I built, but I got there in the end and I have seen a few other peoples models who did a superb job. I'm hoping that the 56 kit I have started will be easier on the roof.

Even on the MOK Ivatt, I was worried about building the curved firebox, but the tab and slot method made it relatively easy and I was very pleased with the result. There is nothing that complicated in the 9f kit, there are a few errors in the instructions, but these are detailed on the MOK website.

Richard
 

Mr Grumpy

Western Thunderer
Thanks Richard :)
I'm sure your 56 will turn out well. The diesels really were nice kits. It's a change to be playing with plastic kits again. I have the BR1G tender with my 9f which is probably the easiest one to build, so I'm hoping that will go ok. I have the nice wheels and just got the motor from Brian, so I may be tempted to make a start in the new year :)
 

Rob Pulham

Western Thunderer
Hi Richard,

They look so,ooo much better than my effort, not having to contend with rivets must have made the preparation a little easier than the 14 ton tank.
 

Mr Grumpy

Western Thunderer
Hi Richard,

Not having to contend with rivets must have made the preparation a little easier than the 14 ton tank.
Hi Rob,
It certainly was!! I don't think there would be any rivets left :)
It's a pity the tank isn't supplied as a complete tube, it does create a bit of extra work, but they are looking fine, and with a little more filling and sanding....... they should be perfectly cylindrical ;)
 

Mr Grumpy

Western Thunderer
The barrel is 45mm or 1 3/4" OD, I had a very quick snoop and couldn't find anything of the correct size (copper or plastic) However, I would have rather rolled them from brass sheet if I hadn't used the parts from the kit.
 
Last edited:

Mr Grumpy

Western Thunderer
Due to sub zero temperatures in the workshop even with the fan heater going full tilt, I have been finding things to do in warmer parts of the house. But I have made a little progress. All the buffer housings have been chemically blackened fettled and painted. The buffers, wheels and coupling hooks have also been treated but not painted.

There are several differences between the LMS and GWR wagons including chassis, brake linkages, buffer housings and wheels. So, I took the option of building the LMS chassis together, and once the wheels are in place, crack on with the others.

I'm at the stage of fitting the microstrip to the underside of the chassis girders. I notice that Heather enjoys doing this, I don't, so perhaps I could post them off to her ;)
Also in the photo, is one of my wife's nail sanding stick things, which following a stealthy trip to her make up stuff is now mine :cool:
It's excellent for filing the cusps from the plastic parts :thumbs:
IMG_7395.JPG
 
Top