A West Midlands Works

Scanlon

Western Thunderer
Tony do you know how much sleep I have lost worrying about those washout plugs??? Seriously thanks for pricking my conscience and making me produce a better model for my customer. Like most of us I never throw away any spare castings so a rummage through the stores boxes was in order. Years ago I bought a job lot of Southern castings from Iain Young and discovered two sprues of appropriate sized Southern Railway style washout plugs. This was how they looked
Washout plus 1 290320.JPG and now
Washout plus 2 290320.JPG
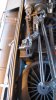
Now I am into the detailing stage and although this loco has a simple outline missing off detail or inaccurate detailing shows. The last few days have been deliberately slow on the progress front. The Westinghouse pump required a frame to make it stand clear of the firebox. A piece of U shaped angle proved ideal especially as when painted it cannot be seen. Varying sizes of copper wire was used for the smaller drain pipes and the main steam feed. The air delivery pipe was formed of 1mm brass wire. Photos of 32441 were used to get the layout correct. The final pipe to be added on this side of the loco was the single lubricating pipe from the cab to the cylinders.

The cab roof was a tricky build. As previously mentioned the build instructions include an excellent scale drawing of the locomotive and this has been used to form the roof and locate it in the correct position. There is a 2.5mm overhang at the front of the cab and I used the micrometer to accurately line everything up. The roof was then tacked in place and measurements taken to ensure alignment. It was a case of third time lucky! The strengthening ribs on the roof proved to be too short and had to be lengthened and now only the upright handrails have to be added.

Inside the cab the backhead has been tried in position and is a neat fit, detailing will start soon. A vacuum ejector and the reverser lever have been fitted, neither was in the kit. The safety valves, dome, chimney and smokebox door were prepared ready for installation. Like many of the class this loco had a flat top to the dome to make it fit the SR corporate gauge. The dome is still work in progress.

On the frames the sandboxes have been put in position and are ready for the sandpipes to be installed. So the loco looks like this today; as you can see there is a lot of cleaning up still to do.
Loco 6 310320.JPG

Loco 8 310320.JPG
Now that much of the work is complete above the running plate I can concentrate on fitting the various sets of steps and the injectors. Work will then stop until the motor and gearbox arrive as I know some alterations to the rear of the frames are required to accommodate the gearbox. Once this is done the valve gear assembly can be completed and eventually the loco can go to the paint shop.
 

Scanlon

Western Thunderer
What a difference two bolts make; for me they locked the frame rigid!!!!!!! How or why was to be an afternoons worth of investigation.

With a frame built on the chassis jig and the running plate built up on the frame you would think all might be OK but no. Using bright lights eventually revealed two areas causing problems. The first was simple, the pipe from the Westinghouse pump into the frames was a tad too long and pushing against the middle driving wheel. A quick snip and that problem was rectified but it was not enough. Eventually the problem was narrowed down to the inside of the fireman's side splasher in the cab rubbing against the rear driving wheel.

When the cab was built up the etch for the middle of the floor in front of the fire hole door was too narrow. This only became clear once the "splasher boxes" were soldered in place. Adding additional planks was simple but where they couldn't be seen they created a problem. Concerted grinding away in a very confined space got rid of any interference and the frame now runs smoothly under the body and with both fixing bolts in place, phew.

The morning started so well. Steps and injectors built up and soldered in place plus the upright handrails in the cab. The loco is now almost as finished as it can be at this stage. A fine looking loco, I hope you agree.
Loco 9 010420.JPG

Loco 10 010420.JPG
When the motor and gearbox arrive the frames can be completed and then fully tested.

Roger
 

dibateg

Western Thunderer
That's always a tricky area at the front of the cab, splashers, floor, backhead, running plate all contrive to cause shorts with the rear drivers...

Cheers
Tony
 

Scanlon

Western Thunderer
With the C2X put away it is time to start the next project. This could be termed a tale of two moguls as I am building a pair of the new David Andrews rebuilt River U class moguls. They will be 31791 for a client and 31797 for myself. Building them in tandem has advantages not least when it comes to drilling and the like. These locomotives differ from the standard SR U class moguls by having different cabs, lower running plates plus minor differences to the valve gear, deflectors etc.

The tenders are standard 3500 gallon or 4000 gallon types and so far the internal frames have been built up in the usual David Andrews style. Both locos have the 3500 gallon examples and they presented no problems although the brake blocks may require a little reduction in overall size, only test running will prove it this is necessary. This photo shows a completed inner frame compared with the basic components.
Tender parts 030420.JPG
and both sets of completed frames
Tender frames 030420.JPG
Hopefully construction of the tender bodies will start tomorrow.
 

Scanlon

Western Thunderer
Construction of the first tender body for my clients loco is complete. The etches are very crisp and everything has lined up near perfectly first time of trying. The inner tender frames were slightly too long requiring about 2mm to be removed from them to achieve a good fit.
31791 Tender 3 070420.JPG
and
31791 Tender 4 070420.JPG
Only buffers and sandpipes still to fit and yes the handbrake has been addressed.

The tender for my loco 31797 was started yesterday and has reached this stage
Tender 3 070420.JPG
Tomorrow should see this part of the build completed and then a cleaning session is in order before a start can be made on building the engines.

Keep safe,
Roger
 

Scanlon

Western Thunderer
Plans to start building the engine frames for these locos had to take a back seat to allow final fettling of the two tenders. There are very slight difference between the tenders, the small grab handle by the front steps have different orientations, the handbrake pedestals are slightly different as are the position of the water treatment fillers. Photos of the prototypes have been used as references for these minor differences.
31971Tender 6 120420.JPG
At the request of my client his loco frame will be built rigid with pick-up using the American system. Looking at the new etches there are some differences between the rebuilt River and a standard U. This photo shows one side of the frames with the springs fully built up and bearings temporarily in place and the other in its component parts. The coupling rods have been built up ready for the chassis jig to be set up.
Frame parts 120420.JPG
and assembled on the chassis jig.
Frame 1 120420.JPG
My own loco will have plunger pick-ups and the middle driving axle will be allowed an element of movement.

With both sets of frames built up I checked them on glass with the wheels and axles in place to ensure everything was hunky dory, it was. A start has now been made on detailing the first set of frames. The brake gear has been installed as these photos show.
Frame 2 120420.JPG
Frame 3 120420.JPG
It is my intention to build up this set of frames shown in these photos before re-starting the build of the set for my loco.

Hoping you all had a safe and peaceful Easter.

Roger
 

Scanlon

Western Thunderer
The last few days have been spent building up the frames with the cylinders and motion brackets under construction. It was while building up the first of the latter that I noticed a small triangular etch was missing from the etches. To make sure I wasn't missing anything both sets of set of etches were thoroughly checked but part 83 was nowhere to be seen, I need 4 of them for the two builds. Following a phone call to David Andrews two sets are in the post and will get to me sometime. The problem is the etch has to go into place from behind, if the motion bracket is fully built up it will be a devil of a job to get them in, so for the moment this piece of work is on hand. I hope these photos give you a better understanding than my description, this one shows the etch I require in place on one of my other moguls.
Motion bracket 2 190420.JPG
and this one shows the problem with trying to fit the etch in position if the motion bracket were to be fully assembled.
Motion bracket 190420.JPG
Inevitably this build switches from one loco to another and currently my loco 31797 is more advanced than the other. Despite the issue describe above there is progress. Both engines now have their wheels and side rods in place and pony trucks assembled. The pony truck has been beefed up with additional spacers on the pivot and a short piece of tube as a deep washer which allows the truck to pivot as well as giving the fixing bolt a secure area on which to be tightened down.
Pony Trucks 190420.JPG Original build is on the left.

The first set of cylinders have been build up and detailed. The castings for the slidebars and crossheads are nickel silver and required quite some cleaning up. However the work is worthwhile and with the connecting rods in place everything has been tested and there are no tight spots. Whitemetal castings for the front cylinder covers and piston valves plus the lost wax castings for the rear of the piston valves and their crossheads have been fitted. For the moment both locos look like this:
Locos 1 190420.JPG now to start filing another set of slidebars.

Roger
 

Attachments

  • Motion bracket 2 190420.JPG
    Motion bracket 2 190420.JPG
    89.7 KB · Views: 10

Scanlon

Western Thunderer
I'm told time flies when you're having fun. I find setting up slidebars and crossheads a challenge but once they are done you can sit back and know a good job has been completed. Both locomotives now have their cylinders fully detailed and have had connecting rods built up and tested on the rolling road as this photo shows.
Frames 4 250420.JPG
Testing revealed a slight tight spot at the very front of the slidebars on one of the locos. A bit of work with some files and this loco works fine. For now the frames of both locos have been put aside and a start made on the first engine body.

I tend to follow instructions for a new to me build. Although there is not a lot of difference between these U's and the production build I find reference to photos is essential. The running plate and cab built up very nicely. The only issue I had was with the frame extension etches which were fine but after soldering in position there was a 0.5mm gap on the saddle extensions. As 95% of their length will be behind the deflectors I filled the gap with 0.5mm brass wire
Smokebox saddle 020520.jpg
Note the boiler was only put in place in this photo.

The cab was then built up and installed. Like all cabs great care is needed to get the roof correct and on these locos the very narrow section of roof above the cut out was tricky. I used round blade pliers to tease the roof into place. With this done the firebox was built up, the rounded shoulders are work in progress.
Cab firebox 010520.JPG
The boiler and smokebox was then built up in the normal fashion although the boiler etch was oversize and needed a lot of filing to get it right. Each section is bolted to the next and lead was added before the boiler was finally sealed up. Building the smokebox saddle was straightforward although the instructions had me baffled for a while. If they were to be followed then fold lines on the etches needed to be used. Reference to prototype photos clearly showed this was not the case so I left them as straight sides. Again 95% will be hidden behind the deflectors.

With the boiler finally in place, securely bolted up it was soldered to the saddle. Alongside the firebox are the "covers" for the firebox expansion brackets and these securely hold the firebox end in place as per the real machines. The reverser cover has been built up and required work to get it to sit correctly against the firebox.
Engine body 1 020520.JPG
Engine body 2 020520.JPG
Now the detailing stage has been reached on this loco I may start on the other loco to bring it up to the same state.

Hoping all readers are keeping safe and well.

Roger
 

Scanlon

Western Thunderer
Only a couple of photos today showing both locos with different levels of detailing. At this stage the two builds constantly leapfrog each other and currently 31791 is the more complete.
Loco 3 170520.JPG
The smokebox door on the rear loco is just held in place with a dot of blu tack.

As is usual for me I start the detailing at the firebox and work forward. Yesterday both locos were at precisely the same stage of detailing but 31791 now has footsteps and part of the valve gear installed above the running plate. This photo shows the distinctive cover for the lifting links that the rebuilt Rivers had due to the lower running plate.
Detail 170520.JPG
The cover is a resin casting currently just put in place for the photograph. A small oil box has to be put on the front of each cover before they can be finally put in place. Another job for tomorrow is to fit the injectors and associated pipework and possibly fit the smoke deflectors.

If the weather holds the plan is to strip both locomotives down and spray the frames during next week. After reassembly the valve gear can be installed and final detailing should then be possible. Maybe they will be completed by mid June.
 

oldravendale

Western Thunderer
I wonder why smoke deflectors were never fitted to the "Ks". Both your builds bear more than a passing resemblance.

However, the Ks were a class unto themselves and I'll never regret having built one despite the peasant traps along the way.

Good looking locos, Roger.

Keep safe.

Brian
 
Hi Roger,
I’m following your builds as I have one of these DA kits myself to build.
A couple of observations I have is that my references show all the River class rebuilt U’s as having double slide bars. I believe that the N’s principally had single slide bars?
Maybe the RHS handrail and taper boiler are creating something of an optical illusion but is the smoke box level?
Looking forward to seeing the completed locos.

Regards
Roger
 

Scanlon

Western Thunderer
Hi Roger,
You are quite correct that all rebuilt Rivers had double slide bars. I'm just fitting them now! I always trial my loco frames in their simplest form and once satisfied all is well they are then completed.
Regards
Roger
 

Scanlon

Western Thunderer
OK, thanks again to Ian for noticing a casting had drooped, investigation revealed a piece of swarf behind one of the castings for the valve crosshead on 31791. This has now been rectified and the upper slide bars have been added to this loco and thoroughly tested.
Frames 5 190520.JPG
Yesterday the covers for the lifting links were detailed and put in place on both locos. The covers are very fragile and can easily crack as I was to discover. To overcome this frailty I spread a little epoxy resin on the inside of the side nearest to the boiler of all four castings. When dry they were much more robust and fitting the oil pot on the front was easy.

Each loco is now taking on its own character, 31791 will be in early 1960 condition without AWS and retaining a standard U class chimney. It was to get new front end frames and a BR Standard chimney later in 1960. 31797 will be in 1964 condition with AWS.
Loco 3 190520.JPG
Castings for the vacuum reservoir and the battery box still have to be added as well as the conduit to the bufferbeam.

Later this week the upper slidebars will be fitted to 31797 and then both locos will have the balance weights added before stripping down the frames and preparing them for spraying.
 
Hi Roger,
You are quite correct that all rebuilt Rivers had double slide bars. I'm just fitting them now! I always trial my loco frames in their simplest form and once satisfied all is well they are then completed.
Regards
Roger
That would explain it.
 

Scanlon

Western Thunderer
My intention was to try and complete 31791 today by fitting all of these parts
Parts 220520.JPG
Well almost everything has been achieved except for fitting the cab doors. The loco has now advanced far enough that over the weekend the frames can be stripped down, thoroughly cleaned and then sprayed up. Once this has been done the valve gear can be installed. This is the state of play with both locos
Loco 3 220520.JPG
31791 requires drain cock pipes and doors plus the cab details building.

31797 is a couple of days behind needing all the parts shown in the upper photo installing plus pick-ups. A final photo of this pair of moguls
Loco 4 220520.JPG
Lots of cleaning still to do!
 

Ressaldar

Western Thunderer
Hi Roger,

all looking very good, looking forward to seeing them emerge from the paintshop.

Stay safe ad well.

regards

Mike
 
Top