You are using an out of date browser. It may not display this or other websites correctly.
You should upgrade or use an alternative browser.
You should upgrade or use an alternative browser.
4mm Brassmasters Black 5, 45232
- Thread starter Dave Holt
- Start date
Dave Holt
Western Thunderer
Mswjr is probably right. Anyway, after further consideration, an executive decision was made - fixed W/M buffers!


The tender is now complete and has temporarily been connected to the loco. The latter has had some fine strips added to the rear edge of the fall plates, to bridge the gap to the tender.


Still got to fit locating pins to the loco number and shed plates but, otherwise, I think it's finished ready for painting.
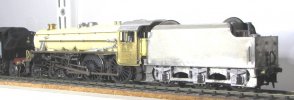
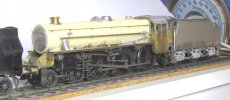
Here is the finished loco, face to face with a later class mate.

Dave.


The tender is now complete and has temporarily been connected to the loco. The latter has had some fine strips added to the rear edge of the fall plates, to bridge the gap to the tender.
Still got to fit locating pins to the loco number and shed plates but, otherwise, I think it's finished ready for painting.
Here is the finished loco, face to face with a later class mate.
Dave.
Dave Holt
Western Thunderer
Well, not much done since the last posting. However, the loco now has its identity and has now been dismantled to component parts prior to painting.
I've been putting this off as I hate to take the models apart having completed the construction - it seems like such a backward step. Still there's no alternative if one wants a finished model.

On looking at the trimmed photo, I noticed that the RHS lubrication box had somehow got bent, so this has now been corrected.
And here's the kit of parts all bar various screws and other small components) ready for degreasing and painting.

Dave.
I've been putting this off as I hate to take the models apart having completed the construction - it seems like such a backward step. Still there's no alternative if one wants a finished model.

On looking at the trimmed photo, I noticed that the RHS lubrication box had somehow got bent, so this has now been corrected.
And here's the kit of parts all bar various screws and other small components) ready for degreasing and painting.
Dave.
Dave Holt
Western Thunderer
It's a mystery. We're not talking Toyah songs here, but a part of this loco I can't currently identify or figure out where it goes!
Whilst waiting for some custom parts for the Ivatt 2 tank, my thoughts have turned to painting the Black 5 chassis. It's ages since I dismantled the loco for this purpose and, on opening the tub containing the small parts, I was faced with an assortment of small screws of various diameters and lengths and some other bits including the bush shown below. By a process of trial and error, I managed to find which screws went where but just cannot think where the bush might fit. It's 2 mm O/D by 2.8 mm long with a washer soldered on to form a flange. Quite a large part to omit. Should have kept records of where everything was as I took it apart.
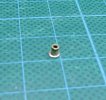
The mystery bush/spacer or whatever.
Dave.
Whilst waiting for some custom parts for the Ivatt 2 tank, my thoughts have turned to painting the Black 5 chassis. It's ages since I dismantled the loco for this purpose and, on opening the tub containing the small parts, I was faced with an assortment of small screws of various diameters and lengths and some other bits including the bush shown below. By a process of trial and error, I managed to find which screws went where but just cannot think where the bush might fit. It's 2 mm O/D by 2.8 mm long with a washer soldered on to form a flange. Quite a large part to omit. Should have kept records of where everything was as I took it apart.

The mystery bush/spacer or whatever.
Dave.
adrian
Flying Squad
Engine - tender coupling? I've used bushes like that but slightly larger for 7mm scale so that the drag link from engine to tender is secure but still free to rotate.The mystery bush/spacer or whatever.
Dave Holt
Western Thunderer
Thanks for the suggestion, Adrian. Like you, I've used similar parts in tender couplings (although I try to use a drilled out 2 mm pin-point bearing as a starting point) but it won't fit on this loco, which uses a different arrangement.
I can only think it's a redundant bit from a superseded idea. I'll probably find out when i come to properly re-assemble the loco, later.
Dave.
I can only think it's a redundant bit from a superseded idea. I'll probably find out when i come to properly re-assemble the loco, later.
Dave.
Stephen Freeman
Western Thunderer
Couldn't be something to do with the bogie mounting perhaps?
Dave Holt
Western Thunderer
Good thought, Stephen. In this case, however, the bogie mounting tube is smaller diameter and much longer than the mystery spare bush.
In a mad fit of enthusiasm (where on earth did that come from?), both the Black 5 and Ivatt tank chassis components have been painted with Precision single pack etch primer. This stuff seems to have changed in consistency in recent times and even a fairly new, unopened tin was almost like jelly. I scooped some out into a small glass jar and heavily diluted it with cellulose thinners to make it useable. Probably destroyed the etching property though.
Dave.
Ian@StEnochs
Western Thunderer
Dave,Good thought, Stephen. In this case, however, the bogie mounting tube is smaller diameter and much longer than the mystery spare bush.
In a mad fit of enthusiasm (where on earth did that come from?), both the Black 5 and Ivatt tank chassis components have been painted with Precision single pack etch primer. This stuff seems to have changed in consistency in recent times and even a fairly new, unopened tin was almost like jelly. I scooped some out into a small glass jar and heavily diluted it with cellulose thinners to make it useable. Probably destroyed the etching property though.
Dave.
I found that too. Yesterday I primed the wheels for my latest build. The Precision Primer needed an awful lot of stirring to get it fluid but once activated and slightly thinned it sprayed very well. Fingers crossed that it sticks the way it should, I will apply the colour coat tomorrow but the finish looks good tonight.
Ian.
I think this is perfectly normal with PP. I've never used their single pack primer, but I use the two-pack, for which you need to increase the thinners from a 1:1 ratio to a 3:1. This is the advice from Ian Rathbone's book on painting, and I'm sure he's never noticed any adverse side effects from the extra dilution - I certainly haven't in the five years or so I've been following his advice.
LarryG
Western Thunderer
I decamp Halford Acid 8 etch primer into a lid and brush it onto parts that would not suit spraying such as loco tyres etc.
When the Halfords etch primer tins are coming to an end, they sometimes spit solids and so I use almost empty aerosols for spraying the insides of coaches where the finish doesn't matter.
When the Halfords etch primer tins are coming to an end, they sometimes spit solids and so I use almost empty aerosols for spraying the insides of coaches where the finish doesn't matter.
Dave Holt
Western Thunderer
Thanks for the suggestion, Larry. I used that method to paint the cylinder wrappers on both the Black 5 and the Ivatt tank, using satin black to take the lining transfers.
Phew! Some fairly major recovery work has been achieved. I was re-assembling the chassis after basic painting and was struggling to get the cylinder/valvegear sub-assembly to fit on to the frames. Thinking that paint was causing the problem by reducing clearance in the locating slots and between frames and spacers, I forced the unit down into position with quite a bit of force. Oh no! Some of the rods had got trapped and become bent in two planes and also twisted in the case of the RH radius rod. My initial reaction was of total dismay at all that work ruined. However, having calmed down a bit, I set about trying to rectify the situation. Careful bending with tweezers and flattening between the jaws of some small pliers has resulted in acceptably straight rods and free movement. The paint's taken a bit of a battering, so some serious touching up is in order.
I think my heart rate has just about returned to normal, now.
Finished result:
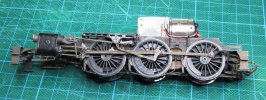
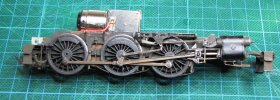
Needless to say, after the straightening session, I was extremely careful on the second re-assembly and the whole thing slid together quite easily.
On looking at the photos, I see that the LH eccentric rod still looks slightly bent and this has now been rectified.
Dave.
Phew! Some fairly major recovery work has been achieved. I was re-assembling the chassis after basic painting and was struggling to get the cylinder/valvegear sub-assembly to fit on to the frames. Thinking that paint was causing the problem by reducing clearance in the locating slots and between frames and spacers, I forced the unit down into position with quite a bit of force. Oh no! Some of the rods had got trapped and become bent in two planes and also twisted in the case of the RH radius rod. My initial reaction was of total dismay at all that work ruined. However, having calmed down a bit, I set about trying to rectify the situation. Careful bending with tweezers and flattening between the jaws of some small pliers has resulted in acceptably straight rods and free movement. The paint's taken a bit of a battering, so some serious touching up is in order.
I think my heart rate has just about returned to normal, now.
Finished result:


Needless to say, after the straightening session, I was extremely careful on the second re-assembly and the whole thing slid together quite easily.
On looking at the photos, I see that the LH eccentric rod still looks slightly bent and this has now been rectified.
Dave.
Chas Levin
Western Thunderer
Hello Dave, I just found this thread and have read through it form the start with great interest and increasing admiration: superb work, really inspiring and incredibly beautifully detailed!
Are there any further updates please?
Are there any further updates please?
Dave Holt
Western Thunderer
Hi Chas.
Thanks for your very kind comments.
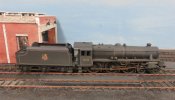
The loco has been painted, lined and weathered by my friend, David Clarke.
I'm going to collect it on Saturday, after which it will need re-assembling and finishing off - cab glazing, crew, buffers, AJ couplings, coal in the tender, DCC chip and probably more I haven't thought of.
I'll post some pictures as it progresses.
Here's a taster, taken by David C.
Dave.
Thanks for your very kind comments.
The loco has been painted, lined and weathered by my friend, David Clarke.
I'm going to collect it on Saturday, after which it will need re-assembling and finishing off - cab glazing, crew, buffers, AJ couplings, coal in the tender, DCC chip and probably more I haven't thought of.
I'll post some pictures as it progresses.
Here's a taster, taken by David C.

Dave.
Chas Levin
Western Thunderer
Thank you very much for posting the picture Dave! I'm so glad I asked: I sometimes think it can be a bit intrusive to ask if someone's done more work on something - real life can intervene, things can happen and so forth, but I was so keen to see how the loco might have come on that I couldn't resist.
David Clarke's done a truly superb job too, worthy of the build IMHO. I look forward to further finishing off pics, as I'm sure lots of others do...
David Clarke's done a truly superb job too, worthy of the build IMHO. I look forward to further finishing off pics, as I'm sure lots of others do...

adrian
Flying Squad
That does look rather nice - captures the prototype well. A little bit of "mind the gap" for the fireman but I presume that is just due to the staging for the photo by the painter and not truly representative of when the loco is finished.Here's a taster, taken by David C.
Dave Holt
Western Thunderer
I collected the loco on Saturday from David Clarke, who has done a lovely job of painting, lining/numbering and weathering. I've started the finishing work by re-assembling chassis and bodies after fitting the sprung buffer heads.
Still to do are:- fitting the DCC decoder, glazing, crew, fixing the cab roof (currently loose to ease glazing) and making and fitting the AJ coupling hooks. Oh, and coal in the tender.
Here it is posed with the tender not coupled but in the right place.

Dave.
Still to do are:- fitting the DCC decoder, glazing, crew, fixing the cab roof (currently loose to ease glazing) and making and fitting the AJ coupling hooks. Oh, and coal in the tender.
Here it is posed with the tender not coupled but in the right place.

Dave.


