Brew Your Own 3d Printer

phileakins

Western Thunderer
Sort of half and half Dave.

Firstly to prove the printer - and it's shown up that I've set the print head slightly too high for a 'block' print. Secondly the LCDR is close to my heart as I grew up on the north Kent main line in Swanley and commuted daily into Holborn/Blackfriars for many years (until I saw the light that is!).

The third half is to see how my 3d drawing skills actually turn out. There is a problem with scaling the actual print at the moment, and the drawing has a schoolboy error, but it'll do for this purpose.

Phil
 

phileakins

Western Thunderer
Not bad for a first run - but the darned thing warped on the short sides half way through, as can be seen. The print did not remain properly adhered to the print bed - but I have a cunning plan ... or several!

Although not pictured I put a rebate on the back of the droplight to assist in glazing, to my amazement it came out just fine. :eek:

All sorts of detailing errors to be sorted out at the drawing level, but in the main it looks like it's supposed to. :)

Phil
 

Attachments

  • 100_0554[1].JPG
    100_0554[1].JPG
    214 KB · Views: 124
  • 100_0555[1].JPG
    100_0555[1].JPG
    174.7 KB · Views: 123
  • 100_0556[1].JPG
    100_0556[1].JPG
    210.2 KB · Views: 126

BrushType4

Western Thunderer
Hi, I think you would be better to use a lasercutter or maybe a cutting machine to cut that particular shape and use the 3D printer for the more intricate parts a laser or cutter can't do.
 

phileakins

Western Thunderer
Hi, I think you would be better to use a lasercutter or maybe a cutting machine to cut that particular shape and use the 3D printer for the more intricate parts a laser or cutter can't do.

Ah - but I don't have a cutter Phil - another part work in the offing? :) If so I'm up for it. On a point of interest though, would a cutter provide a smooth enough surface to the side under the framing - or would it need the framework to be a cut as a fretwork to be applied (glued) to a smooth base?

As I said, it was a test, but if I can get this right each side would cost a only fair fraction of a penny or so in material; and sides and ends would amount to less than twenty pence (or so) with about a six hour print time (the side took 1.75 hours sliced at 175 microns.). It also looks as if the quality is good enough for casting with minimal finishing as well.

Having said that I'm not happy with my CAD software (TurboCad Deluxe) as it only does surfaces and not true solid objects: it shows in a couple of places where the printed sides of 'oblong' framing don't join to a top. I'll experiment with a couple of other CAD packages - FreeCAD is next up as it (apparently) does true solids - and imports graphics so I can continue to trace. Me, lazy ... ?

Any other 3D CAD preferences which would fit the bill folks?

Phil
 

phileakins

Western Thunderer
Luckily I don't have to oversee printing after the first couple of minutes (with the occasional peek thereafter) and as the printer is attached to my wife's PC I can continue to shoot aliens with gay abandon on mine!

There is a mod in the offing which will do away with the PC attachment all together. The dedicated (unofficial) V3 forum is proving extremely useful.
 

phileakins

Western Thunderer
Taking your advice Phil - here's the second attempt under way, the framing being the first element. I'll do the planking as a second element and then merge them before printing.
 

Attachments

  • 2016-10-29_17-29-40.png
    2016-10-29_17-29-40.png
    607.8 KB · Views: 90

phileakins

Western Thunderer
Bit hazy on the first picture, the second confirms it - because the software doesn't produce solids - just surfaces which have not been completed - we have an unusable print. I think that if I increase the depth of the 'Z' axis things might improve, we'll see.

It's all good fun. :confused:
 

Attachments

  • 100_0558[1].JPG
    100_0558[1].JPG
    196.7 KB · Views: 84
  • 100_0557[1].JPG
    100_0557[1].JPG
    202.5 KB · Views: 82

phileakins

Western Thunderer
One step forward - another back!

Trying a different slicing software has got rid of the apparent splitting of the framework - but setting up a different controlling software has led to the print head being slightly too close to the print bed (should be .2mm so that the print head can level the continuous bead of molten filament) which has left rough edges.

Why change the software? Well the 'new' one has the facility to cope with a print bed which is not completely level - rather borne out by the fact that the model is uniformly rough!

Out with the feeler gauge tomorrow. :oops: 
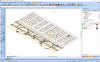
It really only needs a fraction of a smidgin to make the difference.

Phil

PS The model is dead to scale for 7mm.

100_0564[1].JPG
 

phileakins

Western Thunderer
Gettin' there - bit by bit.

The van side on the right is actually 'inside out'. No idea how that happened.

Phil
 

Attachments

  • 100_0573[1].JPG
    100_0573[1].JPG
    211.8 KB · Views: 65

phileakins

Western Thunderer
Bit of a hiatus - testing new (to me) slicing software (which provides the G-Code for the printer) and am in the middle of re-balancing the print platform after a bad experience with driver software. Lesson learned - don't listen to other people! It worked perfectly well before. :headbang:

Phil
 

phileakins

Western Thunderer
This project is a bit like a swan - not a lot happening in sight, but paddling like bu .. mad below.

I've started to learn Autodesk Fusion 360 (see the Aylesbury station laser cutter thread - thanks David) with some, initially, fairly good results - I won't post any pictures 'cos they'll look exactly like the ones already here. It's been fairly easy to pick up, so far, thanks to viewing umpteen on-line videos. The software is capable of amazing results and is well worth a few minutes investigation, try this one for starters (nearly an hour long though so worth skipping through the talking bits - the section on the lathe chuck assembly is especially illuminating).

On the hardware side I'm going to bite the bullet and strip the machine down to tighten belts/couplings etc now that has been run in; and since the problems mentioned above it hasn't been running as well. The value of building it myself - I know exactly what's under the bonnet, or do I? :confused:

Stay tuned for the next exciting episode ...

Phil

[FX - Fade out Dick Barton signature theme here]
 

phileakins

Western Thunderer
Of course I'm too far young to remember Dick Barton - I'm of the Journey into Space (Mich, Lemmy and all) and Dan Dare (on Radio Luxembourg) on a valve radio generation! I heard all the original Goon shows, which drove my parents barmy :) as they couldn't understand what they were all about. I loved them even though I couln't understand them either!

And yes, I do believe you are right oldravendale, although I haven't heard it in years, I'll look it out on't Internet for a reminder.

Phil

[Exit stage right humming Dumpety Dump, Dumpety Dump, Dodardiddy .....]
 

oldravendale

Western Thunderer
Brian I think that "Coronation Scot" was used for the" Paul Temple" series. Dick Barton was called something like "The Devils Gallop"
Ah, yes. You're correct. It was "Paul Temple" and "Steve" wasn't it? Sadly I'm old enough to have forgoten it but that's just an age thing.:)

B
 

phileakins

Western Thunderer
Now - slot A connects to socket B - or is that the one you mustn't do under any circumstances ... :oops:

All went together well after generally inspecting and tightening things up, except that I have been left with two screws! They won't affect anything operational though. I'll sort it out later in the week.

Test print now under way.
 

Attachments

  • 100_0577[1].JPG
    100_0577[1].JPG
    245.4 KB · Views: 33
  • 100_0578[1].JPG
    100_0578[1].JPG
    248 KB · Views: 34
  • 100_0579[1].JPG
    100_0579[1].JPG
    218.7 KB · Views: 33
Top