Cavalier Coaches

iploffy

OC Blue Brigade
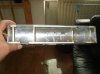
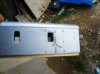
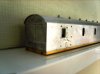
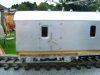
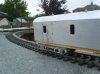
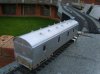
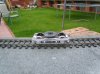
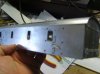
Does anyone know who they are and are they still in buisness about 2 years ago I picked up a little number on Flea bay and the origins of the kit where unknown it has an Aluminium Extrusion for the body (ALA Westdale) a compressed paper (mock wood) floor pan, and very flimsy white metal side frames for bogies. I have measured the lenth of the vehicle and it seems to correspond to 42ft the only identifiying labels are Cavalier Coaches on the bogie side frames. I am assembling it at the moment but am not happy with the rather flumsy construction so i have grafted on bits of Big Big coaches in places where they cannot be seen, but I am at a total loss as to the underframe detail as there are no plans that have come with the kit.

Ian
 

28ten

Guv'nor
Ian
yes I remember them. No they are no longer in business, I believe that back in the 80's they became part of RJH and then onto somebody else (ABS?). the body doesnt sound as if it is Cavalier, as they used brass sides with preformed tinplate roofs for their rather nice range of Hawksworth coaches, so I suspect what you have is Cavalier bogies with somebody else's body.
I am sure Dave Parkins will be along to fill in the missing details
 

djparkins

Western Thunderer
28ten said:
Ian
yes I remember them. No they are no longer in business, I believe that back in the 80's they became part of RJH and then onto somebody else (ABS?). the body doesnt sound as if it is Cavalier, as they used brass sides with preformed tinplate roofs for their rather nice range of Hawksworth coaches, so I suspect what you have is Cavalier bogies with somebody else's body.
I am sure Dave Parkins will be along to fill in the missing details

I already answered this over on RM Web - Cavalier now resides [largely unreleased due to extruded roof supply problems] with ABS Models.

But I agree the kit doesn't sound like a Cavalier one. 42ft sounds like an LMS GUV. I know Cavalier [& possibly ABS] supplied sideframe castings to Westdale. I never thought the castings were flimsy but jest nearer to scale, although the only way to accurately represent something like an LMS 9' bogie sideframe is to etch it IMHO.

Regards,

David Parkins,
MMP
 

iploffy

OC Blue Brigade
Cheers Cynric and Dave Whilst perusing Mr Bartletts website I found what I was looking for and now have a good selection of photo's to go from

Ian
 

Ressaldar

Western Thunderer
Hi Ian,

if it is an LMS 42' GUV, then there is a drawing on page 35 of Peter Tatlow's Historic Carriage Drawings - vol 3 NPCCS, which might help.

regards

Mike
 

iploffy

OC Blue Brigade
Yes it's deffo a 42ft GUV or luggage and parcels van all of the distiguishing features are there looking at the bits in the kit it does seem that it is a big of a hotch potch of bits and there were no etches included time for a bit of improvisation. Can I get the drawing from anywhere else as its a pure 1 off and I wont be purchasing any more grouping coaches and are very reluctant to buy a book for 1 illustration.

Ian
 

iploffy

OC Blue Brigade
Well here is what its all about sorry about the clarity of some of the pictures but the jist is there. I will post more pictures later when I have the bogies on and it's been in the paint shop. Once again thanks Mike for the assistance

Ian

Edited 3 times due to b****y spelling mistakes

Admin - Duplicate images removed
 

Attachments

  • BG and LMS parcels van 003.jpg
    BG and LMS parcels van 003.jpg
    988.1 KB · Views: 43
  • BG and LMS parcels van 004.jpg
    BG and LMS parcels van 004.jpg
    1.1 MB · Views: 44
  • BG and LMS parcels van 005.jpg
    BG and LMS parcels van 005.jpg
    1.2 MB · Views: 45
  • BG and LMS parcels van 016.jpg
    BG and LMS parcels van 016.jpg
    399.6 KB · Views: 28
  • BG and LMS parcels van 017.jpg
    BG and LMS parcels van 017.jpg
    1,016.6 KB · Views: 27
  • BG and LMS parcels van 018.jpg
    BG and LMS parcels van 018.jpg
    932.2 KB · Views: 29
  • BG and LMS parcels van 019.jpg
    BG and LMS parcels van 019.jpg
    860.4 KB · Views: 28
  • BG and LMS parcels van 002.jpg
    BG and LMS parcels van 002.jpg
    888.9 KB · Views: 48

iploffy

OC Blue Brigade
A brief update in colour and awaiting transfers
 

Attachments

  • S8301029.JPG
    3 MB · Views: 5
  • S8301068.JPG
    3.1 MB · Views: 3
  • S8301067.JPG
    3 MB · Views: 1
  • S8301066.JPG
    2.8 MB · Views: 0
  • S8301065.JPG
    3.1 MB · Views: 0

iploffy

OC Blue Brigade
Another daft question as the coach is now painted I have been told I must put a gloss varnish on it before I apply any transfers when do I glaze it

Ian
 
S

Simon Dunkley

Guest
iploffy said:
Another daft question as the coach is now painted I have been told I must put a gloss varnish on it before I apply any transfers when do I glaze it

Ian
Gloss is really important for waterslide transfers. Have to admit that I have never worried about this using PC (now HMRS) dryprint and methfix - and some stuff is kicking around in perfect working order from 30 years ago.
It is worth letting your transfers dry off really well, and then putting a protective coat of satin or whatever varnish over them, to seal them. Unfortunatley, this is also a really good way to find out if they haven't adhered properly, and if they haven't you may end up with a strip and repaint job...

When do you glaze it? Well, probably after you have done the base coats of varnish, but before you weather it.
 

iploffy

OC Blue Brigade
marsa69 said:
Nice coach mate. Was that achieved with those cans of Railmatch that you got?

Yes mate I had a bit of fun trying to mask out the blue to paint the grey of the roof as the paint came off with the masking tape a kind of red tape bought at the same time as the paint from Squires. I rubbed the whole thing down with a fibre brush applying undercoat, quick rubdown again another thin coat of undercoat, another quick rubdown applying a light grey coat another light rubdown and the final application of 2 top coats.

What fun then I decided to gently rub at the blue to try to get the light grey to come through and disress the paint work and in no time at all had a model that looked like the paint was comming off in strips so I gave up on that idea.


I  have now decided that I wont weather it just a bit of frame dirt

ahh well

Ian
 

Phill Dyson

Western Thunderer
Simon Dunkley said:
Gloss is really important for waterslide transfers. Have to admit that I have never worried about this using PC (now HMRS) dryprint and methfix - and some stuff is kicking around in perfect working order from 30 years ago.
It is worth letting your transfers dry off really well, and then putting a protective coat of satin or whatever varnish over them, to seal them. Unfortunatley, this is also a really good way to find out if they haven't adhered properly, and if they haven't you may end up with a strip and repaint job...

When do you glaze it? Well, probably after you have done the base coats of varnish, but before you weather it.
I have never gloss varnished anything before putting transfers on (including water-slide), I do seal them with a bit of thinned matt varnish afterwards though (just over the transfers themselves)  :)
 

lancer1027

Western Thunderer
Hi Ian, nice parcels van mate. As Phill has said, i just use a bit of satin varnish over the transfers ,then i weather accordingly. This i find helpful if any of the transfers are'nt correctly in line or are slightly broken. You can disguise them with the weathering. I have never neede to gloss varnish anything to apply transfers but i dont think theres a righr or wrong way just a way you find that gets you the results you want.

Rob
 

Ressaldar

Western Thunderer
iploffy said:
Yes mate I had a bit of fun trying to mask out the blue to paint the grey of the roof as the paint came off with the masking tape a kind of red tape bought at the same time as the paint from Squires.
ahh well

Ian

Hi Ian,

try using Tamiya masking tape next time - it has a very low 'tack' adhesive and as yet, fingers crossed, I have not experienced any paint lift when removing it. Don't forget to 'support'it whilst removing it  - ie do it in short stages/lenthgs then you have total control and a perfect finish. If you have used Railmatch enamel over/adjacent to Halfords sprays then any 'overspray/creeping' can be removed with a little thinners on a cotton bud, again with no effect on the Halfords paint. It also works with enamels on enamels but make sure that the first colour has dried for at least 48 hours.

Hope that this is of use

regards

Mike
 

iploffy

OC Blue Brigade
Ressaldar said:
Hi Ian,

try using Tamiya masking tape next time - it has a very low 'tack' adhesive and as yet, fingers crossed, I have not experienced any paint lift when removing it. Don't forget to 'support'it whilst removing it  - ie do it in short stages/lenthgs then you have total control and a perfect finish. If you have used Railmatch enamel over/adjacent to Halfords sprays then any 'overspray/creeping' can be removed with a little thinners on a cotton bud, again with no effect on the Halfords paint. It also works with enamels on enamels but make sure that the first colour has dried for at least 48 hours.

Hope that this is of use


The only problem is as I  am still learning I dont know my A**e from my elbow at the moment I have no local model shop and have to go into brum for supplies I have seen Tamiya been advertised before and will go to the Ian Allen Book store in brum to pick some up.

Can anyone give me some idea what colour brown would look correct on the inside of my FK as it was wooden panelled and the seats where black in my time period also what colour was the floor covering as these details seem to be not very well covered

Ta Ian
 

iploffy

OC Blue Brigade
Phill Dyson said:
Ian, how long did you leave the blue to dry before doing the grey ?

Phill I dont think I left it long enough 24hrs between coats and then I masked it up well this time I have learned a lesson patience is a virtue and I will now start other projects to allow the one to paint time to dry

Ian
 

iploffy

OC Blue Brigade
Finished now for the transfers

Ian
 

Attachments

  • Misc 164.jpg
    6.2 MB · Views: 10
  • Misc 166.jpg
    6.4 MB · Views: 1
  • Misc 167.jpg
    4.9 MB · Views: 2
  • Misc 168.jpg
    5.5 MB · Views: 3

lancer1027

Western Thunderer
Nice one Ian,looks really good. A nice little and easy way to weather your roof- get a flat brush dip it into matt black ( if the roof is matt black obviously this wont work ) and paint a sort of blob in the middle. Then with some dirty turps/thinners thin out the black blob. Always go from rain strip right accross to the other rain strip in one stroke. Continue this working along the roof working away from the blob. Eventually the blob will be thinned enough. You can add a little more black to the roof and work it thinner as you get better at it. Keep wiping your brush on a tissue  so not to overload the roof with thinners/turps.
Make sure the strokes with the brush are the full width of the roof as when dry it will show up where you started and stopped. Once done leave to dry. When its dry see what you think, you could then try slightly off colour black by adding dark grey to the same proceedure. Only do the gry in very small areas :thumbs: Let me know how you get on.

Rob :wave:
 
Top