Cookie's Workbench - 7/8ths Alan Keef K40

D816Foxhound

Western Thunderer
Hello Steve,

Regarding your experience with Klear, the military modellers spray it on before and after applying the transfer. Perhaps the Klear does not brush on very well.

I haven't bothered applying varnishes before applying transfers and have had good results in the past. Recently though, I tried "bog standard" Humbrol 35 Gloss varnish brushed on before and after applying the transfers. This was then followed by Railmatch matt varnish spray and the result was very good. Absolutely no sign of any carrier film.

Roger
 

mickoo

Western Thunderer
Steve, regarding Klear, apply in several thin layers, if it's fogging then it's too thick and gives a milky finish, apply a layer and leave overnight in a warm place, apply another and again leave to dry fully, depending on how coarse you under lying paint is you may need three or even four layers.

A better way is to simply spray gloss, apply the transfers then simply add mat varnish over the top.

Looking good BTW.
 

ceejaydee

Western Thunderer
Lovely looking wagon Steve.

Like the other guys have said it is a pity that they are all 10mm as against 1/32 as they are a great looking range. I was beginning to think that I should of chosen 10mm.... :rolleyes:

Since Chris Arundell took over the UK sales the prices have dropped on their 10mm kits making them even more attractive.

Last month Chris told me that they are working on their first 1/32 wagon kit - a BR brake van. Not sure when it will be out but it will be nice to see something appropriate behind all those G1 minerals and forthcoming accucraft 7plank opens.

Ralph Webb

That sounds interesting Ralph; I'd certainly be up for a 1/32 brake to add to my modest collection of G1.
 

Dave Bowden

Western Thunderer
Since Chris Arundell took over the UK sales the prices have dropped on their 10mm kits making them even more attractive.

Last month Chris told me that they are working on their first 1/32 wagon kit - a BR brake van. Not sure when it will be out but it will be nice to see something appropriate behind all those G1 minerals and forthcoming accucraft 7plank opens.

Ralph Webb
Hi Ralph

It would have been even nicer if it had been a GWR Toad brake van. Chris is a member of the East Anglia Group as I am so I shall have to have a word.

Dave
 
"Chris is a member of the East Anglia Group as I am so I shall have to have a word."

Hi Dave
And so am I ....may see you at Hepworth sometime!
Regards
Ralph
 

Dave Bowden

Western Thunderer
"Chris is a member of the East Anglia Group as I am so I shall have to have a word."

Hi Dave
And so am I ....may see you at Hepworth sometime!
Regards
Ralph
Hi Ralph

I shall be there next Wednesday, we shall have to look out for each other. Name Tags at the ready!

Dave
 

Steve Cook

Flying Squad
Thanks for all your replies on the Klear chaps, food for thought. I was under the impression that the Klear would self level to an extent - the underlying surface was not that bad! However, I brushed another coat over the transfer to seal them in and watched as the Klear worked its way under the transfers, setting the full stop after the 2 off on a merry journey of its own. I pushed it back into place but it looks like it shifted again when drying. The Klear also created ripples in the M of Smith, you can just make them out below.

Overall, not impressed with this technique in my hands - I shall give it one more go on some scrap, I'll try spraying and if that gives the same results then I shall I not bother again, I'll go back to varnish.

Still, the wagon doesn't look that bad now I've started picking the ironwork out in black.

NFTT8 Varnished and black bits.jpg

Steve
 

mickoo

Western Thunderer
Steve,

I wonder if they have changed the formula, your right, Klear should self level. When I used the older stuff, once set it was pretty impervious to further applications.

Shame it hasn't worked and if you hadn't mentioned the full stop I'd never have noticed, even now that you have mentioned it I still can't see whats wrong with it :thumbs:
 
Thanks for all your replies on the Klear chaps, food for thought. I was under the impression that the Klear would self level to an extent - the underlying surface was not that bad! However, I brushed another coat over the transfer to seal them in and watched as the Klear worked its way under the transfers, setting the full stop after the 2 off on a merry journey of its own. I pushed it back into place but it looks like it shifted again when drying. The Klear also created ripples in the M of Smith, you can just make them out below.

Overall, not impressed with this technique in my hands - I shall give it one more go on some scrap, I'll try spraying and if that gives the same results then I shall I not bother again, I'll go back to varnish.

Still, the wagon doesn't look that bad now I've started picking the ironwork out in black.

View attachment 49565

Steve

Hi Steve.

I feel your pain with the transfers silvering but just a quick note with the application of Klear. This particular technique came about from model aircraft builders "dipping" cockpit canopies and transparent parts into a small bowl of Klear. This was to to help alleviate distortion when looking through them and was generally preceded by gentle rubbing down with flour grade glass paper to remove the worst marks.
Submersing the canopy whilst hung on a thin piece of wire in Klear and left to dry in a dust free environment usually resulted on a perfect finish with virtually no distortion.
For paintwork, the very best and simplest method is to spray gloss paint, apply the transfers and then airbrush with a Matt varnish to dull down.
Failing that, Satin or Matt paint gently polished to reduce any spray texture, then proper Gloss varnish, then apply transfers, then Matt varnish will give perfect results everytime :)

Best.

G
 

Steve Cook

Flying Squad
Thanks G, looks like gloss varnish is the way forward, I'll try that on the next project.

Had a rare day today, I managed to get a selection of projects almost up to the finishing line :)

First up was a favour for a friend - he is restoring a Tamiya Fiat 500 RC car from his youth and I got the job of building and painting the engine up for him. A bit of work to clean up the weathering on the carbs I think and this one is good to go, he finished the car last week so I'm holding him up :oops:

Fiat 500 Engine.jpg

The pillar drill was finally assembled after being stripped, cleaned, repainted and lubricated. Its now mounted to a stand that brings it up to the right working height for me, whilst the large circular base allows me to roll it round the garage (in a similar style to how you'd move an oil drum) so it can either be put out of the way or stuck in the middle to deal with long lengths of stuff. It looks precarious in the photo, but the weight and the drilling action are well supported with it in use. All I'm waiting for now to finish is the replacement on / off switch.

PD5 Back together.jpg

The tar tank was finally assembled a couple of weeks ago.

NFTT9 Final Assembly.jpg

A few hours this evening have seen it 'ruined' as my Mum would say :D

NFTT10 Weathered1.jpg

NFTT11 Weathered2.jpg

I haven't decided if this one is done, or needs bits redoing - I want to wait to see what it looks like in daylight. Either way though, its pretty close.

Steve
 

Dog Star

Western Thunderer
The tar tank was finally assembled a couple of weeks ago... A few hours this evening have seen it 'ruined'... I haven't decided if this one is done, or needs bits redoing
Looks rather good to me. If you can find the topic, Adrian Marks posted some photos of the weathering that he did on our Slater's tar tank - red body, white lettering - may give you an alternative view of the wuestion.
 

Steve Cook

Flying Squad
Cookie's home for Waifs, Strays, Unloved and Unfinished Projects (WSUUP's)

Despite running an extremely successful breeding program for the aforementioned, I still find it impossible to resist the temptation to re-home somebody else's unfinished projects. The latest 'rescue' involves a 16mm Association Victory project engine, something I've been trying to track down for ages. As is usual, when I had the opportunity to sign up and buy one I didn't, now I'm struck by the body style and want one, they never appear for sale :oops:

Anyway, after a good 18 months of waiting, an unfinished one turned up locally so I went round to see it. Chassis wise its OK, it needs retiming a bit, but it rolls freely enough and looks to have gone together OK.
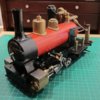
Victory1 Chassis and Boiler.jpg

Its not staying like this of course :) Having spoken to Roundhouse during the week, I've been able to order a pair of their Darjeeling B Class cylinders so I can have the steam chests leaning out as per the prototype.

Victory.jpg

I'll have to modify the existing valvegear to suit, but I think its only a question of changing the radius rods so they bend away from the engine as opposed to the current inboard bend.

The body is a sad story unfortunately, needing a bucket load of rectification work.

Victory2 Body as received.jpg

To be fair, it was the chaps first soldered body and given the thickness of materials, he just didn't have sufficient heat to do the job properly. Compounding the heat issue is that all of the parts have been bent the wrong way (so the etched lines are on the outside of the bend) and none of the cusps have been removed so nothing really fits snugly. I did have a quick look at trying to resolve it as it stood, but a top down view shows that despite being built on a jig, the body is just not square is any dimension.

Victory4 Body errors in assembly2.jpg

There are also gaps where there shouldn't be any whilst the detail parts have been superglued on (ish..)

Victory3 Body errors in assembly.jpg

In the end I just decided it would be better to start from scratch, so fired up the blow torch and took it back to its component pieces.

Victory5 Body meets blowtorch.jpg

The critical parts such as cab front and rear panels, plus the tank sides and tops are all salvageable with a little cleaning up and filing. Everything else is going to need a good clean and reforming to get it to fit properly, a trial piece has shown that the brass starts to fracture if the bend is undone and then performed correctly. I could remake the affected parts, but it seems quicker to anneal and clean, than recut from raw materials. The blow torch came out again this morning and a few minutes were spent warming the parts up.

Victory6 Annealing1.jpg

Victory7 Annealing2.jpg

A trial on some of the practise parts has showed this works out moderately well, I'll wait until everything has cooled down before giving it a go.
Its more work than I hoped for, but its the only option that has presented itself and it does represent a significant saving over the original cost of the components. How well it fares against all the other WSUUP's remains to be seen - if nothing else it takes up less space when packed away :D
Steve
 

Steph Dale

Western Thunderer
Steve,

I hope you haven't just found this out the hard way, but you'll almost certainly have to get rid of any trace of soft solder from the surface before annealing. Otherwise the solder pits the brass and leaves you with hard shiny patches that won't take soft solder readily.

Steph
 
Top