ex LMS diag D2046 Inspection Saloon

Ressaldar

Western Thunderer
Hi all,

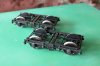
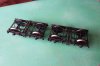
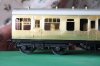
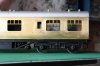
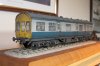
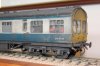
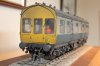
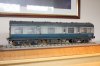
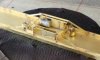
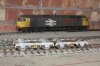
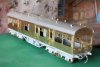
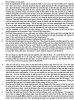
having completed the MLV I am now back on the Inspection Saloon, the one that Malcom Binns (Sidelines) does. Built one a couple of years ago, which has since found a new home and bought another kit to do DM45020 in Scotrail livery and fitted with B4 bogies. However, got a call out of the blue for a blue/white version of M45029 (a repeat of the first one) so here I am.

[attachment=3:1ci55wul]IMG_1014.JPG[/attachment:1ci55wul]

[attachment=2:1ci55wul]IMG_1018.JPG[/attachment:1ci55wul]

[attachment=1:1ci55wul]IMG_1130.JPG[/attachment:1ci55wul]

[attachment=0:1ci55wul]IMG_1136.JPG[/attachment:1ci55wul]

The bogie steps are still to be fitted as they are dependant on door location and on the Saloon, the positions differ slightly. The rest of the underframe including the internal partitions, should be finished today and then it's just the fiddly bits on the body - door handles, water pipes etc.

regards

Mike
 

Attachments

  • IMG_1136.JPG
    IMG_1136.JPG
    196.1 KB · Views: 65
  • IMG_1018.JPG
    IMG_1018.JPG
    379.2 KB · Views: 66
  • IMG_1014.JPG
    IMG_1014.JPG
    344.4 KB · Views: 66
  • IMG_1130.JPG
    IMG_1130.JPG
    227.5 KB · Views: 66
  • IMG_1136.JPG
    IMG_1136.JPG
    196.1 KB · Views: 65
  • IMG_1018.JPG
    IMG_1018.JPG
    379.2 KB · Views: 66
  • IMG_1014.JPG
    IMG_1014.JPG
    344.4 KB · Views: 66
  • IMG_1130.JPG
    IMG_1130.JPG
    227.5 KB · Views: 66

Rob Pulham

Western Thunderer
Hi Mike,
It's looking good I nearly made the stupid mistake of asking was it the LMS one until I read the subject line as I clicked reply :oops: . One of these is on my wanted list as well but it will be done in LMS Crimson.
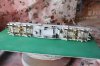
 

Ressaldar

Western Thunderer
Hi CME, Rob and all,

herewith todays progress, the underframes is complete, the bogies still have to have their steps fitted and on the body I've fitted the door hinges and bumpers and folded up the ventilators, so not a lot left for tomorrow - bits and pieces and the furniture.

[attachment=5:39dt65rf]IMG_1138.JPG[/attachment:39dt65rf]

[attachment=4:39dt65rf]IMG_1139.JPG[/attachment:39dt65rf]

[attachment=3:39dt65rf]IMG_1141.JPG[/attachment:39dt65rf]

[attachment=2:39dt65rf]IMG_1142.JPG[/attachment:39dt65rf]

[attachment=1:39dt65rf]IMG_1143.JPG[/attachment:39dt65rf]

[attachment=0:39dt65rf]IMG_1145.JPG[/attachment:39dt65rf]

The Tamyia masking tape that I ordered from Squires yesterday arrived at lunchtime so no holdups envisaged on the painting front, all being well I shall be starting the prep work for the door installation by next Wednesday ready for the dusty work to start the following Monday - then the fun will begin!

regards

Mike
 

Attachments

  • IMG_1142.JPG
    IMG_1142.JPG
    172.1 KB · Views: 50
  • IMG_1138.JPG
    IMG_1138.JPG
    169.7 KB · Views: 50
  • IMG_1139.JPG
    IMG_1139.JPG
    167.8 KB · Views: 50
  • IMG_1141.JPG
    IMG_1141.JPG
    255.2 KB · Views: 51
  • IMG_1143.JPG
    IMG_1143.JPG
    178.5 KB · Views: 50
  • IMG_1145.JPG
    IMG_1145.JPG
    244.1 KB · Views: 51
  • IMG_1139.JPG
    IMG_1139.JPG
    167.8 KB · Views: 50
  • IMG_1141.JPG
    IMG_1141.JPG
    255.2 KB · Views: 51
  • IMG_1142.JPG
    IMG_1142.JPG
    172.1 KB · Views: 50
  • IMG_1143.JPG
    IMG_1143.JPG
    178.5 KB · Views: 50
  • IMG_1145.JPG
    IMG_1145.JPG
    244.1 KB · Views: 51
  • IMG_1138.JPG
    IMG_1138.JPG
    169.7 KB · Views: 50

Jordan

Mid-Western Thunderer
Always impressed by neat work in brass, especially tidy soldering (so unlike my own!!). You must have used a set of roller bars or suchlike to form the tumblehome..? and another dumb question; what do you do with the wheels during painting? They don't look removable, so do you mask the treads etc?
 

Ressaldar

Western Thunderer
Hi Jordan,

thanks for your comments.

don't be fooled too much by the 'shiny' brass - I had just gone over the whole body with a fibre glass scratch brush for the first time. The tumblehome was formed as per instruc tions - with a piece of broom handle and some 2" masking tape - I'll post that part of the instructions tomorrow.

As far as the wheels are concerned, as they are bare at present, and need to be black, I shall apply some vaseline with a cotton bud to the tread and another bit with a cocktail stick to the axle where it goes into the bearings to act as a barrier then spray primer and top coat and when dry, wipe the treads and leave the bearing bit to act as a lubricator. Simples.

Have a go at it - it works for me.:thumbs:
 

Rob Pulham

Western Thunderer
Mike,
You have made a couple of references to the door installation and not placing the bogie step boards until you have sorted out the position. Would you mind explaining how this works? To my simple mind the doors are already etched in position on the coach sides.
 

Jordan

Mid-Western Thunderer
Ressaldar said:
The tumblehome was formed as per instructions - with a piece of broom handle and some 2" masking tape - I'll post that part of the instructions tomorrow.
I dunno.... there I was imagining a fantastic workshop equipped with all sorts of professional gadgetry... :rolleyes: :shit:

Broom handles and masking tape sounds more like my end of the kit-building spectrum... :oops: :lol: :lol:

Good tip about the wheels, though!! :thumbs:
 

lancer1027

Western Thunderer
Hi Mike

The saloon looks great. Is the kit fairly easy to build ( do you have to do alot of prep work to get parts to fit).
If you dont mind me asking :oops: How much are these kits ? and who makes them ? .
Sorry if these questions have been repeated :oops:
I look forward to seeing some colour on it :thumbs: . Top Job :bowdown:

Rob :wave:
 

Ressaldar

Western Thunderer
Hi Rob,

yes, the door position is etched on the bodyside, but it the relationship of the steps on the bogie to those doors that is the query, as you need the bogie mounted on the underframe and the body on as well so that the bogie step can be correctly positioned - the steps are not all in the same position.

Ho Jordan,

apart from the RSU,the digital soldering station and the mini drill with flexible drive shaft, mine is a very low tech workshop. Glad you liked the wheel painting technique.

Hi Rob,ngs

It is a Sidelines kit by Malcolm Binns (www.sidelines.freeserve.co.uk) @ ?120ish includes bogies but not wheels. Straight forward to build, good etches and castings - mostly lost wax and an aluminium roof, evrything fits where it should and quite good instructions.

A friend of mine has a collection of over thirty and they do make up into a very good coach without much effort on the builders part.

regards

Mike

ps Jordan - I've not forgotten the 'destructions' they will follow a bit later.
 

Ressaldar

Western Thunderer
Hi Jordan,

just popped out to the workshop while the kettle was on, so here goes...........................

[attachment=0:2hv2e1an]Top.jpg[/attachment:2hv2e1an]

It does work, so give it a go.

regards

Mike
 

Attachments

  • Top.jpg
    Top.jpg
    232.9 KB · Views: 72

Ressaldar

Western Thunderer
Hi Jordan,

You'll be building one for your little layout before too long.

I painted the bogies today, having put the steps on and as I said earlier, the cleaning off of the treads was just a matter of holding a small screwdriver against the tread whilst turning the wheel and there you are.

[attachment=3:eipw0bs2]IMG_1146.JPG[/attachment:eipw0bs2]

[attachment=2:eipw0bs2]IMG_1148.JPG[/attachment:eipw0bs2]

[attachment=1:eipw0bs2]IMG_1150.JPG[/attachment:eipw0bs2]

[attachment=0:eipw0bs2]IMG_1151.JPG[/attachment:eipw0bs2]

Also put the roof fillers and large air vents on and soldered up the furniture, so definitely on the home straight now.

regards

Mike
 

Attachments

  • IMG_1146.JPG
    IMG_1146.JPG
    212.5 KB · Views: 63
  • IMG_1148.JPG
    IMG_1148.JPG
    232.2 KB · Views: 62
  • IMG_1150.JPG
    IMG_1150.JPG
    208.2 KB · Views: 63
  • IMG_1151.JPG
    IMG_1151.JPG
    195.5 KB · Views: 62

lancer1027

Western Thunderer
Hi Mike, thanks for the info. Thats not bad ?120 inc bogies. I will keep a lookout for one of those as and when i'm ready for one :thumbs: Might be a while as i have quite a few kits to finish off first :headbang:

Rob :wave:
 

Rob Pulham

Western Thunderer
Ressaldar said:
Hi Rob,

yes, the door position is etched on the bodyside, but it the relationship of the steps on the bogie to those doors that is the query, as you need the bogie mounted on the underframe and the body on as well so that the bogie step can be correctly positioned - the steps are not all in the same position.

Ho Jordan,

apart from the RSU,the digital soldering station and the mini drill with flexible drive shaft, mine is a very low tech workshop. Glad you liked the wheel painting technique.

Hi Rob,ngs

It is a Sidelines kit by Malcolm Binns (http://www.sidelines.freeserve.co.uk) @ ?120ish includes bogies but not wheels. Straight forward to build, good etches and castings - mostly lost wax and an aluminium roof, evrything fits where it should and quite good instructions.

A friend of mine has a collection of over thirty and they do make up into a very good coach without much effort on the builders part.

regards

Mike

Hi Mike, my desire for one of these has just come to fruition as I have just picked one up for ?100 from everyone's favourite auction site. Coincidentally it is from a Dave Lowery, It has me wondering if it's the same Dave Lowery who regularly contributes to Model Rail.
 

Ressaldar

Western Thunderer
Hi Rob,

you will enjoy it, it is quite a straight forward and satisfying build - I'm stuck at the moment with mine, waiting for paint deliveries :headbang: my own fault for not checking earlier in the build :oops:

In the meantime, I've demolished the old layout and reduced the length of some shelves in readiness of making the hole in the back wall of the garage for the new personnal door. I've also been preparing for the Area 4 Get-together at Gresford tomorrow and sorting out my stuff to hopefully sell on the Bring & Buy stand that I run.

Looking forward to seeing some progress photos of your build soon.

regards

Mike
 

Rob Pulham

Western Thunderer
I took delivery today and I am impressed by what's in the box - especially the amount of lost wax castings. :drool:

Previously I have had spares from Sidelines but not a full coach (admittedly I only have three 7mm coaches including this one :oops: ) but if it builds as good as it looks and your recommendations, I will be having more - not sure I could run to 30 though :eek:

I turns out it is the same Dave Lowery who writes for Model Rail - well I had to ask didn't I!
 

Ressaldar

Western Thunderer
Well, I've just finished weathering the Saloon, and the chap that I have built it for is extatic about it.

[attachment=3:2bsl8lej]IMG_1170.JPG[/attachment:2bsl8lej]

[attachment=2:2bsl8lej]IMG_1172.JPG[/attachment:2bsl8lej]

[attachment=1:2bsl8lej]IMG_1176.JPG[/attachment:2bsl8lej]

[attachment=0:2bsl8lej]IMG_1178.JPG[/attachment:2bsl8lej]

lets hope that he feels the same when he collects it at Telford.

regards

Mike
 

Attachments

  • IMG_1170.JPG
    IMG_1170.JPG
    218.5 KB · Views: 64
  • IMG_1172.JPG
    IMG_1172.JPG
    211.9 KB · Views: 64
  • IMG_1176.JPG
    IMG_1176.JPG
    206.4 KB · Views: 64
  • IMG_1178.JPG
    IMG_1178.JPG
    200.3 KB · Views: 64
  • IMG_1170.JPG
    IMG_1170.JPG
    218.5 KB · Views: 64
  • IMG_1172.JPG
    IMG_1172.JPG
    211.9 KB · Views: 64
  • IMG_1176.JPG
    IMG_1176.JPG
    206.4 KB · Views: 64
  • IMG_1178.JPG
    IMG_1178.JPG
    200.3 KB · Views: 64

Rob Pulham

Western Thunderer
It looks super MIke.
Mine will somewhat redder than that. Possibly a daft question but what have you used for ballast on your display board? I have acquired an oak kitchen door that I intend making something to display items for photos on.
 
Top