A
Arun
Guest
Pleased to hear [at Telford] that the L12 will also be available with long smokebox and stovepipe chimney.
Arun
Arun
")
")


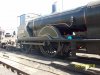
The T9 is presently out of traffic with the bogie stripped down and wheels out, I took a lot more pictures if there is interest (I don't want to hijack the thread) and the loco is readily available for more if wanted.

Phil, you could post them into a gallery thread (please).The T9 is presently out of traffic with the bogie stripped down and wheels out, I took a lot more pictures if there is interest (I don't want to hijack the thread) and the loco is readily available for more if wanted.
Cheers.
Phil
Phil, you could post them into a gallery thread (please).
Rob
) that for the engine in LSWR 1912 ish condition, the front hornguides should be cut down from the normal Drummond ones we supply separately. I simply used the rear as a template for the front. From left to right Large Drummond, plain rear small, cut down large for the front driver.


![100_0679[1].JPG](/data/attachments/87/87291-2abadd120efcd165389e79542eedeb31.jpg)