Scattergun Johns very varied workbench

allegheny1600

Western Thunderer
Hi All,
"Scattergun" certainly seems appropriate for what I will be posting here as my interests are rather wide ranging. Although principally a H0 modeller, I do work in other scales - 4mm P4 for my Western Region diesel hydraulics and "00" for my local club which is Leigh MRC.
We meet on Tuesday and Thursday evenings and we have decided to whip ourselves into shape by turning our library in a library/modelling room, we can get just 4 people working in there.
Our main layout is now "Bickersleigh", a 00 gauge colliery layout inspired by some of the many former collieries in the area, sadly all gone now except Astley Green colliery museum.

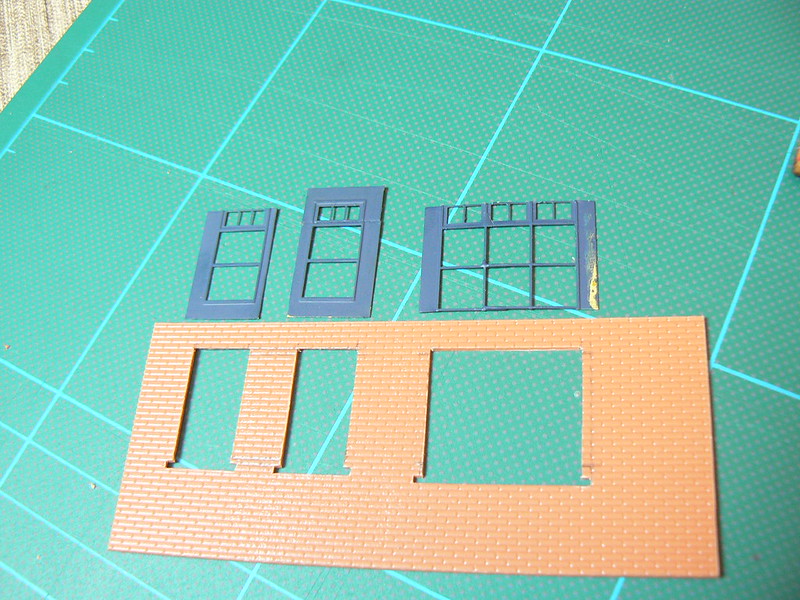
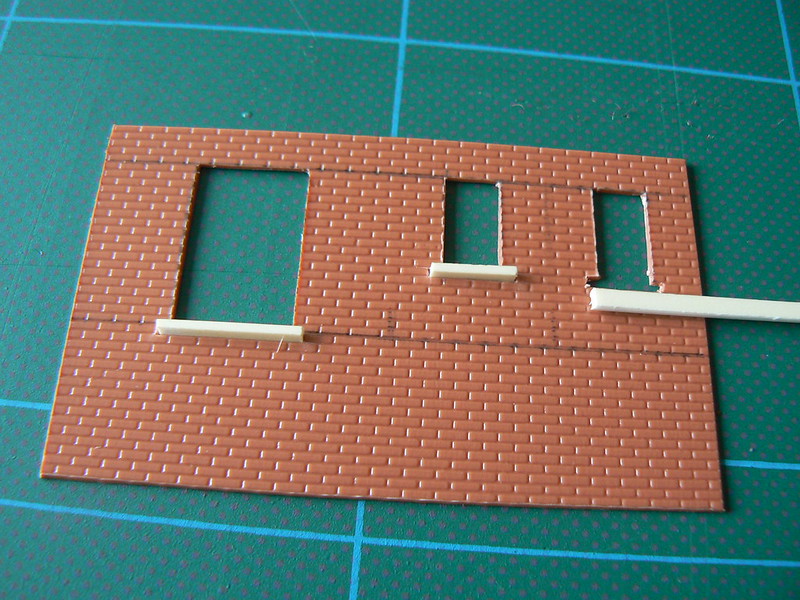
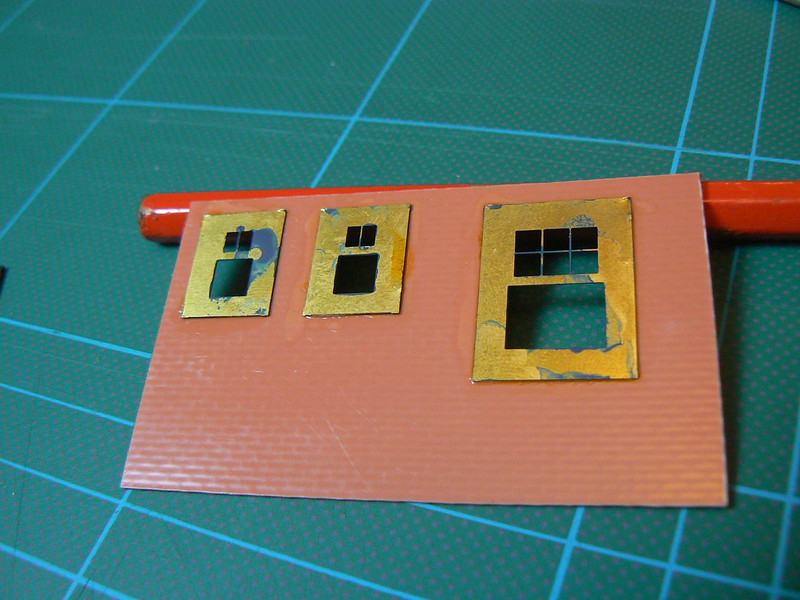
Anyway, a while back I volunteered to build the managers offices seen here;
30788853454_77482f8fe4_c.jpg
(marked with an X)

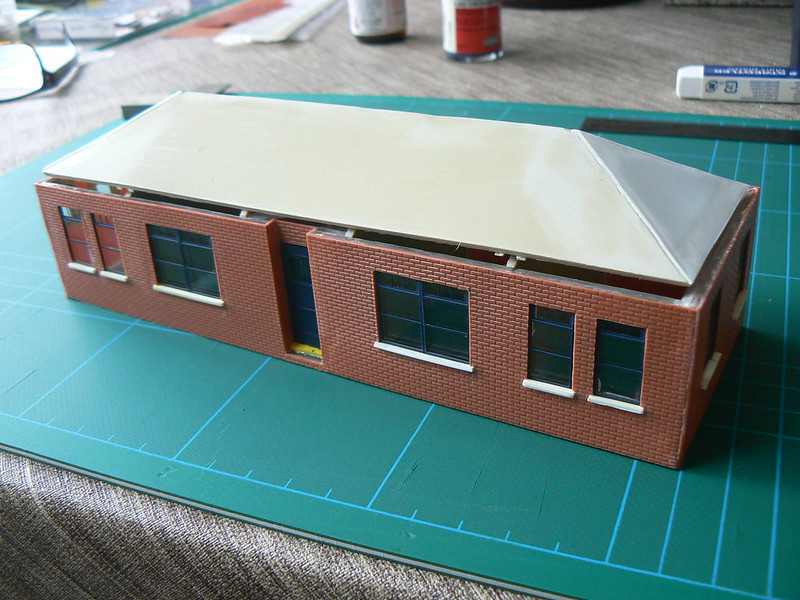
After several weeks work and two attempts, I had (so slowly) built this;
31258021160_5dd2411402_c.jpg

Unfortunately I felt this was too flimsy so recently I decided to start a third time, now using thin perspex.
To be continued.
 

allegheny1600

Western Thunderer
After attacking a sheet of perspex with my trusty Olfa cutter, I ended up with several pieces cut like this;

31630381655_726e7e171f_c.jpg
These are the sides and ends of the building. The inset in the centre of the long sides is the entrance to the building.

31593156296_28896ed129_c.jpg
I was quite sure the building needs a base so I used this offcut, which had a large hole in one end. I then drilled three other holes and squawked lines between each hole.

31258016000_e5ef318e24_c.jpg
Relief! I was able to carefully press out the excess material from the centre.

I wanted to do it this way so I can get access to the interior of the building for details, lights and so forth.
Quite how I can put individual room lighting in though, I'm not sure yet!
Cheers,
John.
 

geoff_nicholls

Western Thunderer
round about this time last year i picked up a strip of 20 micro LED lights, with battery pack, from Wilkinsons. The pack price says £3.50, but I think I got them cheap. With a bit of planning, you could light up the whole site. The lights are a bright white, like flourescent lights.
 

allegheny1600

Western Thunderer
Thanks Geoff! I will look into that. I should think flourescent lights would be fine in a slightly more modern (1960's?) building like this.
I didn't get any more work done last week but last night I made some progress.

30973504233_636459da3c_c.jpg
Glueing the sides and ends onto the base.

30973502483_8e429ba615_c.jpg

31783199955_f0956467de_c.jpg
Then marking out, cutting and glueing the roof formers, room dividers.

I have made the roof formers a rather shallower angle than the 45° that I originally made, I'm sure that the photo shows a shallower angle than normal. Only when I had cut this and stuck it did a colleague tell me of the various different rooking angles for bungalows etc.
I hope it looks okay, not many folk will get a protractor out and check it!
Hopefully!
Cheers
 

Jordan

Mid-Western Thunderer
You can fill it with Ferrero Rocher for the holidays, John..!!! :D

Sorry, silly season is here :oops: ;)

How do you glue the perspex together? Look very neat joins.
 

allegheny1600

Western Thunderer
Ooh, Mrrr Jordan, you are spoiling us wiv your treats!
Silly season all year round here buddy!

I glue the perspex with "Plastic Weld", it is really good stuff. I tried Mek to start with and had to re-do all the joints when they fell apart on me. It is available from local model shops, it's just kept in stock in our modelling room. I could use some at home really.
Cheers,
 

allegheny1600

Western Thunderer
Just by way of a diversion, here is some other stuff I have been doing;
This is part of my work on my Prussian H0 scale layout.
I decided that I didn't want my turntable to have several spurious exit tracks unconnected to anything else so I removed one to see how easy it was to remove the rails and use filler to remove any traces of where the rails where. I then subsequently lost/misplaced this piece of the table, grrr!!!
Good news however, I found my missing turntable segment!
The bad news was that I only found it AFTER I had ordered and received a set of additional segments from Lippe, they were reasonably priced in themselves but for such a small order, the postage was relatively expensive. Not to worry, at the time, I could not see how else to get around my missing segment! HA!
So, this is what a segment looks like;
31273096622_0bc7bcfe5e.jpg

And, with the rails and extraneous bits removed;
31381697416_642175c777.jpg

Filled with Squadron "White Putty" and sanded down;
30610603003_344a295efc.jpg

As a group and with an original "blank" segment;
31417594005_3e93f13cc5.jpg

Now to paint, possibly fill & sand again, paint again and see what they look like!

I have also found a wonderful picture online showing a similar table in use, in Prussian days. Note that there are only handrails around the winding mechanism, health and safety was much less apparent in those days.
31273537172_396dc1e803.jpg

So, here is the original model;
31302912281_c513f5125b.jpg

And, without handrails!
30610588483_56398a057c.jpg

A little cheating really, the handrails just unclip from the table, useful!
John.
 

allegheny1600

Western Thunderer
Over the holiday period I did get some modelling done (at last!).

31676902320_1b242a6fcf_c.jpg
Here we have all the blank segments completed (still with masking tape) and the partially repainted track segments too.

31211024514_499c2cd962_c.jpg
The rails were painted with Howes acrylic "dark rust" and the 'concrete' section with the same firms "concrete", I had to repaint this as all the blank sections were painted this way.

31676896360_bcdd58f001_c.jpg
I took the opportunity to paint the rail sides on the bridge deck, these had to be masked off. Only when I removed the masking did I realise the section between the rails is removeable, oh well, never mind.
I also thought it a good idea at this stage to paint the sides only of the circular rail the bridge rides on, with all the segments in place, this would be very difficult.

32012922146_13952ae2be_c.jpg
I had also cut down the place where the bridge was built up to support the operators hut, also the supporting "jockey" wheel was repositioned.

32012916766_af66542edf_c.jpg
I'm quite pleased with the overall appearance here.

31211011554_c9fc5bbbdd_c.jpg
As the bridge deck and the track segments are code 100 rail, I bought some Peco transition tracks to drop the section of rail down to code 75 and painted them too.

31211009844_9f2b191a5c_c.jpg
At very long last, the turntable is almost complete!
All that now needs to be done is to make and fit a short section of railing around the winder and then install into that hole in my baseboard that I cut, in about October 2015! Oops, that's too long ago, I hope the next bit of real progress doesn't take so long.
Cheers,
John.
 

allegheny1600

Western Thunderer
Not updated here for ages (sorry!) I have been procrastinating and gossiping on too many club nights but have made a modicum of progress on the managers block over the weeks.

32548023782_3a18b6dc03_c.jpg
Here is my method of marking out the room dividers/roof supports, hopefully self explanatory.

31888205203_7cd43d2622_c.jpg
These end up like this and after some cleaning up, can be glued into the structure.

32548020602_6e39dc7deb_c.jpg
That should be adequate support for the roof, I hope.

31888201193_c57bb1835b_c.jpg
So, to the roof. I decided to continue using the heavy duty reclaimed plastic sheet that I had found in the bin! At over 2mm thick, it would be hard to cut but again, the Olfa cutter makes light work of it.

Then I had the "great" idea of making the roof removeable as I want to be able to detail the interior and fit lights etc.
32700684035_f8521aab53_c.jpg
Here are my first steps in plotting this, adding more sections like the top part of the room dividers.

32578350231_be30983b95_c.jpg
Then glueing them to the roof sections. This took a couple of tries as my geometry skills are very rusty!

32660031426_968584cd97_c.jpg
Eventually, I ended up with this!

32548009102_bd8e78f938_c.jpg
After some more (undocumented!) work, cutting diagonals off the ends of the roof and building it up again, I did end up with something quite like. The sharper eyed of you may have noticed that the supports at one end are not square so the roof will only fit one way round.

Now to cut out the window apertures on the segments of prepared Slater plasticard. Believe it or not, I am already on my third attempt at this!
Ho hum, the joys of scratch building, eh?
Cheers,
John.
 
Dammtor

allegheny1600

Western Thunderer
Hi Again!
Around Christmas just gone, we lost my dear Auntie Kay who was the grand age of 95 so it was inevitable really. Anyway, she kindly left me a sum of money and I really wanted something 'big' to remember her by. My good lady Bev, was very explicit in stating that she didn't want anything for herself so I was free to choose as I liked. The most impressive thing I could come up with was going to be an ESU T16 (BR94 0-10-0T) but really, it would have been just another loco!
Fortunately it was not yet available but I had hovered over the "reserve" button a few times when this came up, the Trix H0 scale model of Hamburg's Dammtor station.
A quick consultation with Bev who was supportive and I made my offer. After a while, it was accepted and yesterday a rather large box turned up.

31862812714_3246f7c1cc_c.jpg
Getting the two kits out revealed just how big everything is.

32326393510_1b39595559_c.jpg
That's a standard size dishwasher and worktop in the background!

31892890083_461cddbf63_c.jpg
What a model it will make!

31862807834_90e6031595_c.jpg
Looks like the previous owner has made a start, this facade has been "weathered". Yes, that's a 12" rule!

31862803564_3069f79599_c.jpg
Oh dear! That's an awful lot of plastic parts in there and that's just one box! Apparently there is some 9Kg of plastic here.

I have been doing quite a bit of internet trawling and have found a few very good sites where owners have made detailed descriptions of how they proceeded, thank goodness for that! I need such help!
Fortunately I do have a fair resource of my own photos I took, never dreaming that I really would need them someday.
The instructions suggest that between 70 - 90 hours is required to build this monster but I understand from other builds that it will take considerably more than that to do it real justice, like painting all the interior, fitting lights, catenary and so forth.
Wish me luck guys!
John.
 
A rough & ready point.

allegheny1600

Western Thunderer
Hi All,
As threatened in my first post, anything can happen on here! What modelling I have managed to do is all too often for other people, as indeed is this 'piece' but for once, I managed to photograph the process.
My club (Leigh) has a rather nice colliery layout called "Bickersleigh", a contraction of Bickershaw and Leigh and one of my dear colleagues, Roy had been trying to make a curved turnout for the hidden sidings - out of old pieces of set track! To be fair to him, he had done a good job - given what he had to work with.
However, the starting point was simply not good enough (who on earth had suggested using set track?) so I decided to build a working turnout from scratch, using copperclad and rescued code 100 as it had to match the remainder of the layout. Due to the position of this point, it is critical to the operation of the layout. All this and there is just barely five weeks until our exhibition so I couldn't hang around.
I had no time to mess around with 'Templot' and I can't use it anyway so I simply made the measurements required by taking a 'rubbing' of the old point by pressing hard all over a sheet of A4 paper!
Once at home, I added some additional working onto this;
35558755883_af8ae7dd0d_c.jpg
[/url]

Really rough, eh?
I didn't even have any 4mm copperclad sleeper strip to hand so I used 7mm stuff instead. I actually thought it might be thicker and help match the original Peco code 100.
36322593616_d600b43fd0_c.jpg
[/url]

About an hours filing produced a reasonable crossing vee;
35558754173_30f6316c07_c.jpg
[/url]

I stuck the sleepers to the paper with Pritstick and left them overnight then started soldering the vee into position;
36198524942_88c113e02a_c.jpg
[/url]

I had quite a bit of trouble making and getting the wing rails for the vee set into position, I don't know what I did wrong there but carried on with then setting the switches into position, from where I could then calculate where the stock rails fit;
36198523982_c45b8fe19c_c.jpg
[/url]

A couple of steps later and the point was more or less ready!
36198522022_2056d29f51_c.jpg
[/url]

I used 'marigold' gloves while I scrubbed all the flux off (in the sink, with boiling water) and of course, safety glasses while I gapped the sleepers and it was ready to be taken to the club. I gave it a quick test by rolling a selection of wagons through beforehand and thankfully even that big gap at the vee, doesn't seem to be a problem (fingers crossed).
All I could get done at club was lift the old point and fit the new but it seems to work okay. Just have to motorise it and wire it now.

What do you think of my first point, please? I had a group tuition at the Manchester MRS where I got less than half a P4 point built and that didn't work and that's all I've ever done (apart from plain track). My only special track building tools were a code 100 roller gauge and the American RP25 'Standards Gage'
Cheers,
John.
 
Last edited:

Lyndhurstman

Western Thunderer
Hi All,

What do you think of my first point, please? I had a group tuition at the Manchester MRS where I got less than half a P4 point built and that didn't work and that's all I've ever done (apart from plain track). My only special track building tools were a code 100 roller gauge and the American RP25 'Standards Gage'
Cheers,
John.
Nice work, John. I do like a bit of handbuilt trackwork, and a bit of 'bespoke' is even better. I guess building on a curve gives some "issues" when aligning the nose of the crossing with the knuckle, but the the proof of the pudding is in the eating, and if the stock are happy, then we can ask no more.
I once had to build a douple slip in 00 for the GMRC layout, but I just could it make it fit in the space, and with the standards. I think it was more me, than the plan (which - if I recall - was effectively freehand on wallpaper). I have improved since then; I built this (that should be "am building" because you'll see it's shy of some checkrail, and I've reworked the right hand nose and knuckle since I took this photo....) freehand in P4 on a B&Q shelf for "Watkin's Wharf"....

Watkins_Wharf_crossing.png

Well Done. Keep on keeping on...

Cheers

Jan
 

jonte

Western Thunderer
Nice work, John. I do like a bit of handbuilt trackwork, and a bit of 'bespoke' is even better. I guess building on a curve gives some "issues" when aligning the nose of the crossing with the knuckle, but the the proof of the pudding is in the eating, and if the stock are happy, then we can ask no more.
I once had to build a douple slip in 00 for the GMRC layout, but I just could it make it fit in the space, and with the standards. I think it was more me, than the plan (which - if I recall - was effectively freehand on wallpaper). I have improved since then; I built this (that should be "am building" because you'll see it's shy of some checkrail, and I've reworked the right hand nose and knuckle since I took this photo....) freehand in P4 on a B&Q shelf for "Watkin's Wharf"....

View attachment 77655

Well Done. Keep on keeping on...

Cheers

Jan

Too good for a simple 'like', Jan.

That's a feat of engineering. Would love to see some stock traversing it, too!

Best wishes,

jonte
 

Lyndhurstman

Western Thunderer
Thanks Jan!
Oh my, your freehand track is very impressive. I hope that one day, I could tackle something like that.
Cheers,
John.

Thanks John,
My first handbuilt point was a copperclad marriage of EM and 009. I didn't have a layout, or any stock; it was a competition entry, and I won - possibly because no-one else had entered the Trackwork category ).

Too good for a simple 'like', Jan.

That's a feat of engineering. Would love to see some stock traversing it, too!

Best wishes,

jonte

Thanks Jonte
It's supposed to have a thinner checkrail, but I couldn't find anything suitable at the time. One day it will bear the weight of trundling stock... one day... it needs gapping first, though :)

Cheers Chaps

Jan
 

allegheny1600

Western Thunderer
Hi All,
On my "Bickersleigh" thread, you could catch a glimpse of the 'Managers office' that I have been slowly building over some time now.
It has been a while since I posted about this so I thought I'd give an update.

I marked out the various window openings and cut out with a nice new scalpel blade.
36774440695_c936bfb526_c.jpg


The window sills were simply cut down plastic strip from 'Evergreen', happily the thickness of this was almost exactly one 'brick' thick so was easy to allow for.
35965411013_18381bec30_c.jpg


The painted brass windows appeared to glue easily to the back of the wall, using EMA plastic weld - it's the only stuff that I found would glue the perspex.
36774438525_b3e1f3f757_c.jpg


Repeat this procedure several times for all the sides and ends and it's looking a lot more complete now;
36774437585_e0d579e8fa_c.jpg


Now to tackle the roof and maybe (given time) some details and weathering.
Cheers,
John.
 

allegheny1600

Western Thunderer
In addition to the above, I had to make a working point lever for the point shown earlier - I'd had a couple of goes at motorising it with both Peco and H&M motors but failed miserably with neither working very well (partly due to my ineptness with all things electrical!).
Anyway, I ordered from Roxy Mouldings a Summersons point lever from Southwark Bridge models which arrived in very good time.
Although I found the instructions a little sparse, I got this far
36774443805_7959b61ca5_c.jpg


35965412713_8dff1e9b04_c.jpg
[/url]

So, it is 'working' in a sense but for the life of me, I can't see how I should connect the remaining parts in order to have it throw a point. Any pointers, please? No pun intended!

In the meantime I have simply begged an old but effective GEM Mercontrol point lever that seems okay. Bearing in mind what I said above about some of the other members of Leigh, it may well be better to leave this in situ and use the above lever myself, somewhere.
Cheers,
John.
 
Top