Geoff
Western Thunderer
Hi Chaps,
Well here we go with what I hope will be an interesting topic, hopefully some of you here on the forum will chip in with your own ideas so we can all learn something new.
Trees must be about the most difficult items to model and over the years I have tried several methods from twigs covered in foam, to dried Yarrow stems bound together and dressed with various scatters
As previously mentioned in Gardeners World on this very forum, Paul Marshall- Potter first drew my attention to using C & L plastic mouldings and sea moss together to make trees in an article he wrote for The Railway Modeller.
So first a word about the materials, the C & L plastic mouldings come in four sections, which with a little imagination can be used in a variety of ways to produce different shaped trees. The components come as flat mouldings and the branches need to be bent and twisted to form the shape you require. This can be done by using a hairdryer to gently soften the plastic or holding them with a pair of pliers and dunking them in hot water.
Once you are happy with the shape the parts can be joined together with a solvent such as Plastruct.
Brian Lewis has in the past given me permission to use his instruction sheet and you will be able to view it in the photo sequence which will follow.
Now a quick word about sea moss, as you will know this is a plant and my head gardener had the same trouble as Neils when she tried to cultivate some for me. So I bought a "Forest in a Box" with a view to making trees quick and easily, if only life was that simple. An awful lot of the stems were bent and had to be straightened out. This is done by holding the stems over a steaming pan or kettle and gently shaping them so they can be used. To put it mildly I was not happy with the product or the results I achieved, and think the sea moss is best used in the background, closely grouped together or as saplings and small bushes. So to cut a long story short I packed the plants away and forgot about them.
Putting the trees on hold I continued to build the layout until I read Pauls article, to be honest I didn't think it would work but having all the materials decided to give it a try.
So lets crack on and see some photos, the first of which shows the C & L instruction sheet and components. You will see they suggest using teased out horsehair for making the canopy and the results can be good.
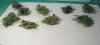
Next we have from left to right , a basic small sea moss tree, this is just three stems bound together and the trunk covered in bark mix.
In the centre we have a plastic trunk with sea moss branches attached. You can drill holes in the plastic for the stems or glue them on top, the joints will be hidden beneath bark mix. A top tip is to use an activator with the cyano otherwise you will take all day waiting for the cyano to grip.
Last of all is an assembled tree trunk in the nude, this scales out at 46 feet high in 4mm scale.
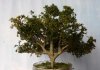
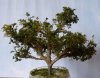
The next photo shows the tree with bark mix applied awaiting paint and finally the tree dressed but not yet trimmed. Then in true Blue Peter style, here is one I made last week !
To be continued...................
Geoff
Hi sorry about the problems you might have had viewing the photos, I got disconnected twice whilst uploading them.
Well here we go with what I hope will be an interesting topic, hopefully some of you here on the forum will chip in with your own ideas so we can all learn something new.
Trees must be about the most difficult items to model and over the years I have tried several methods from twigs covered in foam, to dried Yarrow stems bound together and dressed with various scatters
As previously mentioned in Gardeners World on this very forum, Paul Marshall- Potter first drew my attention to using C & L plastic mouldings and sea moss together to make trees in an article he wrote for The Railway Modeller.
So first a word about the materials, the C & L plastic mouldings come in four sections, which with a little imagination can be used in a variety of ways to produce different shaped trees. The components come as flat mouldings and the branches need to be bent and twisted to form the shape you require. This can be done by using a hairdryer to gently soften the plastic or holding them with a pair of pliers and dunking them in hot water.
Once you are happy with the shape the parts can be joined together with a solvent such as Plastruct.
Brian Lewis has in the past given me permission to use his instruction sheet and you will be able to view it in the photo sequence which will follow.
Now a quick word about sea moss, as you will know this is a plant and my head gardener had the same trouble as Neils when she tried to cultivate some for me. So I bought a "Forest in a Box" with a view to making trees quick and easily, if only life was that simple. An awful lot of the stems were bent and had to be straightened out. This is done by holding the stems over a steaming pan or kettle and gently shaping them so they can be used. To put it mildly I was not happy with the product or the results I achieved, and think the sea moss is best used in the background, closely grouped together or as saplings and small bushes. So to cut a long story short I packed the plants away and forgot about them.
Putting the trees on hold I continued to build the layout until I read Pauls article, to be honest I didn't think it would work but having all the materials decided to give it a try.
So lets crack on and see some photos, the first of which shows the C & L instruction sheet and components. You will see they suggest using teased out horsehair for making the canopy and the results can be good.
Next we have from left to right , a basic small sea moss tree, this is just three stems bound together and the trunk covered in bark mix.
In the centre we have a plastic trunk with sea moss branches attached. You can drill holes in the plastic for the stems or glue them on top, the joints will be hidden beneath bark mix. A top tip is to use an activator with the cyano otherwise you will take all day waiting for the cyano to grip.
Last of all is an assembled tree trunk in the nude, this scales out at 46 feet high in 4mm scale.
The next photo shows the tree with bark mix applied awaiting paint and finally the tree dressed but not yet trimmed. Then in true Blue Peter style, here is one I made last week !
To be continued...................
Geoff
Hi sorry about the problems you might have had viewing the photos, I got disconnected twice whilst uploading them.
Attachments
-
Trees 28 11 10 017.JPG8.7 MB · Views: 0
-
Tree with bark mix applied.JPG5.6 MB · Views: 0
-
 Trees 28 11 10 Teased horsehair clumps.jpg31 KB · Views: 4
 -
 Trees 28 11 10 023 ready for trim and planting.jpg73.7 KB · Views: 4
 -
 Trees 28 11 10 023 One I made earlier.jpg51.8 KB · Views: 4
 -
C & L Plastic tree components.jpg2.jpg852.3 KB · Views: 2