7mm Mickoo's Commercial Workbench

mickoo

Western Thunderer
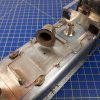
A little more progress, not as much as I wanted or planned before being dragged off to (supposedly) enjoy this thing called Xmas, pah :cool:

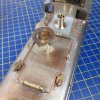
The dome isn't fixed and is being particularly troublesome, it's a large cast lump and by the time it's hot enough for the solder to flow..... the half etch skin underneath has buckled, so you don't get a nice seamless joint.

Plan B is is the order of the day, no idea what that is yet, but it is required.

There's a flanged joint plate required on each of the top feed pipes, near the safety valve bonnet; they're not supplied in the kit so another task for the 3D printer over the next few days.

IMG_8369.jpg

IMG_8370.jpg

IMG_8372.jpg
 

simond

Western Thunderer
Mick,

Can you drill & tap the dome (or something stuck/soldered/etc therein) and get a screw in from below?

It looks very nice. You didn’t show us what’s below the plates either side of the chimney (or if you did, I missed it)

Merry Whateveritis
Simon
 

mickoo

Western Thunderer
Hollow dome, thin half etch skin on tank top. Skin to thin and flexible to be sure an adhesive will remain bonded over the years so it would need some additional mechanical restraint as well.

The problem is the hollow dome and making sure whatever fixing, be it nut or screw is centred.

20191224_201507.jpg
 

simond

Western Thunderer
Lathe job, Mick.

Make a plug that fits, doesn’t matter if it it’s circular or not, as long as it fits, and solder it in. Mount the dome in a chuck, or a collet in a chuck, and drill & tap for the screw.

I can do it for you if you want. PM me if it would help.

Atb
Simon
 

mickoo

Western Thunderer
Nearly there now, cab roof fixing (removable) to sort, ventilator too then some pipework to re attach to the back head to complete that.

The chassis was already a working chassis, however the coupling rods had de-laminated and the balance weighs were soldered on :eek: New wheels were procured and new coupling rods etched, they'll be soldered up and fitted tomorrow and the chassis run in.

That'll only leave a clip on each top feed pipe at the rear tank stay, two tank front steps either side of the smoke box door, the (found in the bottom of the box in pristine condition - so never fitted) rear steam pipe valve and fitting and top lamp irons (missing so will need to raid the spares box) front and rear to complete.

The plan is to have it all complete by years end ready for shipment to Warren for paint.

IMG_8378.jpg

IMG_8379.jpg

Drat, cab roof slipped :rolleyes:

IMG_8380.jpg

IMG_8381.jpg
 

mickoo

Western Thunderer
Once again, the fat lady has sung :cool:

Time to pack it up and send it to paint, then it'll be back for glazing, buffer springs, hooks and final test run before going off for DCC fitting.

IMG_8407.jpg IMG_8408.jpg IMG_8409.jpg IMG_8410.jpg

I did notice this evening after final assembly that I'd missed out the door handles and that the sand pipes were never fitted, not any more though :thumbs:

The cab roof is held on with nickel silver wire clips. the gutter is fixed on the left hand side to the cab shell, on the right hand side to the removable roof section.

IMG_8383.jpg

IMG_8384.jpg

IMG_8386.jpg

To fit/remove, simply slide the roof sideways to the right so that the left hand clips spring free, lift the left hand side and slide right until it pops off.

This will probably damage the paint on the right hand side, but it's planned as a one shot deal to get the roof on once the interior is finished and then waft matt black over the whole cab roof to finish off.

That's the plan anyway ;).

Tomorrow it's on to a new project, a big LNER Pacific, looking forward to that one.
 
Last edited:

mickoo

Western Thunderer
New year, new project, little to show at the moment but progress none the less.

It's a David Andrews Peppercorn A2 with Mark Wood wheels.

So far it's gone to plan, the only change I made was to the inner two wheel bearings which run in slots. It seemed to me that the bearings would rather turn in the chassis than on the axle, there being no visible means to prevent this.

So I simply added a length of wire soldered across the top. It's not fitted to the frames, just the top of the bearings to stop them spinning, but still allow vertical movement.

IMG_8412.jpg

IMG_8413.jpg

IMG_8415.jpg
 

mickoo

Western Thunderer
A little more progress, a little bit of too and fro with the coal space, typical from the couple of DA kits I've built, in the end it was clarified as having a full load of coal, so I gave up and it'll be plated over in due course.

The division plate suffered similar traits, being too tall by some margin and the opening for the water scoop dome too small, it was eventually all bullied into shape.

There's already a looming issue with the tank front and shelves either side of the coal space doors. There are slots and tabs for all the parts but try as one might, the gap remains twixt shelf and upper bulkhead.....deduction, they're just too short.

None of the innards or front end is fixed yet, so fret not over the gaps between tank top and sides, it'll all be made good in the next session.

The buffer beam comes with a large flat plate attached below the coupling hook, it should be removed as it's not fitted on Peppercorn A2 engines, nor is the transverse Vacuum tank....which I now have to remove ;)

Most of the upper works is from a rather thick gauge of brass, be warned, you'll need a lot of heat on some of these joints, I'd say about 80% were done with a micro flame. Even with the iron set to 450°C and the biggest tip, it still failed to get enough heat in.

It should also be pointed out that the tender wheels, are not Marks Woods, but are in fact Walsall Wheels.

IMG_8416.jpg

IMG_8417.jpg

IMG_8420.jpg
 

7mmMick

Western Thunderer
Starting to look the part Mick. Is the transverse vacuum tank fitted to the Thompson A2’s. Asking for a friend ;):D
 

mickoo

Western Thunderer
Starting to look the part Mick. Is the transverse vacuum tank fitted to the Thompson A2’s. Asking for a friend ;):D
All Peppercorn and Thompson Pacifics are steam braked through out, therefore there is no requirement for the transverse Vacuum tank ;)
 

mickoo

Western Thunderer
Finally, after a lot of too and fro, the tender is complete (sans buffers).

The coal space will have a full load so no need for any details in there.

The scoop dome base will be blended in when the Milliput comes out, as will the hole for one of the rear steps and handrail knobs. I tend to acquire a collection of things to do before mixing some up.

IMG_8423.jpg

IMG_8425.jpg
 

7mmMick

Western Thunderer
What size brass did you use for the front beading mate? That’s one of the last jobs I have to do on my build,

cheers

Mick
 

mickoo

Western Thunderer
LNER beading typical of the period is 1 - ½" by ½"

In our terms 0.87 x 0.29, you can get both 1.0 and 0.8 mm beading; I opt for the 1.0 as invariably it needs trimming to match the plate work and often ends up nearer scale width.

LNER beading description varies between D and elliptical, I've not seen half round fitted anywhere, if you just waft over the top of half round it gets closer to the right profile, close enough for me anyway.

Elliptical is nearer the truth but it's a compound curve.

Image2.jpg

I use NuGold (soft) from MetalClays4You on Ebay, half meter is about £3 or something, cheap as chips and lasts for several models.

As far as material strength goes, it's half way between copper and brass, it'll hold a straight line easily but will also form around sharp corners with a little care.

If you've already built the tender then forming the double curves will be tricky, I've a note to myself to fit the beading first next time with 224°C solder!

Be aware also, that on straight sided tenders the beading goes right down to frame plate level

Image1.jpg

There is a small instep in the side plate that supports the floor and the wooden floor boards have a notch cut to go around the beading.

Being as I added my beading last and needed to slide the footplate assembly in and out, I cut mine flush with the floor top. In fairness the gap on the DA tender is so small I'd probably not get beading in under there anyway, but it is a niggle none the less.
 
Last edited:

P A D

Western Thunderer
Very nice Mick,
It makes a change from the smooth sided Gresley variants. Plating over the the coal space for a full coal load must save a lot of time and effort in not having to fit details to the inside of the front and side plates.
Cheers,
Peter
 

mickoo

Western Thunderer
Peter, cheers, indeed the full coal load saved hours of work.

I checked with the client first as the kit supplied coal space was a woefully poor fit in places, so much so it would of been easier to make a new one, again that takes time.

Adding the details would have again racked the time up as most do not fit really well.

The overall saving was actually quite a lot and it's a option I'll be offering/laying out to all new clients, it is after all, their money.
 
Last edited:
Top