7mm MOK Ivatt 4MT in S7

richard carr

Western Thunderer
The main castings fit the chassis with 10 ba screws.

IMG_1262.JPG

IMG_1263.JPG

Here are the connecting rods some more beautiful castings

IMG_1264.JPG

The little ends need drilling out 3.1 mm to accept a brass bearing that goes inside the cross head.

IMG_1266.JPG

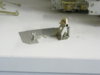
The nightmare bits for the mechanical lubricators that sit on top of the J hangers, those a 3 foot 1 wagon wheels for comparison, and you are supposed to be able to make them work, but mine don't seem to wiggle much.

IMG_1269.JPG

IMG_1270.JPG
 

richard carr

Western Thunderer
I have finally got back onto the Ivatt after being distracted by numerous diesel weathering jobs, building MDV wagons from the JLTRT kit and designing sprung W irons for them.

Most of the valve gear has been put together.

IMG_1314.JPG

I still need to fit the valve rods into the valve guides and connect those up to the cross heads but that is all going to fit easily.
There are no clearance problems with cross head and the leading axle coupling rod even with using S7 wheels.

I have also largely finished the pony truck.

IMG_1312.JPG

I have added the brakes and started on the sanding gear. You do need to be careful with the brake block, the castings require about 3mm to be removed from the bottom of each one and they are all handed and have a top and a bottom, so be careful to get the the right way up.
There are no problems with getting the brakes to line up with S7 wheels.

IMG_1313.JPG
 

richard carr

Western Thunderer
Work keeps progressing slowly but steadily on the Ivatt.
I have switched to doing the body details and the cab

IMG_1322.JPG

IMG_1323.JPG

The top photo are the bits to make up the steam manifold, the lower photo some of the parts for the back head.
IMG_1324.JPG

This is the cab floor with the reverser and the sanding gear controls.


IMG_1327.JPG

The back head and floor just placed in the cab before any of the pipe work is added.

I spent quite a bit of time working out where everything goes even with what appear to be detailed instructions.

IMG_1333.JPG

A lot of the pipe work has been added, the cab roof needs to go on soon.

Richard
 

Attachments

  • IMG_1325.JPG
    IMG_1325.JPG
    99.9 KB · Views: 13

richard carr

Western Thunderer
It has been a very enjoyable build so far.

I'm fitting the cab roof now, this is proving to be the trickiest thing in the kit and it looks like I will have to file it down a bit.

Richard
 

richard carr

Western Thunderer
I have managed to put in quite a few hours into this build over the last 3 weeks.

The loco body is now almost complete.

IMG_1336.JPG

The biggest problem is the join between the chassis and the body, there are just so many bits of pipe work that connect the 2 together that makes it impossible to have clear break between the two.

IMG_1334.JPG

One thing I did come across is that the rocking grate levers protrude under the cab, but then catch on one of the chassis spacers. It is possible that I have done something wrong, but I don't think so and as no one is going to see them in reality I have just cut the off and carefully ground down the backhead base so that the cab sits nicely on the rear of the chassis.

IMG_1337.JPG

The valve gear is almost finished including all the piping for the lubricators.

I have even started to paint the tender.

IMG_1338.JPG


IMG_1339.JPG
 

Martin Field

Western Thunderer
Holy cow! Gawd knows I'm not a kit builder and looking at this I'm so pleased I'm not! I used to produce very high end model car kits for collectors, but this takes the biscuit. I can quite see how it's worth the asking price, but still amazed how many of you claim to have similar kits "tucked away" in cupboards and on shelves. That's a LOT of money to have "tucked away", plus the wheels, gears and motor. I wish I had half forgotten 500 pound wads tucked away!
 

adrian

Flying Squad
I can quite see how it's worth the asking price, but still amazed how many of you claim to have similar kits "tucked away" in cupboards and on shelves. That's a LOT of money to have "tucked away", plus the wheels, gears and motor. I wish I had half forgotten 500 pound wads tucked away!
I don't think anybody forgets about the kits being tucked away, it's more a case buying whilst available. There are quite a few kits no longer available on the market so if you didn't buy at the time you have lost the opportunity to get one. If it was something special then it is worth buying for a later project when you have time available to build it.
 

Martin Field

Western Thunderer
Always assuming you can afford 500 notes in the first place, of course!

I wonder what people charge to build and paint these things.
 

oldravendale

Western Thunderer
Let's put it this way, Martin. For someone with your skills and expertise as you've described there is a living to be made building locomotives and carriages, and come to that scenic items, both scratch and from kits for those among us who are incapable of putting a soldering iron to metal. You'll never become a Rockefeller, but there are quite a few serious collectors who will pay good money for that something special.

B
 

Martin Field

Western Thunderer
I'm never going to find out am I?<G> My problem would be I have very particular likes and dislikes. Big locos don't interest me. I'm a tank man, I prefer smaller stuff and particularly Industrial, I really don't like GWR and I don't like diesels, BR coaches or any modern wagons.
Oh dear, I think I'll stay with cars and motorbikes! Mind you, I don't do Porsches or Audis either or ANY foreign bikes. But my customers always knew that!
 

Martin Field

Western Thunderer
I have done, Oldravendale. Way back. Western Models did them and I've no doubt SMTS have had a crack at one in their particular way.
 

farnetti

Western Thunderer
[The valve gear is almost finished including all the piping for the lubricators.]

Hi Richard,

It looked like (from previous posts) that you had already attached the lubricator box to the motion bracket assembly.

Being quite a relatively large lump of metal, and taking sometime to heat up, how did you solder the large number of lubricator pipes to it without previous bits falling off, RSU maybe?

Ken
 
Top