Evening all,
It’s been quite a year since I last posted. Aside from the pandemic, I lost my Mother around this time a year ago so I didn’t really feel like modelling for a while. Sometimes small trains seem irrelevant...however they can also be a source of great comfort when things get tough.
So during the first lockdown, in April I began to make a start on the inset track base, then the ballasting and followed up by starting the dries buildings. The inset track has been the subject of many a 2mmFS disaster for me so this time I used foamboard as a base with templates hand drawn and finished in white card. This has then been painted with acrylics a base concrete colour and weathered with powders.
View attachment 134824
View attachment 134825
View attachment 134826 There is still the marking of joint lines and cracks etc. but it allowed me to do the ballast and then apply the first coat of grass as set in 1983 I want the slightly run down look rather than the completely overgrown look!
I then started to build the dries in relief, starting with the easier side! I have used foamboard as a base overlaid with various embossed plastic sheets. It’s a right old mix of stone, concrete, brickwork and block work.
View attachment 134827
View attachment 134828 Gutter brackets were added in sections and looked like progress was being made...until I placed the boards back in storage and the building fell forward and snapped them all off...I don’t mind telling you that my language that followed was pretty fruity!
Following rebuild and a small foamboard enclosure to prevent this happening again, it was giving the cursory coat of grey primer to see the bits that need attention. Gutters and down pipes were added too.
View attachment 134829
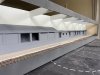
Following completion, the second more complex deeper dries buildings was started again using the same methods and with some corrugated sheet added to the mix.
View attachment 134831
View attachment 134832
For the roof I wanted to lay the sheets individually as I had done this successfully on my 2mmFS Coombe Junction - Moorwater layout. A slither of plasticard to act as a batten was added in which also gave me a line to work to as well.
View attachment 134830
View attachment 134834
Interestingly the later block work infills between the brick piers are not full height stopping short of the roof structure.
View attachment 134833
Again the cursory mist of grey primer spray to this building too.
View attachment 134836
View attachment 134835
Overall I am happy with the slight random imperfections in the roof and since these photos were taken I have started to apply the base colour acrylics to the different materials...mostly various shades of grey!
I hope to try and further progress over the Christmas break so there shouldn’t be a year between posts this time.
As always, comments welcomed...
Have a good Christmas all,
Pete

 There are two long lights, one in each 1100mm board and the middle section plugs in a shorter filler piece once I join the boards together...
")


")


 Ha!
Ha!