Heather Kay
Western Thunderer
No, not a kettle. A pair of JLTRT Mk1s, in their original as-built condition - or at least, as close as JLTRT kits can be.
I was in two minds about making a thread on this build. It's not like you haven't seen Mk1s being built before. The models were already started by a previous builder before my client acquired them from eBay. He thought it would be a quick build for him to supplement his existing stock, and then he looked in the box...
So, what's the story here? I have a BSK and TSO. As they arrived on my bench, the body sides had been painted and lined, one set of windows had been painted, and the interior of the BSK had been started and somehow made a right horlicks of. The B1 bogies are mostly constructed, although missing some of the axleguard keeper plates. Most of the castings are there, but there are some key bits of etched brass missing.
I've already asked Laurie L at JLTRT to send me a bunch of replacement bits (good job there's that solid silver guarantee!), and while I await those - and various odds for the LNWR build - I decided now would be a good time to get things started on the Mk1s. That and the requirement they're need for a Christmas present this year.

I stripped off the brass work and set it aside for later use. I have plenty of spares for T-handles and grab rails, but it doesn't hurt to re-use what came off the kit if it's clean. I then set about removing the Pressfix lining. I'm not sure it had been applied correctly, as it was slightly tacky to the touch. Be that as it may, the tip of a sharp No10 blade let me carefully slice it away. I'm not worried about damaging the paintwork. While it's nice enough, there are enough blemishes and scuff marks to require a repaint anyway. I was careful not to gouge the actual body moulding, though.

Next, I assessed damage and set about cleaning up the dodgy paint. To be fair, it wasn't that bad, just a bit, um, bright. Having built a BSK before, I knew there are some issues with door bumpers on one side, so I made a note! Some of the hinges had been pinged off, so they need attention, too.
I have decided to clean up the window areas where there are mould flaws. The models are to be finished in "blood and custard", pretty much as built in the early 1950s, with a slightly tired finish. I shall be using the Phoenix paints I used on the Collett build, which has a slightly darker, more purple shade of crimson, and Fox transfers for the lining and lettering.

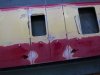
I'll need to check the references, but either this door opens the wrong way, or the bumper is completely superfluous in its current location!") The guard's handrails also need holes drilled: may as well do that before repainting commences.
The guard's handrails also need holes drilled: may as well do that before repainting commences.
Once I've cleaned up and filled the sides, I'll get a coat of primer on them to see if there's anything glaringly obvious I've missed. I can't really kick off the underframes at this stage, but I can spend a while fettling and cleaning up castings and so on. It'll make a change from battling brass LNWR coaches.
Don't expect a blow-by-blow account on this build. I'll probably cherry-pick anything I think you might be interested in.
I was in two minds about making a thread on this build. It's not like you haven't seen Mk1s being built before. The models were already started by a previous builder before my client acquired them from eBay. He thought it would be a quick build for him to supplement his existing stock, and then he looked in the box...
So, what's the story here? I have a BSK and TSO. As they arrived on my bench, the body sides had been painted and lined, one set of windows had been painted, and the interior of the BSK had been started and somehow made a right horlicks of. The B1 bogies are mostly constructed, although missing some of the axleguard keeper plates. Most of the castings are there, but there are some key bits of etched brass missing.
I've already asked Laurie L at JLTRT to send me a bunch of replacement bits (good job there's that solid silver guarantee!), and while I await those - and various odds for the LNWR build - I decided now would be a good time to get things started on the Mk1s. That and the requirement they're need for a Christmas present this year.
I stripped off the brass work and set it aside for later use. I have plenty of spares for T-handles and grab rails, but it doesn't hurt to re-use what came off the kit if it's clean. I then set about removing the Pressfix lining. I'm not sure it had been applied correctly, as it was slightly tacky to the touch. Be that as it may, the tip of a sharp No10 blade let me carefully slice it away. I'm not worried about damaging the paintwork. While it's nice enough, there are enough blemishes and scuff marks to require a repaint anyway. I was careful not to gouge the actual body moulding, though.
Next, I assessed damage and set about cleaning up the dodgy paint. To be fair, it wasn't that bad, just a bit, um, bright. Having built a BSK before, I knew there are some issues with door bumpers on one side, so I made a note! Some of the hinges had been pinged off, so they need attention, too.
I have decided to clean up the window areas where there are mould flaws. The models are to be finished in "blood and custard", pretty much as built in the early 1950s, with a slightly tired finish. I shall be using the Phoenix paints I used on the Collett build, which has a slightly darker, more purple shade of crimson, and Fox transfers for the lining and lettering.
I'll need to check the references, but either this door opens the wrong way, or the bumper is completely superfluous in its current location!
The guard's handrails also need holes drilled: may as well do that before repainting commences.Once I've cleaned up and filled the sides, I'll get a coat of primer on them to see if there's anything glaringly obvious I've missed. I can't really kick off the underframes at this stage, but I can spend a while fettling and cleaning up castings and so on. It'll make a change from battling brass LNWR coaches.
Don't expect a blow-by-blow account on this build. I'll probably cherry-pick anything I think you might be interested in.

")


 Might have to call them and speak to a human.


)")
.jpg")