Peter Cross
Western Thunderer
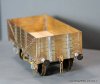
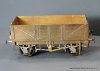
Looks very impressive. I do like to see wagons with different hangers and springs rather than fit all cast white metal ones.


Nice choices, you are not going to be dis-appointed. Peter has a X-Y compound table bolted to the base of his Proxxon pillar drill and - when needed - the bench vice can be bolted to the slides of the X-Y unit.... Chris bought me a Proxxon Mini Pillar drill and a Proxxon Bench Vice for Christmas ...
Can you buy the X-Y table as a separate item or does it only come with the milling version?
In this instance the Bench vice that I was referring to is the swivel headed type that clamps to the workbench so might not be the one that you have? She also got me a small Proxxon machine vice that fits the drill table.


")


Nice work Rob, glad to hear you're feeling better pal. Just going back a few photos can I please ask how you've simulated the ribbing on the van roof? Looks very effective and i've been thinking of ways to replicate the effect myself?
Cheers Mick