Seat casting in resin

Simon

Flying Squad
Having volunteered to produce some seat mouldings in resin for Rob's Mk 2 coaches, I thought I'd share my experiences in the shed as I try to deliver. I am not an expert resin caster by any means, but have had some success (and a lot of failures) It strikes me that casting with polyurethane resin is a generally under utilised DIY method.

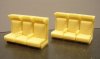
The first stage is a decent pattern, which Rob sent me last week. You have to give some thought to where the moulding rubber is going to get into, in this context the only modification I had to make to Rob's pattern was to push squadron filler under the seat squabs in order to make them "solid", otherwise the rubber would have flowed round under the seat surface and torn as the mould is removed from the pattern.

I am using "Moldsil" silicone rubber, I obtained this from Jacobson chemicals and it cost me  ?70.44 delivered for a 5kg pack. This is a lot - to put it into context this mould is about 150g worth. I will be using Sike G26 Biresin polurethane resin to make the seats.

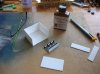
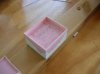
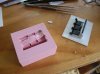
Here is Rob's pattern next to the partly completed mould box, I make these up with Plastikard solvented together, they need to have no gaps (the rubber will creep through the smallest space) and are easy to break down when taking the mould off the pattern. The pattern will be solvented on to the base of the box.


Attachments

  • Seat1.jpg
    Seat1.jpg
    289.4 KB · Views: 138
  • Seat2.jpg
    Seat2.jpg
    260.8 KB · Views: 138
  • Seat3.jpg
    Seat3.jpg
    156.4 KB · Views: 138
  • Seat4.jpg
    Seat4.jpg
    215.7 KB · Views: 138

28ten

Guv'nor
Thanks Simon, I shall be following closely as resin casting is something I have been wanting to try. Out of interest, how much would you say an open wagon body cost to make?
 

lancer1027

Western Thunderer
Looking great Simon :thumbs: 
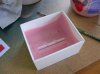
Very interesting to see this develope. My heart sunk :eek: for a few seconds when i saw my seat almost covered in gunk :lol: but i have every faith in what you are doing :thumbs: . Look forward to the next installment.
Rob. Now holding his breath for the end results :thumbs:
 

Simon

Flying Squad
28ten said:
Thanks Simon, I shall be following closely as resin casting is something I have been wanting to try. Out of interest, how much would you say an open wagon body cost to make?

Thinking about my "lowfit", I reckon I used up about 1kg of Moldsil making the mould and its insert. I will make notes when I do the next mould and write them down along with all the calculations of volume etc which I tend to have lost when I come back to use the mould again. Rich's LBSC wagon is a 7mm model so should be directly relevant to your question.

I don't think anything I've produced should have cost more than about ?6.00 each, although I am going to scrap my current (first) lowfit mould owing to the presence of bubbles, which will make the real unit cost pretty horrific until I have knocked out a number of successful castings from the second mould.

I am still in the learning stage and my "whole wagon" projects have each had problems which effectively put the unit cost up (time spent fettling and repairing faulty castings, throwing away some particularly bad results etc) I can cast simple things with pretty much 100% success - packing cases, vacuum cylinders, brake assemblies and hopefully Mk 2 seat units.

What I haven't yet managed is a very deep wagon, my GW 2 plank is the deepest cast I have done so far. My problems with this casting have been getting the stanchions to fill and form properly. It was designed to be a drop on fit to John Dale's chassis kit, which is what my example is built on to.


Attachments

  • 2plank.jpg
    2plank.jpg
    291.6 KB · Views: 115

28ten

Guv'nor
?6 sounds very reasonable :laugh: I know what you mean about the three dimensional thrill, opening a JLTRT kit and picking up a complete western cab is the same :D
I think you are doing the right thing in using a resin body on a metal chassis as that gives the best of all worlds. I am actually thinking that the Syphon i am working on would be a good candidate for a casting the sides and ends
 

lancer1027

Western Thunderer
Hi Simon, I have just finished the double seat for the open second, i just need to make the single then i will post to you if thats ok :thumbs:
Rob :wave:
 

Simon

Flying Squad
Hi Rob

Yes that is fine, look forward to receiving them in due course.

Sorry for lack of update today, I have decided to leave the rubber to "go off" for another day. This is because the overspill on the outside of the box doesn't seem to have set, which hasn't happened to me before.

That said, and as reassurance to you as creator of the entombed seat pattern, this afternoon I opened the second mould for a packing case which I made at the same time as your seat mould and this came out perfectly.

Another update with pics tomorrow.

Simon
 

Simon

Flying Squad
iploffy said:
Any idea 'ow much wonga we ar talkin' bout mister

Ian

I'm not sure yet, but it won't be very much. I will work it out once I have cast a few and see how much resin is used etc.

I don't want to do these commercially but will be very happy to produce whatever is required by members of this group, so long as it all works out at my end and Rob is happy to pattern make. So far I think there is Rob, Phill and yourself that have expressed an interest.

It will give me a great "buzz" to see my little contributions used in such great modelling :)
 

Simon

Flying Squad
Good news!

Detailed report to follow later but I have taken Rob's seat pattern out of its pink tomb and a perfect mould has resulted :thumbs:

The pattern is unscathed :)

Lots of family stuff at moment, I will try and get some casts done over the weekend though.
 

Simon

Flying Squad
Quickish update, here is a picture of the completed mould and Rob's pattern. As you can see, one armrest came off when the mould was removed (since put back on).


Attachments

  • Firstmould.jpg
    Firstmould.jpg
    228.8 KB · Views: 43

Simon

Flying Squad
Just back from the shed, complete with a few first casts in resin from the seat mould.

It wasn't going too well (see casting on left) lots of air entrapment in the armrests and headrests, until I remembered that a dusting of talc in the mould makes a huge difference :headbang:

I think this has the effect of reducing the surface tension of the resin as it enters the cavity, in any event it produced usable results, the casting on the right.


Attachments

  • Seats1.jpg
    Seats1.jpg
    185.4 KB · Views: 29

lancer1027

Western Thunderer
Hi Simon , they look great :bowdown: :bowdown: :drool: . I need 36 of these please mate :thumbs: . Again they look exellent. Its amazing how they have turned out. Just shows what can be done when casting.
Rob :wave:
 

28ten

Guv'nor
That looks pretty impressive! Even if there are a few pin holes it still beats making dozens of them.
 

marsa69

Western Thunderer
The casting on the left can still be used. Heavens knows we've all travelled on enough crappy mk2's in our time :laugh:
 
Top