You are using an out of date browser. It may not display this or other websites correctly.
You should upgrade or use an alternative browser.
You should upgrade or use an alternative browser.
Tom Mallard’s Workbench L&B in 7mm scale and clockwork CR 828, 4mm Saints
- Thread starter Tom Mallard
- Start date
Tom Mallard
Western Thunderer
I'm looking forward to seeing the pictures too, but prefer to use daylight as the main light sourceHi Tom,
I'm really looking forward to seeing the pictures of the K3 tender, I need to really settle on a loco for my build and up my knowledge on the detail differences. I knew the group standard tender had differences but there's seems to be so many?
ATB Mick
I found the Bradwell instructions cover the detail differences extremely succinctly, though as always I recommend selecting your preferred prototypes first then research around them, but maybe I am looking at this from the viewpoint of someone who is often prescribed his work? It helps to do this rather than a broad brush approach which I have found can confuse matters a little. The RCTS books do seem to highlight the key differences used in each class as they are addressed, and this is no different for the K3. Knowing the contractor for the engine will define which tender got used with it, then work on from there finding other pictures of the batch in the period you wish to model. This K3 tender will be a low front one (nearly all the ones on the K3's were of this type) but often they had riveted tanks with separate coal sheets. Revisions to the design include relocation of the rear coal plate (moved forward and increased in height leaving same bits of interesting looking angle) and the removal of one vacuum reservoir from the tank top on the vacuum braked ones.
Did you sort out a GA for the group standard tender? Apart from Martin Finney's kit, how are you planning to build the tender?
Best regards
Tom
Tom Mallard
Western Thunderer
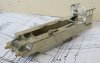
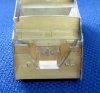
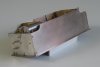
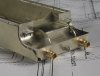
Here's a couple of pictures of the K3 tender. Apart from the new overlays, the tank has been modified by filing lots of rivets off the etched Martin Finney parts as I am representing a welded tank.
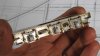
Although I borrowed the frames from the Finney kit as a template to reproduce the rivet locations on the new 15 thou nickel silver frames, I copied the external bearing slots from the Dave Bradwell kit. Regular top-hat bearings are used with a little carrier topped with the spring wire as per many after market wagon underframe kits.
Tom
Attachments

dibateg
Western Thunderer
Hi Tom - I used an Isinglass drawing as a guide and starting point ( I don't know where it was derived from ) , but most the reference for detail differences came from the photos in the Yeadons K3 book. They are certainly sport a host of detail differences..
Best Regards
Tony
Best Regards
Tony
Tom Mallard
Western Thunderer
The B2 wasn't standing idle inspite of the lack of etched add-ons. Maybe I am further on with it than I think, but I cannot complete the chassis until some new spring/keeper plate etched and associated frame brackets turn up, not to mention the replacement B17 style of brake pull rod arrangement. The footplate was revised, too, preventing me from attaching all the main body together, so it'll hopefully look better soon.
Best regards
Tom
Best regards
Tom
Attachments
Tom Mallard
Western Thunderer
From what I've heard, the Isinglass drawings are developed from original information in many cases, and in the past I have been able to get copies of originals held by his son who holds the collection now. These drawings are referred to on the Isinglass website, or certainly were the last time I looked.Hi Tom - I used an Isinglass drawing as a guide and starting point ( I don't know where it was derived from ) , but most the reference for detail differences came from the photos in the Yeadons K3 book. They are certainly sport a host of detail differences..
Best Regards
Tony
The main problem of course is that they simply don't have enough information to make an accurate model, and so a GA is your best bet. Yes, they do host many differences, and these won't be on most GA drawings but somewhere on a detail drawing in the NRM archive. Sometimes as in the case of the modified 4700 gallon tender attached to the B2 I am building, then a useful drawing outlining the changes was made, so there may be hope. If you do use Martin's kit, I think you can trust that he has done his homework and much of this research has been done for you.
Best regards
Tom
7mmMick
Western Thunderer
I'm looking forward to seeing the pictures too, but prefer to use daylight as the main light source
I found the Bradwell instructions cover the detail differences extremely succinctly, though as always I recommend selecting your preferred prototypes first then research around them, but maybe I am looking at this from the viewpoint of someone who is often prescribed his work? It helps to do this rather than a broad brush approach which I have found can confuse matters a little. The RCTS books do seem to highlight the key differences used in each class as they are addressed, and this is no different for the K3. Knowing the contractor for the engine will define which tender got used with it, then work on from there finding other pictures of the batch in the period you wish to model. This K3 tender will be a low front one (nearly all the ones on the K3's were of this type) but often they had riveted tanks with separate coal sheets. Revisions to the design include relocation of the rear coal plate (moved forward and increased in height leaving same bits of interesting looking angle) and the removal of one vacuum reservoir from the tank top on the vacuum braked ones.
Did you sort out a GA for the group standard tender? Apart from Martin Finney's kit, how are you planning to build the tender?
Best regards
Tom
Hi Tom,
I've not yet made it to the NRM but a visit with Mick Nicholson is planned in a few weeks time. I've had loads of help from Tony with research and sourcing castings etc. I have the Green book and yeadons and the picture attached maybe my chosen build as its taken at Dairycoates in the early fifties, which is ideal.
![.149 - 61965 Hull Dairycoates[1].JPG](https://www.westernthunder.co.uk/data/attachments/31/31330-6a640954576454dead0428afe5e7d116.jpg ".149 - 61965 Hull Dairycoates[1].JPG") 61965 is an Armstrong Whitworth built engine and was resident at Daiycoates from 05/10/47 until withdrawl in 1962 so again this suits my 1948-1952 modelling period. I plan to make a start on this build towards the back end of the summer so will watch your progress with great interest,
61965 is an Armstrong Whitworth built engine and was resident at Daiycoates from 05/10/47 until withdrawl in 1962 so again this suits my 1948-1952 modelling period. I plan to make a start on this build towards the back end of the summer so will watch your progress with great interest,Hi Tom - I used an Isinglass drawing as a guide and starting point ( I don't know where it was derived from ) , but most the reference for detail differences came from the photos in the Yeadons K3 book. They are certainly sport a host of detail differences..
Best Regards
Tony
Here's hoping mine turns out as nice as yours Tony

ATB Mick
7mmMick
Western Thunderer
Here's a couple of pictures of the K3 tender. Apart from the new overlays, the tank has been modified by filing lots of rivets off the etched Martin Finney parts as I am representing a welded tank.
Although I borrowed the frames from the Finney kit as a template to reproduce the rivet locations on the new 15 thou nickel silver frames, I copied the external bearing slots from the Dave Bradwell kit. Regular top-hat bearings are used with a little carrier topped with the spring wire as per many after market wagon underframe kits.
Tom
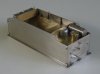
Very nice clean work Tom, would it be possible to see a front on image of the coal space when time permits please ? Just so I can see the low fronted tender arrangement,
Many thanks Mick
7mmMick
Western Thunderer
Is that a dropped well centre on that 4200 group standard tender?, if so, how does the intermediate axle pass through it?
I'm also looking to get the group standard 4200 Gal GA from NRM, but for the V2 and B1 classes, as yet I've no idea what revision I need, as already noted, there appears to be quite a few
It's all looking very good so far

Hi Mick,
I've not had a good chance to look through the lists yet but I'm assuming there's plenty to go at for the various tenders. Is there a reference to which tenders were coupled to which class of loco?
ATB Mick
Tom Mallard
Western Thunderer
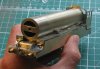
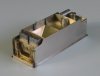
Sorry for the delay, Mick.Very nice clean work Tom, would it be possible to see a front on image of the coal space when time permits please ? Just so I can see the low fronted tender arrangement,
Many thanks Mick
Hopefully this pic will shed some light on the arrangement of low fronted group standard tender. Unfortunately it also shows I need to finish off the model properly!
Best regards
Tom
Attachments
Tom Mallard
Western Thunderer
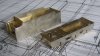
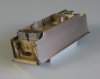
Things have moved on quite well, the tender chassis has been up on it's wheels (a fraught process springing the wheelsets into position) and then down off them again whilst I review the sideplay controlling washers. Most of the detailing is done with the replacement steps formed from 8 thou nickel silver as mentioned previously and the brakegear, vacuum brake arrangement and water scoop gear all getting a look in. It's quite complicated between the frames and mostly the details end up just as murky silhouettes!
Other areas which are close to completion are new parts which have been sorted for the footplate and associated layers. These take into account the lack of a valence and give strength to the assembly and consistency with the engine. and it is a case of choosing where the holes for the fixing screws ought to go.
Best regards
Tom
Attachments
Tom Mallard
Western Thunderer
No problem, Mick.Tom, In the background to your photos is what looks like a GA for the 4200 GST , do you have a drawing number please so that I can order a copy from NRM or at best find it in the list.
This is a drawing that is from Armstrong Whitworth of 1930, so not the one I am modelling and it has a valence shown. The number is 12466, the drawing title is Tender General Arrangement (Elevation & End View).
I am sure there must be lots of others, not least ones which show the plan view...
Best regards
Tom
Tom Mallard
Western Thunderer
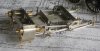
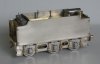
The hybrid tender bodywork has reached a point close to completion, and awaits just the handrails (which I am always undecided on attaching before painting) and doors.
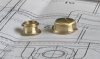
Apart from the homemade sides, footplate, steps and lamp-irons, I have used mainly Martin Finney etchings with the rivets filed off, Martin's castings for the tender front (apart from the tap which is from my own pattern) with a Dave Bradwell casting for the water filler. I used 0.3mm wire for the fire iron holders, and this looks so much better than an etched item.
The lamp irons are something I generally replace on 4mm scale models with ones made from laminated 4thou nickel silver for the complex one at the top, and bent up 8 thou nickel silver for the lower ones. The bend is completed in my vice with a very small hammer to give a good sharp bend which meets the back edge of the lamp iron's foot.
I have not attached the toolboxes or vacuum tank in an effort to help simplify painting of the model.
Tom
Attachments
Tom Mallard
Western Thunderer
Thanks very much Mick - very kind of you.Absolutely fantastic Tom, lovely work
ATB Mick
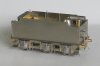
I have more or less finished the tender now, leaving a few parts on the chassis unattached (they prevent wheelset removal) until after checking for ride height against the engine and trackholding.
Best regards
Tom
Attachments
7mmMick
Western Thunderer
Hi Tom,
That really does look the business. Are you aware if any of these castings are available in 7mm, especially the tank filler and axle box spring hangers, they're very nice. I started reading the green book last night on the K3, looks like even the can sides are a minefield, lots of research to do with this one,
ATB Mick
Tom Mallard
Western Thunderer
Sorry Mick,Hi Tom,
That really does look the business. Are you aware if any of these castings are available in 7mm, especially the tank filler and axle box spring hangers, they're very nice. I started reading the green book last night on the K3, looks like even the can sides are a minefield, lots of research to do with this one,
ATB Mick
The spring hangers and filler are specific to Dave Bradwell who only does 4mm scale. I still reckon that if you can afford it a very good place to start is Martin Finney's group standard tender kit. Admittedly it doesn't cover all variations but it gets you going. Plus the 7mm scale castings he supplies are usually a little more detailed than those in the 4mm scale versions of his kits and are always well produced. The chassis is designed as a compensated arrangement, and I think to spring it would not be particularly straightforward so it depends what you want. If you are set on scratchbuilding, I cannot think of a source for even a small number of the requisite castings in 7mm scale.
Best regards
Tom
Steph Dale
Western Thunderer
I still reckon that if you can afford it a very good place to start is Martin Finney's group standard tender kit....
...The chassis is designed as a compensated arrangement, and I think to spring it would not be particularly straightforward so it depends what you want.
Tom,
I must admit I've not had a close look at Martin's LNER Group Standard tender, but if the chassis is like those under his LNER 8-wheelers and the Stanier, Drummond, Adams and GWR tenders (i.e. plain slots with axles running on beams) the it was one of the thoughts in mind when I designed my hornguides. Mick'd have to put up with normal 3/16" axles on his tender rather than the 5/16" axles Martin recommends, but I'd contend that the building of Martin's tenders with springing (and split-axle pick-up if you want it) just got a whole lot easier.
I keep having to remind myself I'm looking at a 4mm model with the photos you've posted, most impressive!
Steph
Tom Mallard
Western Thunderer
Back on with the B2 and the front end is moving gently in the right direction. Still waiting for my etches (since April) - what a farce that is turning out to be.
The whole of the upper works is built upon a jig to hold the valence in place which makes life much easier whilst building up the main parts. None of them can really be tested until the centre section of the footplate and splashers is in place, but this is on the etch I'm waiting for...
The front end of this Thompson rebuild has a fair few steps and rebates to get right. The middle part is a fold up etch, and the cosmetic frame extensions drop in to slots either side. I like my coupling hooks to be nice and sturdy, so they're made up from a double lamination of 10thou which looks better than just a single thickness. Each buffer base is drilled out for some wire to represent the bolt heads.
I took to my lathe so the chimney and dome could be done. Had to have two goes at the dome after a burr I was using took a chunk out the skirt. The chimney for these engines looks quite different to a lot of Gresley designs and I wonder if it was influenced by others at Darlington?
Previous to the B2 was some revision/refurbishment/refinement of an aged Guy Williams model. This was such a privilege to be asked to do, but I still worried about the outcome and made sure we could keep as much original material as possible.
Attachments
Tom Mallard
Western Thunderer
Significant progress this time round (to my mind) in that the main components of the body have been fitted and fettled to generate a good fit. I finally recieved some useable etches of the footplate and brakegear etch I'd been waiting for so the footplate was re-started straight away.
The splasher faces are furnished with a little rebate into which the top sits which is filed carefully to fit against the boiler and firebox. Clearance between the firebox sides is minimal between the backs of the wheels so I removed material here where it could impinge. These P4 models always seem to end up an exercise in clearances...
The chassis has been worked on to obtain a free-rolling motion. I start with the rods and work outwards, the last part addressed being the return crank and eccentric rod. I always find some small misalignment somewhere which creates far more resistance or drag than one imagines is possible, but once sorted it makes so much difference.
The Dave Bradwell chassis components have lots of nice little design features to help things fit together or create little jigs for assembly. There are also some really nice cast brass covers for the return crank bearing.
The picture of the chassis shows how close all the motion runs together. The assembled bodywork is one of multiple dry-runs to see how things are looking. The Wakefield lubricators are from castings I had done for the O2 locos which are on my webpages and which also featured in MRJ.