You are using an out of date browser. It may not display this or other websites correctly.
You should upgrade or use an alternative browser.
You should upgrade or use an alternative browser.
Martin Shaw
Western Thunderer
Adrian
This is what I have, Model 000 Quick Change Tool Post - Arc Euro Trade. I don't have any difficulty in maintaining alignment, perhaps the only time I might check it is prior to parting off. I agree though the demands on spare money are varied and great.
Regards
Martin
This is what I have, Model 000 Quick Change Tool Post - Arc Euro Trade. I don't have any difficulty in maintaining alignment, perhaps the only time I might check it is prior to parting off. I agree though the demands on spare money are varied and great.
Regards
Martin
Rob Pulham
Western Thunderer
Thanks for the pointers Gents,
I think I am going to start off with the basics and work my way up if the bug bites - I seem to recall enjoying lathe work at school even if I was a little nervous at the time but it's a long time ago. One of the reasons for buying this one is it's very small size which will fit on my small workbench area and then can be stored in a cupboard when not in use.
If all works out as planned we hope to move in the next 3-5 years and one of the criteria will be a bigger workshop/studio for Chris and I to play. Depending on how much use it's had I may then consider buying something a little more sturdy but in the meantime i plan to use this for small detail turnings, centre drilling (something I struggle with even with my Proxxon) and insulated bushes/split axles using my stash of GRP kite rod.
Richard Spoors
Western Thunderer
I can fully recommend this quick change toolpost which I use on my Unimat 3
Quick Change Toolpost for Unimat 3 & 4 Lathes
Regards
Richard
Quick Change Toolpost for Unimat 3 & 4 Lathes
Regards
Richard
Rob Pulham
Western Thunderer
Thanks Richard,I can fully recommend this quick change toolpost which I use on my Unimat 3
Quick Change Toolpost for Unimat 3 & 4 Lathes
Regards
Richard
I did find that example having just received a Chronos newsletter, my only concern was whether it would fit my SL because they are quoted for fitting the Unimat 3 and 4 - I noted also that there seems to be a couple standard threads. 12mm and 14 mm can anyone tell me what mine is likely to be?
Steph Dale
Western Thunderer
12mm I think Rob. You could always measure it!
Steph
Steph
Rob Pulham
Western Thunderer
I can and will but I must confess I am never really comfortable measuring threads but I suppose that it should be simple given that there is 2mm difference in the two.12mm I think Rob. You could always measure it!
Steph
Steph Dale
Western Thunderer
Yeah - but you could do it the easy way; wrap a turn of paper around the shaft/thread and mark where they overlap. Flatten the paper, measure the distance between the two marks and divide by 3 will give you a very good idea of the shaft size and may be easier than trying to get calipers in a confined space.
In terms of measuring external threads (e.g. screws, bolts, headshafts) you can measure them exactly as you would a shaft - the quoted size for a thread is always based on the dimension over the threadform.
Steph
In terms of measuring external threads (e.g. screws, bolts, headshafts) you can measure them exactly as you would a shaft - the quoted size for a thread is always based on the dimension over the threadform.
Steph
Richard Spoors
Western Thunderer
Thanks Richard,
I did find that example having just received a Chronos newsletter, my only concern was whether it would fit my SL because they are quoted for fitting the Unimat 3 and 4 - I noted also that there seems to be a couple standard threads. 12mm and 14 mm can anyone tell me what mine is likely to be?
Rob, it should do as it has 12mm T nuts with 6M thread.
Regards
Richard
Rob Pulham
Western Thunderer
Yeah - but you could do it the easy way; wrap a turn of paper around the shaft/thread and mark where they overlap. Flatten the paper, measure the distance between the two marks and divide by 3 will give you a very good idea of the shaft size and may be easier than trying to get calipers in a confined space.
In terms of measuring external threads (e.g. screws, bolts, headshafts) you can measure them exactly as you would a shaft - the quoted size for a thread is always based on the dimension over the threadform.
Steph
Thanks Steph, I hadn't realised that the thread is alway measured over the threadform, as they say every day is a school day
 .
. Now for complete dummy moment. The drill chuck has 12x 1mm engraved very prominently along the side......
Overseer
Western Thunderer
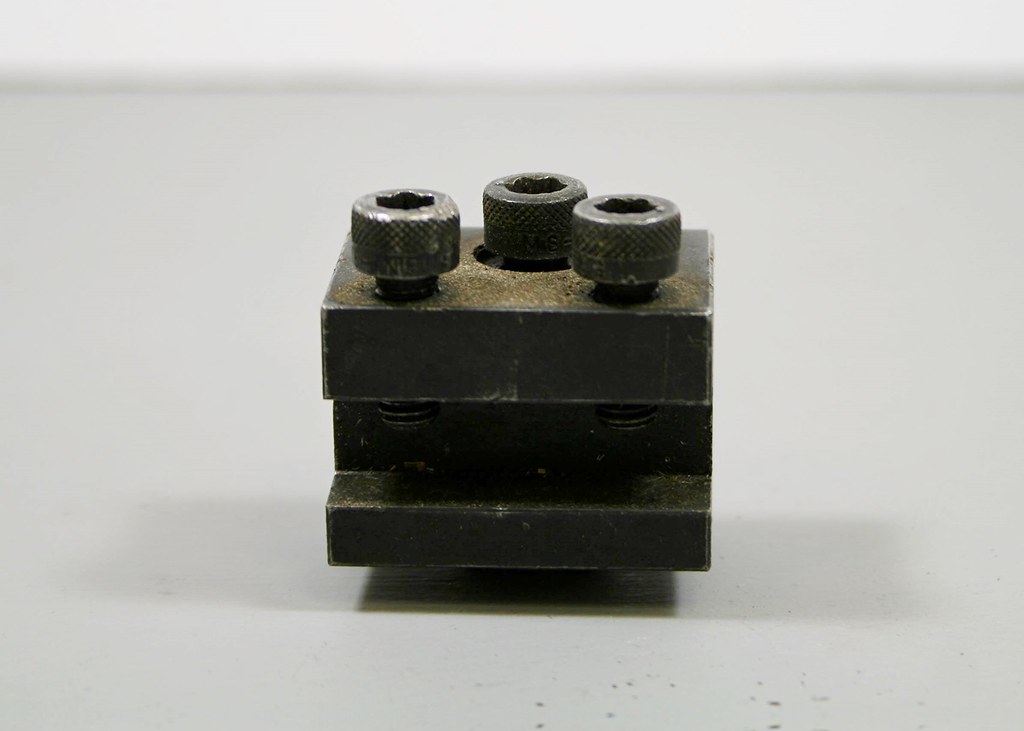
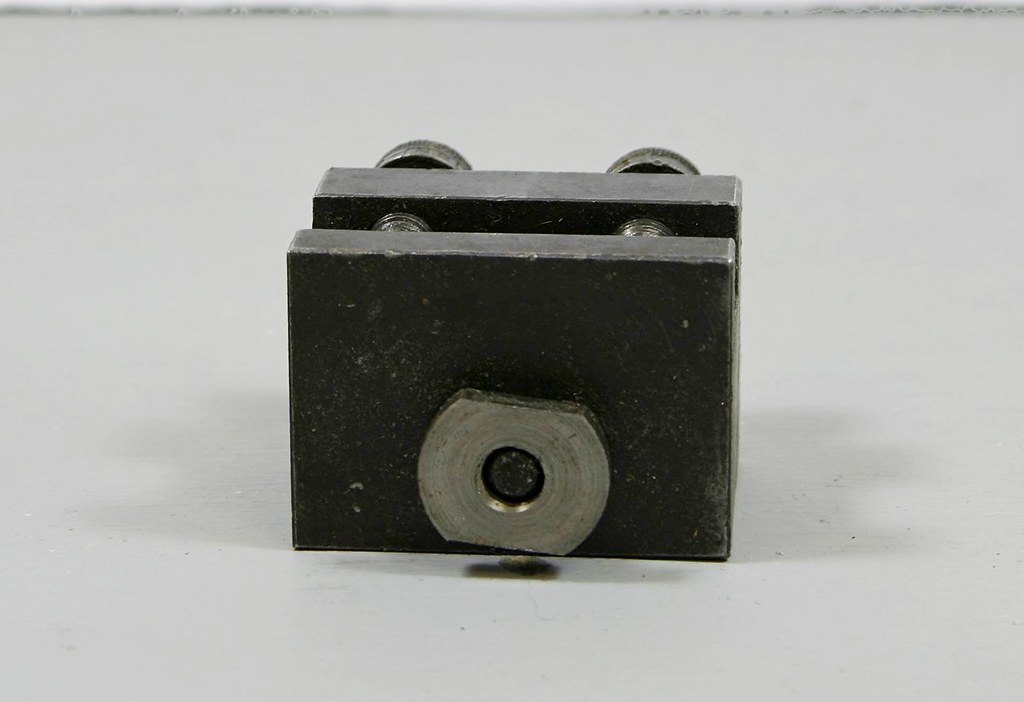
The tool post for the SL is around 8.5mm lower in the tool holding slot height than the Unimat 3. A quick change tool post for a 3 may work on an SL if it can be adjusted low enough but much better to get the correct one if you can. The comparison is here -

Unimat 3 post on left, SL on right.
The lathe needs a good clean. Instead of the standard 3 jaw chuck the ER16 collet holder from Chronos (quite a few years ago) is fitted.
Unimat 3 post on left, SL on right.
The lathe needs a good clean. Instead of the standard 3 jaw chuck the ER16 collet holder from Chronos (quite a few years ago) is fitted.
Rob Pulham
Western Thunderer
Thanks Fraser,
In the end I opted for a middle of the road twin height tool post which was slightly more than the basic model but not as much as the quick release version. I also got a parting of tool and a small set of assorted cutting tools to get me started. With the remainder of my meager budget I also bought a few feet of belt making material. - All from RDG. good service, I spoke to them on Monday to confirm that the cutting tools would be suitable for my lathe and I received them yesterday.
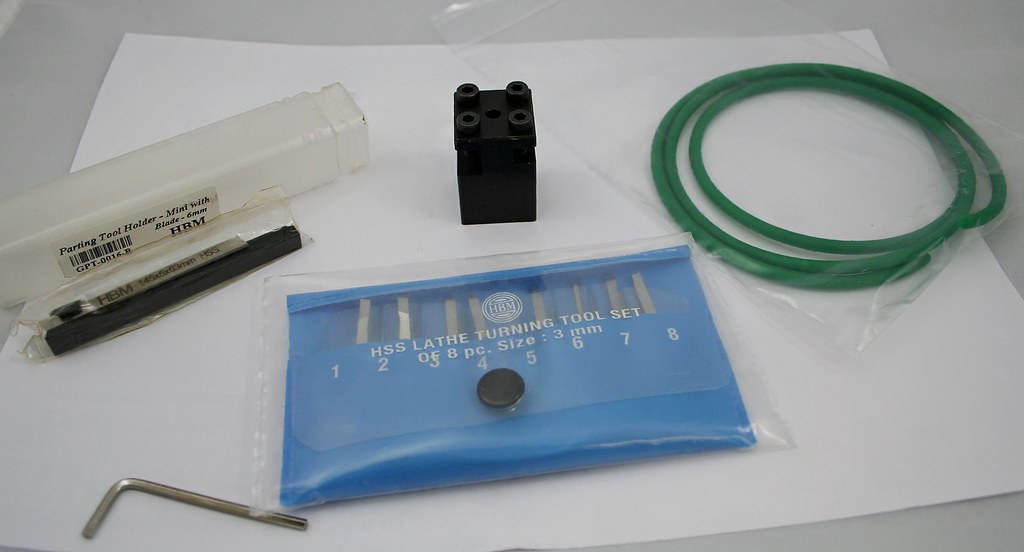
Unfortunately with it being black in colour you can't really see any detail of the tool post....
In the end I opted for a middle of the road twin height tool post which was slightly more than the basic model but not as much as the quick release version. I also got a parting of tool and a small set of assorted cutting tools to get me started. With the remainder of my meager budget I also bought a few feet of belt making material. - All from RDG. good service, I spoke to them on Monday to confirm that the cutting tools would be suitable for my lathe and I received them yesterday.
Unfortunately with it being black in colour you can't really see any detail of the tool post....
Rob Pulham
Western Thunderer
Last Friday I finally got around to trying to fit the tool post to have a go at actually turning something. I was somewhat dismayed to find that the tool post is far too tall taking the cutting tool way above the centre line.
A phone call to RDG clarified that the toolpost I bought is for the Unimat 3/4 and indeed despite saying basic Unimat in the descriptions none of their tool posts will fit the Unimat SL. To be fair they did off my money back if I returned it and gave me the phone number of Pro Tools who might have a tool post for the SL.
In the end neither Pro Tools or Chronos have a tool post to fit the SL and after doing a bit of searching I have bought a second hand one from the US $20 for the post which was very reasonable and an eye watering $49 for postage. Having looked at a couple of others that were more expensive with similar postage I bit the bullet and ordered it. I just hope that I don't get stung for import duty as well or I will be crying
Brian McKenzie
Western Thunderer
Was shortening the height of the toolpost ex RDG not an option ?
Rob Pulham
Western Thunderer
Hi Brian,
That was going to be my next point of exploration if I hadn't been able to find one. I don't have the equipment to shorten it so I would have had to have found someone who could. Sadly despite its small size it's still quite a chunk of metal to cut short and square up again.
That was going to be my next point of exploration if I hadn't been able to find one. I don't have the equipment to shorten it so I would have had to have found someone who could. Sadly despite its small size it's still quite a chunk of metal to cut short and square up again.
Ian_C
Western Thunderer
Rob, if you end up needing any bits & bobs machining drop me a line. Happy to help.Sadly despite its small size it's still quite a chunk of metal to cut short and square up again.
Rob Pulham
Western Thunderer
Many thanks Ian,
Your offer is much appreciated.
Your offer is much appreciated.
Rob Pulham
Western Thunderer
The tool post arrived this morning from the US and it came straight to me without incurring any additional import/Royal Mail charges for which I made a sigh of relief.
At this point I must also publicly thank Adrian for his generosity in not only turning the replacement brake cylinder casting for me but for also slipping a couple of workshop technique books into the package when he sent it. It was/is very much appreciated.
A posting on WT wouldn't be complete without a couple of photos
Adrian's wasn't the only bit of generosity I have received in my small saga with the lathe. There was Ian with his kind offer to machine the part that I had bought in error, and again it was much appreciated.
Then last but not least a gent on another forum where I had been having a similar discussion, asked me dimensions because he had a toolpost in his shed going spare. When I confirmed with Bob (I only know his first name) that it would fit he offered to send me it FOC.
I sincerely hope that I can return a favour to you all at some point
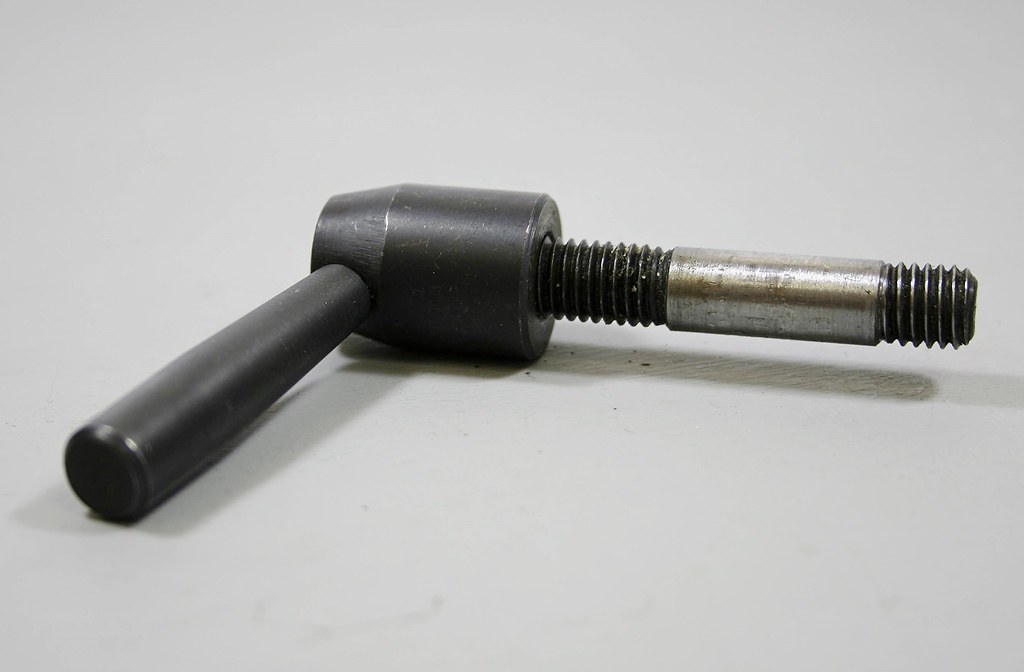
This is what was left with a neighbour while I was at Doncaster on Saturday
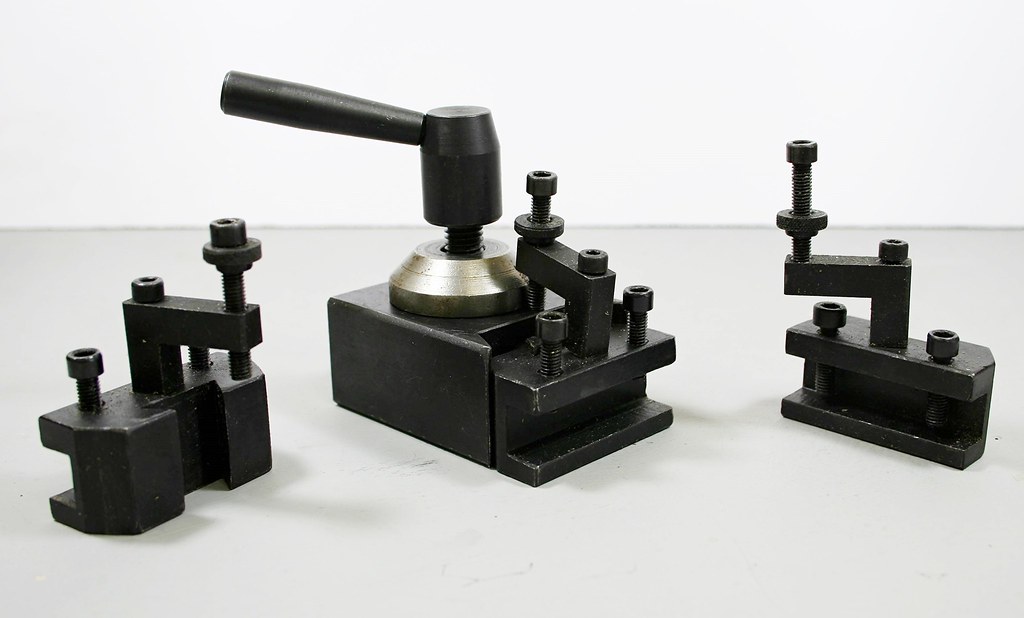
It needs a small amount of work on the locking shaft to make it fit my T Nut - the thread is 9mm whereas my T nuts are 6mm so one of my first jobs will be to turn the short thread below end below down and rethread it 6mm - Adrian had also suggested that if I couldn't turn it on the lathe (I didn't have the other toolpost at the point we discussed it) I could always chop the end off then drill and tap the remainder 6mm. I could then cut the head off a 6mm bolt and epoxy it in to create the bottom part of the thread. This would have been easily achievable with the tools that I have and I had considered that I might have a go if the toolpost hadn't arrived in a reasonable timescale.
My conclusion is that despite all the doom and gloom in the wider world, there are a lot of very nice people within our world of model railways.
At this point I must also publicly thank Adrian for his generosity in not only turning the replacement brake cylinder casting for me but for also slipping a couple of workshop technique books into the package when he sent it. It was/is very much appreciated.
A posting on WT wouldn't be complete without a couple of photos
Adrian's wasn't the only bit of generosity I have received in my small saga with the lathe. There was Ian with his kind offer to machine the part that I had bought in error, and again it was much appreciated.
Then last but not least a gent on another forum where I had been having a similar discussion, asked me dimensions because he had a toolpost in his shed going spare. When I confirmed with Bob (I only know his first name) that it would fit he offered to send me it FOC.
I sincerely hope that I can return a favour to you all at some point
This is what was left with a neighbour while I was at Doncaster on Saturday
It needs a small amount of work on the locking shaft to make it fit my T Nut - the thread is 9mm whereas my T nuts are 6mm so one of my first jobs will be to turn the short thread below end below down and rethread it 6mm - Adrian had also suggested that if I couldn't turn it on the lathe (I didn't have the other toolpost at the point we discussed it) I could always chop the end off then drill and tap the remainder 6mm. I could then cut the head off a 6mm bolt and epoxy it in to create the bottom part of the thread. This would have been easily achievable with the tools that I have and I had considered that I might have a go if the toolpost hadn't arrived in a reasonable timescale.
My conclusion is that despite all the doom and gloom in the wider world, there are a lot of very nice people within our world of model railways.
Rob Pulham
Western Thunderer
I have managed to have a further play with my lathe today and one thing that I have noticed is that the cross slide feed has a lot of play in it.
I discovered this as I was turning a new axle pin for my Hobby Holidays axle jig having bent one and not got around to buying a replacement from Phil (I have the 5 axle version and so far I haven't needed them all). I was turning a length of 3/16 silver steel to have a pin that will fit the holes in the coupling rods and I was almost there when on what I hoped would be the final fine cut the play play allowed it to cut too deep and no the pin is under size.
It's no big deal as I have plenty of the rods left to have another go but I thought I would ask if anyone knew how I might reduce the play?
Or is it a case of trying to find a replacement topslide?