mickoo

Western Thunderer
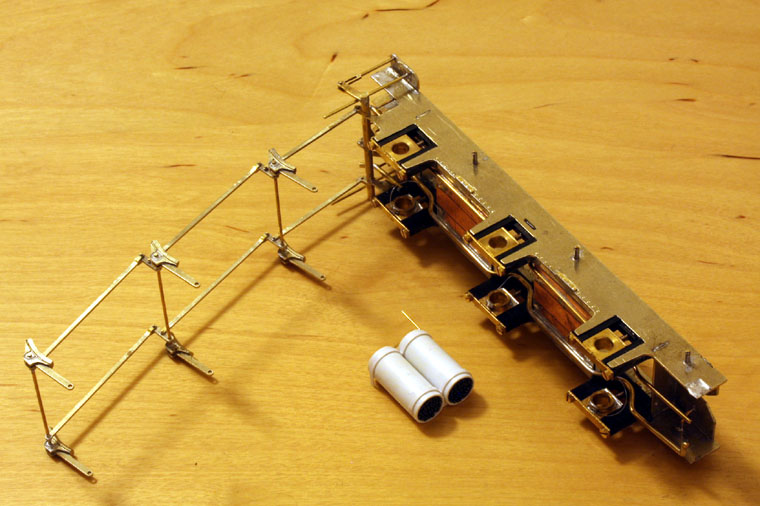
A little more of the tender.

After May 48 the W1 received the streamlined non corridor tender (5639) from A4 60004 which it ran with until withdrawal.

The basic tender is the same but some notes indicate the shovel plate was extended, though those notes are specific to the previous corridor tender they are not specific to the replacement A4 tender as far as I can ascertain.

It's a simply build, follow the yellow brick road and a couple if days later a tender body is ready for fitting.

IMG_0260.jpg

It's not quite finished, beer and some R&R have stopped play for the evening but essentially everything behind the front plate is complete except buffer housings and tank filler, the buffer housings will go on tomorrow, the tank filler when we get the new stock of castings. As such the whole front end is just placed into position so there are a few gaps between bits and pieces.

IMG_0261.jpg

There's a fall plate to go over the coal opening and the tabs to bent up on the fixings that hold the streamlined casing smoke box door handle, but other than that, everything above the shelf is done, all of the remaining work is the handles and fittings below and door which I cut off by mistake...:rolleyes: I haven't extend the shovel plate, the information is in-concise.

The front end on the A4 and W1 is the high (original) type, if you use this tender on an A3 then there's a lower front end you can fit.

Primarily the lower front end was developed to prevent the slipstream creating a vacuum in the cab, the A4 and W1 have a weather cover, the A3 does not. With the cab roof and tender fairing being the same height (sans weather cover) at high speed the slipstream creates a vacuum and fills the cab with swirling dirt and debris. By lowering the tender front a vortex is formed which destroys the slipstream and thus the vacuum effect. There's many a yarn of A4's being near un-driveable at high speed if the weather cover was damaged.

IMG_0262.jpg

Other than buffer housings and hook the rear end is complete, the lamp irons take a little care and the joint between the two halves will benefit from a bead of paint between them to close the small gap, if you're clever or skilled you could use solder, I'm not or that brave, so paint or dilute PVA works well to seal the seam before painting.

IMG_0264.jpg

Higher elevation, more the view we're used to, the space for the tank filler being obvious, forgot to add the streamlined faring above the front end needs adding once the front end is in and secure.

Overhead view.

IMG_0267.jpg

There's still some ugly solder to clean up, a wash in Cillit Bang reveals all your woes :cool:

It's smooth enough for painting but for instruction photos, it has to go, annoyingly, this was solder free until the next but last test fit of the coal bunker, a reheat of the joint allowed the solder to weep through to the visual side :mad:

There's a few other places that need a scrub and clean, but overall it's just about reasonably presentable for photography.

Enjoy.

MD
 

mickoo

Western Thunderer
Hi Mick, any progress with the resin boiler?

Cheers

Richard

Yes, it is in hand and we had a discussion at Doncaster on how and where the extra fittings were going to go on the inside for additional fixings to the footplate.

The other bespoke brass castings for springs, hangers, brake cylinders and shafts as well as injectors are well in hand too.

Once we have all the pieces in play then there will be one more final test build of everything to make sure it all fits out of the box as well as making new high quality photos for instructions.

Mick D
 

mickoo

Western Thunderer
And that, as they say, is that. Didn't manage to beat the sun so a couple of indoor shots with the instruction ones tomorrow in daylight once the buffer housings have been put on.

The front end is now all complete and fitted.

IMG_0268.jpg

It was clean only moments ago but attracts fluff like nothing else.

Internally a few webs and gussets to add as well as the two vent pipes, hard enough to bend one right, even harder to bend a second that matches :D

IMG_0275.jpg

The lamp has reflected off the sloped coal plate and made it look like a floodlight has been placed in there, quite a neat effect which I didn't notice until it was processed.

IMG_0276.jpg

A quick check with the engine and all is well, the W1 tender after 1948 had the shorter handrails at 4'-3" the engine was 4'-6" but something is a miss as the difference between the two looks greater them 3" :confused:

IMG_0271.jpg

IMG_0273.jpg

Enjoy

MD
 

Dog Star

Western Thunderer
Mick,

What about the hole in the wood floor for the wash bucket?

And the water level gauge behind the side door?
 

mickoo

Western Thunderer
It's a straight build out of the box for instruction purposes, if there's no bucket hole in the floor in the original then there is no bucket hole in the re-release.

Sorry, but running a whole new etch and photo tool for one hole in the floor is just simply prohibitive. If you wish to make the bucket hole then the dia is 5.25 mm, approximately, give or take.

Water level gauge is fitted to the left side of the tender as it should be, but I have not added the handle.....I have more pressing priorities. The photos from yesterday were clearly noted as incomplete and that the whole front end needed to be finished, the photos from today do not reveal the left side of the tender front.
 

mickoo

Western Thunderer
Just to close out some decent shots outside today, four ¼ views to hopefully show everything is in place (still no bucket hole Graham.....sorry ;)).

Other than the tank filler casting (new production run) and hook (fitted after painting....as will be the buffer heads and hoses) this what you get when you tip the bits out of the box.

IMG_0277.jpg

IMG_0279.jpg

IMG_0280.jpg

IMG_0282.jpg

The tender has been built to represent an A4 type with high front end as would be fitted to the W1 (5639) and I've changed the lower shovel plate door for the solid version which some notes indicate happened on A4 tenders.
The solid lower door and upper doors, were fitted to all low front tenders when fitted to A3 engines where the front end was modified and cut down. I've no proof solid upper doors were fitted to A4 tenders, but there's a lot of tenders to choose from and if Doncaster found reason to fit solid ones to cut down fronts, then they may well have done so for the original high fronts as well.

Next up in this project is the W1 backhead build up and detailing for instruction photos.

MD
 
Last edited:

mickoo

Western Thunderer
In and out of the paint shop.

IMG_0419.jpg

IMG_0422.jpg

IMG_0423.jpg

IMG_0424.jpg

Just realised I've forgotten to paint the steam heat pipe glad hand.

Also into the paint shop shortly is the corridor tender.

IMG_0412.jpg

IMG_0414.jpg

The chassis is waiting for a few white metal bits to arrive before finishing but apart for the tank filler the body can go into the paint booth, certainly in primer to stop it tarnishing any further. Recently I seem to be developing an overtly irrational distaste for brass.

On the inner chassis I played about with the brake rigging to try and make it removable easier, that on the streamlined tender is a bit of a faff truth be told.

IMG_0402.jpg

The rear brake hanger was made into a pivot which allows the whole brake rigging to be rotated out of the way.

IMG_0403.jpg

Small stubs for the other hangers allow them to be sprung on when the rigging is folded over, the front end presented a bit of a conundrum.

IMG_0404.jpg

Small bore tube was used to fix the brake levers in place, corresponding pegs in the frame clip into the holes.

IMG_0406.jpg

The final assembly drops neatly into the cosmetic frames.

IMG_0408.jpg

MD
 

Steph Dale

Western Thunderer
Y'know, I think that's only the second time I've seen someone attach brakegear like that to a tender chassis. In my case I hinged it off the business end as I thought it would be easier for the tender I was building:

secrl22.jpg


Steph
 

mickoo

Western Thunderer
Nice :thumbs:

It certainly makes life much easier, in actual fact you could probably get rid of the stubs for each intermediate hanger and rely on the rear pivot and front brake shaft on mine, the twin brake pull rods make for a fairly durable set of rigging all told.

Next across the bench is the third LNER 8 wheel tender in the range, the GNR coal rail version. It has been part started and the chassis is all but finished, so no need to repeat words and pictures from above.

The brass has survived long term storage remarkably well, better than some new kit etches I've received truth be told, however the steel axles and wheel rims have not. Even if they'd been blackened I think they would of suffered, maybe not as badly but suffered none the less, hence my religious oiling of the shafts and rims to keep this at bay.

IMG_0428.jpg

They'll clean up fine so that's the task for this evening, a nice scrub, polish and bath, then blackening and a film of oil to preserve them.

MD
 
Last edited:

mickoo

Western Thunderer
There, much better :thumbs:

IMG_0432.jpg

They'll get a wipe with a lint free cloth and I think I can see some tarnishing on one of the rims so might cut that one back and do it again, they were all bright silver before the blackening so not quite sure what that tint is. Couple of washers made a run for it so substituted some others from stock, they're slightly thicker, which is good as it limits side play at the front and rear a little more.

MD
 

mickoo

Western Thunderer
Brian, doesn't matter who it was, I only posted them up to show what happens if they are not protected, more importantly, if they do get like this then don't despair as they can be cleaned and recovered nicely.

What is strange is that of the four wheel sets only two are badly corroded, the far right set only needed a quick rub with a soft fibre brush and it was like new.

All, as you know, were in the same box and fitted to the chassis, so it's strange you had such localised corrosion.

MD
 

mickoo

Western Thunderer
One of the problems of nice clean models is photographing them with out burn outs from the bright areas and it's often hard to see the details.

So as a trial I've primed the corridor tender body and taken some photos in shade and full sun, it certainly helps bring out the details for modellers.

Shade

IMG_0441.jpg

IMG_0443.jpg

Sun

IMG_0457.jpg

IMG_0458.jpg

The sun ones, whilst pretty also suffer from loss of detail but the neutral shade ones seem to work better.

They also show all the gaps that now need filling with Milliput :eek:
 
Last edited:

mickoo

Western Thunderer
I use Halfords Acid 8 etch primer, it's ok and gives a good coverage, but for the tank sides it needs a little touch with some 1500 wet & dry.

For the chassis and running gear I use Clostermann black etch primer.

On the streamlined tender the upper works were done with Halfords satin black over the etch 8 primer, then the tanks sides were Doncaster autos Land Rover deep bronze green and the buffer beam was....runs to garage...Halfords Fiat red orange, I'd read somewhere that Ford carnival red was the right colour but it looked too orange for me to be honest.

It's not air brush finish, I'm working toward that, rattle cans never will be but it's acceptable for what I need right now.

MD
 

mickoo

Western Thunderer
Looking very nice.


One of the downsides I suppose of the minimalist soldering technique.
Kind of, some of the gaps you can't really seam solder without making a real mess of things, access and surface detail, some you just don't see or are not as blatant in raw brass.

Two own goals are the front bulkhead lamination's where I failed to see or apply enough solder to make smooth and the side to rear joint on the left near the top, where more than enough solder was applied but it all soaked inside, lovely huge fillet inside mind, but a thin gap outside.

Both easily fixed with a thin smear of Milliput.
 

mickoo

Western Thunderer
Onward and the last of the trio and being blunt, saturation point for me.

A straight out of the box build for instruction photos, the chassis still has some tidying up to do and I'm missing some castings but the streamlined chassis is identical so it's been 'borrowed' for the photos.

Unlike the other two this one presented a few new trip wires, for me it was the rear overhang (can't remember the real name....too tired) the whole body took three days to complete, that section was nearly six hours on it's own, it has come out reasonably well; mind, now the primer is on it needs a few further tweaks to clean it up.

IMG_0466.jpg

IMG_0467.jpg

IMG_0468.jpg

IMG_0469.jpg

IMG_0470.jpg

IMG_0472.jpg
 

OzzyO

Western Thunderer
Hello Mickoo,

some nice building work going on here, but I do have a question, where did the L.N.E.R. keep the fire-irons on these eight wheeled tenders?

ATB

OzzyO.
 
Top