Highbridge and Dartmouth

Paul Townsend

Active Member
Olton Bridge model was built by the late Mike Jolly.
He bequeathed it to a chum who custodied it for many years but in return for services rendered offered it to me around 2013.

The timing was just right so I adapted my model design for Dartmouth in Broad Gauge c. 1875 to include it.

The prototype was a Brunel design for OWW Rly to cross a road at Olton near Bromsgrove. In the end Directors got cold feet and used a wrought iron bridge instead. The location exists today, line was quadrupled later on and a newer boring bridge is now in place.

In my fantasy world, the directors of Totnes and Dqartmouth Rly bought the drawings and had it built just north of Dartmouth to provide for the South Hams Rly to go below and bridge a stream. It would have been the last timber structure built using IKB's design.

The baseboards with this bridge and my foreground mixed gauge trackwork was entered into Scalefour North "18.83 Challenge" in 2014 at Wakefield and won the Eileen's Emporium award for best scratch-build in the show. So that was partly for my track and partly in memorium to Mike Jolly.
 

Paul Townsend

Active Member
I’d like some more words and pictures about that bridge, please. :thumbs:
Some wider angle pix in my post of Jan 24th and some more words here today.

I have been tidying up some wiring and stowing some Merg modules below the track bed this week.
I now have to plan the detail of the track that crosses a BBd joint at the same acute angle as the bridge...it will be a dropin small section.
 

john lewsey

Western Thunderer
It is booked to appear at RailWells in August 2024, NOT this year!

However , I will be at RailWells this August doing demo of Broad gauge modelling so stop for a chat.
Hi Paul I can't Im afraid as I live in España and at the moment my wife is having chemo so travelling by plane is Just a bit risky. (colds etc). Someone I know recently got on a plane even though she knew that she had Covid, I wasn't impressed.
 

Paul Townsend

Active Member
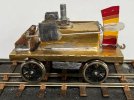
I have been bothered by a bit of plain BG track causing derailments and hard to diagnose so I have built a BG version of the Masokits track deviation detector wagon. I have used a P4 vesion for years successfully at Highbridge. This new version gave instant diagnosis of a slight twist over just 2 sleepers....easily rectified and cured.Track deviation detector_Masokits_IMG_2536.jpg
 

Herb Garden

Western Thunderer
I have been bothered by a bit of plain BG track causing derailments and hard to diagnose so I have built a BG version of the Masokits track deviation detector wagon. I have used a P4 vesion for years successfully at Highbridge. This new version gave instant diagnosis of a slight twist over just 2 sleepers....easily rectified and cured.View attachment 189920
Paul,

That looks like a very neat bit of kit, could you explain further how it works and how you constructed it?
 

Paul Townsend

Active Member
That looks like a very neat bit of kit, could you explain further how it works and how you constructed it?
Masokits offer an etch (£10) for P4 or EM, with excellent instructions. It clearly lists the parts you need to buy to complete the job.
I used Ultrascale wheels to get the best concentricity otherwise wheel wobble confuses the issue. They are mounted on BG axles. I need to grind off the pinponints else picking it up can be painful ! I filed a wheel clearance arch at the end where the etch din't have one. Michael specifies the gauge of lead to use but as I ran out of lead sheet I made a little brass box from etch offcuts to be soldered on the top, filled it with liquid lead and sealed it with UHU and a brass lid. Mine weighs about 100 grams so stays firmly on the track! I added 2mm ID tube my long axles to control wheel sideplay.

It works by having one axle rocking on dodgy track, on the left in my piccie. This is connected to a vertical plate whose top edge activates the wire levers. The levers amplify the movement and shows it on the coloured scale with 4 grades of indication. Perfect track is shown by the indicator always hovring in the white. Red guarantees derailments. I was tired at painting time so hands were wobbly. Its functional and not cosmetic so I don't mind the splotchy painted patches.

Highly recommended if you have lots of track to build and maintain. It is very sensitive and I have learnt to trust the yellow and brown indicated grades on my old P4 version.
 
6 Wheel carriages

Paul Townsend

Active Member
Dartmouth Broad Gauge has some lovely 6 wheel carriages built by a friend and on loan to me.
They have tended to derail in places where the track is OK but complex, eg curves on gradients or complex pointwork.
Most are built from Broad Gauge Society kits.

Investigation revealed that they all have sprung suspension with a single spring wire each side of .013" gauge. Weights are generally in the 60-90 Gram range which is correct for these vehicles.

The static spring deflection was negligible and needed at least 40 grams weight adding to sit correctly.

I am modifying them to individual springs per axlebox using .011" wire for the outers and .009" for the middle axle. This follows advice for CSB locos to avoid see-sawing on the middle axle. One required weight adding as it was < 50 grams.

I also am ensuring the B2B gauge is at the top end of the tolerance range.

Where these mods are done the reliability is much improved.
 

Paul Townsend

Active Member
I had expected to give another update on progress chair gluing and track painting & ballasting but two MR factors have stolen July planned work. Also the rebuild of the kitchen has caused some management issues together with a visit from a Rat.

I had a self-inflicted fault in the electronics that corrupted the firmware in a few Merg kits.
It took a while to diagnose the cause and restore working firmware.

The electric design has always been primarily for DCC but as I now can run trial trains ( locos on loan are DC only )I am finding I need to add some more places where a loco can be isolated to allow for several "locos in steam".

Having got into the DCC way of wiring I had neglected that design requirement.

So I am installing some additional relays driven by CBUS to do the job...desirable but not much good for pictorial reporting ! Thats 70% done so back to sticking half chairs. When insanity approaches I will finish the added relays caper.
 
Highbridge

Paul Townsend

Active Member
Moving on...sleepless in the tropical night.

Recent activity for Highbridge is to consolidate the success of the new led strip lighting by removing the previous installatikon of led spots and floods. The ceiling is now decluttered.

Anyone want some MR12 12volt led spots ? ( same fitting as old QI halogen 12v lamps)
I have a quantity of various wattages and beam angles now going spare at a low price. Not more than a few hundred hours use...rated life is many 1000s of hours.

email me if interested.
 

Paul Townsend

Active Member
Highbridge has long had a cassette access point near the fiddle yard so excess or visiting stock can be stored off the layout.

When we moved house several years ago the upheaval disrupted the track alignment badly so the cassettes were unuseable.

Last evening Tim and I finally bit the bullet...soaked the naked bit of track with warm water to soften the PVA....prised up the sleepers and re stuck with some packing cardboard.

When dry I will revisit with the soldering iron to fine tune the bumps and hopefully bring the cassette system back into use.
The fiddle yard does get overcrowded.......
 
Dartmouth

Paul Townsend

Active Member
At Dartmouth the recent progress has centred on my need to do something interesting in between sessions of sticking down half chairs in order to preserve sanity and keep the mojo well.

Decisions have been made and implementation has commenced in several vital areas:

Signalling
What to plant on the model for 1875? There will be a mix of double sided semaphores, disc and Xbars, bobby with a red flag etc.
All servo controlled and pluggable for travelling safety. Ground signals will be capstans. In BG era, bobby went out with a long pole to operate the capstan turning it through 90 degrees to operate a switch. On top was a flag so drivers could see how the turnout was set more clearly than peering at swicth blades.

Lever frame's relationship to the signal box at the station. Both were brand new concepts at the time and so the installations were primitive and "Beta versions". I have a lovely brass well engineered 21 lever frame to which I am adding microswitches so it will talk to CBUS. It already has a full mechanical locking frame for me to use in years to come.

Early design of Saxby and Farmer signal box needs building. It controlled the station.
Thanks to Becasse in another place for info and advice.

Couplers
90% certain to be Dinghams, trials commenced. Fallback is Alex Jacksons of which I have experience at Highbridge S&DJR

Uncouplers
may be servo lifted permanent magnets or electromagnets since Paul Segar just pointed me at a low current coil on Ebay.
Most such coils from our MR traders are too greedy for current in my book.
Whichever actuator I choose I will have several operated from one button since all the UCs in one JMRI block will operate together.
Clearly only one loco moves at a time within a block so any static waggons over a UC won't matter.
Simultaneous is literally true for electromagnets as they will be wired in parallel, hence desire for low current per coil.
If servos, which will be digital, the bunch will be sequenced at say 1/4 sec intervals ( by Merg drivers). This ensures total current is no more than for 1 servo.

6 wheel BG vehicles.
Altering the spring suspensions as mentioned a while ago.
 
Last edited:
Top