You are using an out of date browser. It may not display this or other websites correctly.
You should upgrade or use an alternative browser.
You should upgrade or use an alternative browser.
Piercing (Jewellers) Saw video guide
- Thread starter adrian
- Start date
Brian McKenzie
Western Thunderer
Dan Randall
Western Thunderer
That is interesting. Is the blade tilt essential, when cutting the steel plate though? If not, it seems like an ideal job for a laser cutter. 
Regards
Dan

Regards
Dan
adrian
Flying Squad
Yes - the tilt means that there is a small draft to the steel plate, apparently like a cutting rake, required for it to act as a stamping die.That is interesting. Is the blade tilt essential, when cutting the steel plate though? If not, it seems like an ideal job for a laser cutter.
Regards
Dan
Overseer
Western Thunderer
The 'draft' only needs to be there if you are making a single part clapper punch. Angling the blade in this situation means the top and bottom of the piece of steel are in the same place when the steel is flexed apart so form cutting edges. Doing it this way has the advantage of not needing additional registration of the upper and lower plate. Laser cutting could be used to make similar punches but they would have to be separate pieces with registration holes to fix them together - one piece would be cut for the inside of the punch and another for the outside. There would therefore be more waste steel, but the punch could also be set up to punch from the middle of a sheet of brass or plastic instead of only the edge.Yes - the tilt means that there is a small draft to the steel plate, apparently like a cutting rake, required for it to act as a stamping die.
Ian@StEnochs
Western Thunderer
The 'draft' only needs to be there if you are making a single part clapper punch. Angling the blade in this situation means the top and bottom of the piece of steel are in the same place when the steel is flexed apart so form cutting edges. Doing it this way has the advantage of not needing additional registration of the upper and lower plate. Laser cutting could be used to make similar punches but they would have to be separate pieces with registration holes to fix them together - one piece would be cut for the inside of the punch and another for the outside. There would therefore be more waste steel, but the punch could also be set up to punch from the middle of a sheet of brass or plastic instead of only the edge.
I remember making a similar plate punch to punch coach windows from plastikard. I think I got the idea from one of Binnies articles in Model Railways in the 70’s.
At that time there were some vacuum moulded coach sides with panelling moulded on the market. However the builder still had to cut out the windows. The punch worked ok but it took a lot of care getting the window correctly positioned before punching. Quite a lot of ‘nearly right’ but not good enough meant that in the end I reverted to hand cutting. The punch worked great for the separate drop lights and saved a fair bit of time though.
Ian.
Given my success with a piercing saw, I think 'soddering' sums it up rather well.Apart from calling it "soddering" it translates across the pond reasonably well.
michael080
Western Thunderer
I found that, as mentioned in the video, the finer blades are easier to handle. The 8/0 blades have 35 teeth per cm, so that there is always more than one tooth in contact.Given my success with a piercing saw, I think 'soddering' sums it up rather well.
Michael
Tim Watson
Western Thunderer
Afraid I skipped through much of the video. A technique that I find useful is to sweat thin material onto thicker sheet to make it easier to cut.
Tim
Tim
Brian McKenzie
Western Thunderer
It's likely easier and quicker to make this style of punch tool as two separate pieces, then rivet them together. This gives better control for the 'draft' of the cutting edges and allows for some experimentation with punch clearance.
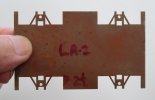
Being resident at the end of the planet, far away from hobby etching services, I made press tools for punching some foldup wagon underframes in 0.6mm brass.

The four 'axle' holes get drilled first, set out for the wheelbase required. These are used to position the blank over pins in the tool. Then the small triangular and rectangular holes get punched individually, and a different tool is used to pierce the 'W' external shape. All a bit tedious, but the results are consistent.
A close fitting 'stripper' plate (clamping the brass to the die plate) was needed to keep everything flat to avoid curling.
Being resident at the end of the planet, far away from hobby etching services, I made press tools for punching some foldup wagon underframes in 0.6mm brass.

The four 'axle' holes get drilled first, set out for the wheelbase required. These are used to position the blank over pins in the tool. Then the small triangular and rectangular holes get punched individually, and a different tool is used to pierce the 'W' external shape. All a bit tedious, but the results are consistent.
A close fitting 'stripper' plate (clamping the brass to the die plate) was needed to keep everything flat to avoid curling.
Brian McKenzie
Western Thunderer
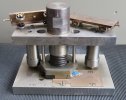
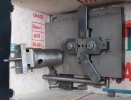
Further to the above, just pulled this out of its storage box (first time seen this century). It chops out the external 'W' shape of the axleguards.

The big round bit at top fits inside an old flypress. The wagon axles are in temporary bearings.

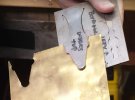
These are the tooling bits to pierce the holes inside the W irons - all punched one at a time, requiring much flipping over of the brass sheet at each position. All amateur stuff done in the home workshop.

The big round bit at top fits inside an old flypress. The wagon axles are in temporary bearings.

These are the tooling bits to pierce the holes inside the W irons - all punched one at a time, requiring much flipping over of the brass sheet at each position. All amateur stuff done in the home workshop.
Phil Atkinson
Member
The problem with 8/0 blades is (as with all the blades) the higher the number of noughts the thinner and shallower the blade. Hence the easier to break. But as with lots of things in life, it's all a bit of compromise. You need the high number with more teeth per inch or cm for the thinner materials which will also get you sharper corners, but you need the lower numbers to give you the strength to avoid breakages.I found that, as mentioned in the video, the finer blades are easier to handle. The 8/0 blades have 35 teeth per cm, so that there is always more than one tooth in contact.
Michael
Regards Phil

