john lewsey
Western Thunderer
Your work is quite frankly superb Mick 
 the camera is reasonably kind but highlights the bits that need more attention, you know the part that you didn't finish quite soldering and would come back to! All being well I can motor on in the week and let you know how the inside motion goes,
 Hello Mick,
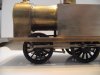
I do like the flair at the base of the chinmey and the retaining bolts thereon. At this time there seems to be no fixings to stop the steam dome cover from being borrowed so what does the GA say about securing that platework?
regards, Graham
, but, each to their own ")
Interesting, on the whole I've found the GA's I'm working from to be acceptably accurate, I've checked a fair few marked measurements and all scale exactly the same so I'm happy to scale the rest that are not marked.
To be honest I doubt the real locos were that accurate when it comes to body and sundry fittings, valve gear yes but even then said standard parts very rarely fitted other locos, it was found that Gresley A4 gear was often bespoke to a particular loco and during works visits it was either marked from the loco it was retrieved from or if 'lost' and the replacement slightly out, one was sent back to stores to rummage through and find a set that did fit.
There is also of course the train of thought, if you don't know what the measurement is, how will anyone else, further, if they do, will you let them measure your model or would they even care to, in short, it's your model and personally I take the view that if it looks right then that’s good enough for most people, so pinching and odd inch here or there is...let’s be honest....quietly acceptable....but not publically admit able LOL.
There is of course the kudos of knowing that your model is accurate in all respects to 0.05mm but I'm slowly coming to the realisation that O gauge is perhaps not the best scale to work to such tolerances
)")
I wish my soldering was as neat and unobtrusive.
Sorry for the hi-jack, but Dan, I've PM'd you.
Mick, that J73 of yours is really coming along. Your attention to detail and the quality of your modelling is inspirational, can't wait to see the finished loco.
Best wishes,
Dave (H&BR)
, Anyway I'll post some pictures up soon as I intend to finish the motion in the next couple of days.Hi Mick,
I am a bit behind you but I have spent a bit of time over the last 3 nights cleaning up the castings and getting the crossheads to run in the slidebars. Sadly I have just discovered that I have no nickel rod small enough for the pins so it looks like an Eileens order is on the cards.
oh and forgot to mention, the 1mm rod for the pins came with the valve gear ?Ioh and forgot to mention, the 1mm rod for the pins came with the valve gear ?
ATB Mick


")