Skytrex PCA

Smith

Member
As a first post I thought I'd better write something showing a crumb of modelling ability.... so what better than a kit with only about 20 individual parts.
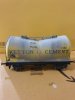
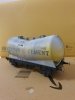
Like most of my modelling this is pure nostalgia. A PCA tank, hopefully the first of 5, that will replicate the colourful Ketton Cement tanks of the late 1970's, early 1980's.
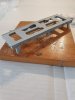
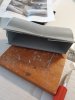
The Skytrex kit is the starting point, however as with most resin based kits, getting rid of the warps takes some doing, as can be seen from the first photo. The second illustrates the need to remove a fair bit of resin flash. This may take a while...
 

Attachments

  • 20210213_115911.jpg
    20210213_115911.jpg
    87.8 KB · Views: 61
  • 20210213_134308.jpg
    20210213_134308.jpg
    91.2 KB · Views: 62

Dog Star

Western Thunderer
Welcome "Smith"... or can we use "Mark" as you are amongst friends?

A modern tank wagon, nice. A modern tank wagon with S7 wheels (?), just as nice.

When posting photos, please consider inserting the image into your post as a large image by clicking the "full size" button.
 

Smith

Member
Yes, Mark is good... I'm just so slapdash with internet details.

Thanks for the advice re images.. here are a few more on progress, although I can't seem to disable the thumbnail part. Will endeavour to move on from 'novice'.

As you can see, a metal inset followed by 10 mins in boiling water seems to sort out the chassis warp.

20210213_135500.jpg 20210213_152035.jpg 20210213_135500.jpg 20210213_152035.jpg 20210213_152035.jpg 20210213_152035.jpg 20210213_135500.jpg 20210213_152035.jpg20210213_154334.jpg 20210213_154334.jpg 20210213_154334.jpg 20210213_135500.jpg 20210213_152035.jpg 20210213_154334.jpg 20210213_152035.jpg 20210213_135500.jpg
 

Dog Star

Western Thunderer
I have built a JLTRT TTA which is of similar construction to the Skytrex kit... just more complexity in the underframe. When bought the 'frame had a bow end to end and the "JLTRT advice" was to dunk in hot water and then in cold water. Never again because the hot water softened the resin casting in 3D rather than just the bit which required attention.

My Good Lady looked at the 'frame which now resembled an egg-slicer and offered a supreme example of the "if you had asked me" look. I took her advice and tried again... this time using a hair drier and cardboard sheets so as to localise the heating effect... well worth while as I was able to get the frame straight along solebars and middle longitudinals.

regards, Graham
 

Smith

Member
Hi Graham, ... you live and learn.... easier than scalded fingers.
I didn't dunk in cold water, just laid the chassis on its back, metal frame down and put a can of tomatoes (other canned veg available!) on top. And surprisingly it worked.
Next task was to open up the wheelbase by 1mm each side and shape the axle castings to fit. I also drilled out some of the resin filled 'gaps' on the underframe pipework to add some scale daylight.
20210213_154334.jpg 20210213_163000.jpg 20210214_142930.jpg
 

Dog Star

Western Thunderer
Thank you for hitting the "full image" button, much better for your readers.

I like what you are doing to provide active suspension, we often "massage" suspension units so as to incorporate springing behind etch axleguards, for example:- Dragon Models wagons... Slater's four wheel coaches... seems to be an acceptable approach for 7mm models.

regards, Graham
 

Smith

Member
The chassis frame looked out of line to the naked eye, but was, in fact square. It might be the internal moulding is not square.
Anyway, compensated axle fitted, all square and some springing definitely perceptible.... helped by the weight of the tank cast.
Starting to look the part...

20210228_101345.jpg 20210228_144934.jpg 20210228_145649.jpg
 

Strathclyder Ken

New Member
Hi Mark,

I have a few of these to build, also in S7, so I will be watching with interest how you get on. I was wondering how I would spring/compensate them, but I think you might have provided the answer!

Ken.
 

Smith

Member
Ken, glad to be of help... the only sticking point I had was getting the right gauge of wire. Trial & error I'm afraid, and I've no idea of the source/gauge of wire I used. Just out of the scrap box.
The real nightmare has been the lettering. A real mash-up of existing waterslide transfers... but will work with intended heavy-ish weathering. 20210311_080624.jpg
 

lnerjp

Western Thunderer
Hi Mark

Might be a bit late for that one as you've already painted it but Pete Harvey does a detail etch for the PCA, the main part of it being a nice etch for the walkway on the top.

A method I was using to spring mine (but still unfinished like most my stuff) is to use the old Bill Bedford springs sold be Eileen's Emporium, you just need to crudely mill / gouge out the backs of the suspension castings to allow the wheel axles to ride up and down.

Good work, yours is already far more finished than mine.

JP
 

Smith

Member
Thanks chaps. JP - I have the Pete Harvey etches, but was leaving to the end as I feared the paint spray would mask the detail. I didn't use his etched tank rungs as I thought they were a little frail. Hard enough for me making the wagon first time round let alone any repairs.
Anyway, extra chassis detail added as per photo of 9462, tank body completed but data panels will be added as 'cleaned' post some weathering.20210311_205149.jpg
 

Smith

Member
Weathered so far, with chassis to go & metal blackcouplings, etc. Awaiting inspiration about how to get some of the finer wording on the tank frame. Oh, and started on 9461, which had different font wording.
 

Attachments

  • 20210325_192436.jpg
    20210325_192436.jpg
    76.7 KB · Views: 3
  • 20210325_192539.jpg
    20210325_192539.jpg
    75.4 KB · Views: 5
  • 20210325_192511.jpg
    20210325_192511.jpg
    65.1 KB · Views: 4
Top