A Finescale Adventure - Lateral Thinking?

Richard Insole

Western Thunderer
You might be wondering... What is he talking about?

Well. It was time that I started solving an issue with an indirect and creative approach and doing it in an unusual and unique way.

The issue?

It's about time that I got stuck into a project that stretched and challenged my abilities. Not that I am proclaiming to have much in the way of 'abilities' :)

With Dad's help (one of these days I will have his skill to be able to try on my own) we have made technical drawing(s), and whilst I won't give anything away yet, we are both VERY excited about it.

So... Coming soon, to a 5 3/4" gauge railway near....

20210609_180418.jpg
Any ideas?

"Buh, you have given us anything to go on"...

Your right! I haven't, have I...

Hmmmm....
20210609_182553.jpg

Cheers,
Rich
 

Richard Insole

Western Thunderer
I think I have allowed too much time, keeping you all hanging so... Time to finally announce what the next joint project will be. We are very, very excited about this little sweetie, and a lot of the time has been spent so far, just working out how we are going to do this. Rest assured, I will not be trying to take on Dad's level of expertise and complexity. For the most part, this will be simple in design and construction.

The plan was formed some months ago after our proof of concept posting where we and the kids were enjoying the short thrilling ride on the one section of track. A couple of key points that we agreed on was, whilst the riding truck did in fact support the weight of a big kid, it was rather unsettling when trying to squeeze onto it with meer hopes and wishes not to be torn off backward with a misplaced balance or seating position. "We really could do with something a bit bigger to sit upon"... Now... this did make the old brain box smoke a bit, as we looked through some material of wagons that could be used to keep it in fitting with the little engine.

With the help of an over-excited me, dying to get in on all the action, I may have (and much to the concern of the wife) made a rash purchase and ordered the same wheels that were used on the riding truck. They worked so well and we did prove that they were up to the task. But, it really should be a riding truck with boogies right? This created a headache of its own... more on that to follow.

Now, whilst Dad's little engine is amazing in every way and will be fantastic when we take the maiden voyage down the line, there is the concern that this is ultimately intended for use by the children. SO many man-hours, care, and attention have been put into Dad's little engine, I would hate for it to get damaged in any way... with a hop skip and a run to the laptop to pull up some images of an idea... Ahhhh Ha! what about this!

Head over heels in love! It would be insulting to let this idea go and would be a perfect starting place for me to jump in feet first. I tried to be smart with what I named this tread...

So, I present to you all... In the new line of the saga...

"A finescale of a sort - LATerally thinking..."


horwichruston a10483687815_6935b5ffe4_o.jpg
A Ruston LAT - Aka "The Flying Breadbin".

And look what we have here... it seems to be pulling a familiar little engine behind it.

There are a plethora of photos of these LAT's that are still clunking and chugging up and down both private and public preservation lines in the UK. This one with the wonderful stripes (ZM32) is somewhat of an interesting one. There are several unique features surrounding it, that just spurred us on to want to make her even more.

ZM32 was factory painted all-over "Ruston" green at the start of its life in 1957. It was then later painted with the wasp-stripes seen here. Sadly, she no longer wears her stripes with pride, but, can still be found in use today
horwichruston d 3643771965_2ceca91fff_o.jpg

Once we were sold on the idea (which didn't take much doing), Dad got to work with drawing up some plans. So, you could say it's my fault that there has not been much progress on his little engine (guilty).

View attachment 145546

Much the same as the little engine, this will be on the same scale but more importantly, will be less intricate that the children can bump this about without the fear of irreparable damage.

This will likely be a long project, as discussed in other posts in the saga threads, I will be relying on many factors in the construction of this little beauty. A doner body/loco has already been sourced along with some of the supplies needed to get this breadbin flying.

Before I want to get stuck into this build, however, I want to get some practice in... Sunday saw the start of the boogie for the riding car, which is being based on a gun trolley. I will follow this post up soon with that.
zpoint 879.jpg

It is safe to say that I have bitten a big bite out of the proverbial cake but, one that I am very excited to get stuck into.

What do you think?

Cheers,
Rich
 

Peter Insole

Western Thunderer
Now the drawings have been done, the bodging has begun!

We have set ourselves quite a task getting the railway up and running. It is quite difficult to decide which item to prioritise, for each seems to be equally important. Preparing the roadbed and laying the hardcore, ballast and rails down is of course the obvious - but that will require some good, full days, plus a whole lot of muscle. Besides, I have in the meantime still to invent and make up some sort of home-made rail bender !!

The new "Kiddie whizzer" LAT locomotive should indeed be a much more straightforward project than the little Horwich engine has turned out to be, but the chassis and drive system will still be rather complicated.

Having something to ride on seems to be the front runner for attention at the moment. The carriage body may be just (?!) a basic carpentry job, but the bogies will be a whole barrel of fun - yet again bearing in mind our awkward choice of gauge, lack of lathe, and particularly the otherwise essential "wherewithall" !

It seemed sensible at the time to kick things off by obtaining a set of wheels. As the type and design appears to have been proven on the loco tender/driving truck, we ordered more from the same source. I was thinking however that I had previously been somewhat over cautious with the heavy axle material for a four wheeled truck, and recommended that as the weight would be distributed on a pair of bogies, something a bit lighter would be preferable. I'm afraid that in doing so, I led my wide eyed apprentice engineer (and investor!) horribly astray. We became the proud possessors of a long length of 10mm threaded rod - that would flap around in 17mm wheel bearing journals - all eight of them! What a twit !

There seemed to be no alternative to asking a friend to turn up a batch of collars for us. Then I recalled the "wheeze" with plumbing fittings for the driving wheels of the little engine... and wondered... ???...

Ah, ha! Yes, 10mm x 1/2 inch straight couplers in brass were cheaply available locally... so...

hzqSAM_5736.JPG

The brass is nice and soft, so it only took a few swipes with the large file to cut down the angles on the nuts, then whirl them in the drill chuck down to a really snug 17mm diameter.

When two were done, (you get a pair of nuts per coupler) chop the middle bit out, and...

hzqSAM_5739.JPG

Only a couple of stout, 10mm washers on either side to contain the new collars were needed before locking up with the nuts - in the intended fashion.

hzqSAM_5740.JPG hzqSAM_5741.JPG

Result !!!!

We still have to measure out four tubes to the precise "back to back" and cut another pair of side frames, plus pick up some Nylocks to fit them all up, but at least we can be sure that the wheels won't fall off now ?!

Pete.
 

Tom Insole

Western Thunderer
Ah, Well...

If the cat is out of the bag I guess I can pitch in my efforts so far ;)

Badge5.jpg

I totally forgot to snap pics of the other preview parts I brought over on the 16mmngm Garden Railway show day.

Really looking forward to seeing how this one progresses! I'll also offer my help where I can for little parts etc :)

All the best
Little big Bro, Tom.
 

Peter Insole

Western Thunderer
The carriage and wagon shop is getting rather busy now.

hzqSAM_5755.JPG

Having sorted the awkward issue of the wheel bearings in a familiar, full blown, bodging fashion, and with four completed axles set up and ready to install, some serious bogie production could begin.

Did I mention that the apprentice was keen? ...

hzqSAM_5764.JPG

Here he is, and just look at him going for it !!

He did slow down a bit when realising just how many short lengths of angle needed to be cut from the length... and his elbows had started to ache.

hzqSAM_5766.JPG hzqSAM_5768.JPG

An awful lot of accurate holes needed drilling before the first bogie frame was finally assembled.

hzqSAM_5769.JPG

The basic design is a fabricated version of an original Woolwich Arsenal, 18 inch gauge, "standard" type, cast iron bogie, where the suspension is mounted on the inner sides of the wagon solebars, and a transversely restrained, but otherwise vertically floating bolster rides in between.

The rigid construction is a concern, but with such a narrow wheelbase and the added bonus of quite deep flanges, the temptation of following the rather economic prototype practice is too strong. Of course, it remains to be seen whether or not it will work for us when reduced in scale to just under one third full size. At least the materials have been relatively cheap and easy to obtain, and any service modifications that might be required should, hopefully, be fairly straightforward.

Looking forward to finding out !

Pete.
 

Richard Insole

Western Thunderer
To follow on from Dad's last post here. It's fair to say that we have made some terrific progress...

I will, however, take a small step back through time and show you a couple of the 'snaps' that I took on the progress before the last photo dad uploaded.

As you can see, dad focused on getting the wheels to fit onto the axels we got. accidentally, we picked up a 10mm threaded rod (approximately a metre of the stuff). I lovingly chopped them down into the dimensions needed for 4 axels, leaving a small amount to spear.

20210704_160005.jpg

Once we had them, that pretty much where dad took over with the photos up above, with the axels. Our next steps was to mark out and cut from the 6mm thick bar of steel, was the sides of the bogie.

20210704_155959.jpg

Feeewwww... That was tough work! Two 180mm lengths of steel bar, the centre line marked and centres punched to drill through both of the sidebars
20210704_162254.jpg
20210704_163247.jpg

Sadly, I didn't get a photo after the drilling. What I can tell you is after some time spent lubricating the holes/drill bit with some rather smelly old gearbox oil and a small headache after the bed slipped and a reset to ensure a level, the holes were drilled. Boy, did that take some time and some valuable lessons learned. We drilled some smaller pilot holes initially, and we found that we needed to use a slightly smaller bit than we did use for the pilot hole. We found that the bigger pilot hole causes a small amount of jumping in the rather hard steel rod. Nevertheless, we succeeded and came out victorious, making the most of the short amount of time that we did have.

Jump forward a couple of days (as I was at work and kept busy with naughty projectors needing some TLC with their xenon lamps and general management of a cinema) Ahhh yes, even though my heart is set on making progress with the bogies, sometimes you have to play with expensive (and somewhat dangerous) equipment at work because nobody else is authorised or willing to get stuck in.
20210708_092958.jpg

Still, back on track (pun intended), back to it...

Rich
 

Richard Insole

Western Thunderer
A new day and little man with us helping to put the newly finished axels with wheels on them to the sidebars.20210710_121725 - cropped.jpg

Back down into the depth, we went... crashing and bashing. now marking out and cutting the bar for the next steps of our bogie.

Oh hey... a friend.. I guess he didn't like the banging and had to climb out the bowsprit to see what all the fuss was and watch for... prosperity... Not used to this kind of audience.
20210710_125916.jpg

We would saw the 4 little 20mm angle, drill holes into them crudely (well cruder than all the effort needed to ensure the bogies were square). Once we got these fabricated, it was just a case of lining everything up and clamping it all together to drill the various holes needed to bolt this all together. You can see in this next image we have put everything back together to mark up the last 4 holes on the top bar. The sides have already been drilled and temporarily screwed in. Checking for true all the while.
20210710_174225.jpg

And finally, an image you have already seen.. Done! Well, for today anyway. A little man coming and asking if we were "done yet" as we were "taking too long".
20210710_182057.jpg

Cheers,
Rich
 

Richard Insole

Western Thunderer
Now that we have caught up with progress.. here is our last bashing session. Litlle ones left at home with mummy to allow maximum effort and time.

We picked up rather quickly with where we left off. This time with taking what we had learned on the second bogie. This one went much quicker, and as we took photos of the first, not much in the way of evidence. So, the focus of this post is to carry on with what happened next. Both bogies are at the stage of the last image on the last post.

In what felt like the 50th time, we took it all apart again and marked up for the handy dandy coaster wheels that will be used to help with rotational travel.
20210721_143319.jpg

These holes didn't have to be too precise as they were just to hold the wee casters in place. Whilst I drilled the holes, dad started with colouring in the garish white wheels with this tried and tested way, with a chisel tip permanent marker. You can see that the first two had already been done.
20210721_143709.jpg

All back together and 'coloured in'... looking rather mechanical. So pleased with this!
20210721_153056.jpg

Juices flowing with excitement, it would have been almost criminal not to take it out and pop it on the line to get a much-needed photoshoot of the two sat together ... hmmm, could we maybe find a temporary slice of wood to test them out?
20210721_162112.jpg

The difference between the white naked nylon and the 'coloured in' is night and day here. dad had a rummage and came up with a plank of wood, an old shelf in fact. All be it a bit on the grotty side but, still giving us a flavour of what's to come and a nice visual end of a hard days graft.
20210721_173428.jpg

We are both so pleased with what we have managed to create here. and considering that what we have spent on them is a fraction of what you could pay for a premade set of bogies, all the more proves and stands as a reminder that you really can make anything with a few basic bits of material. The next steps are to start with the main body of the carriage. Which will entail some of my specialty, some woodwork. I have some much needed time off work over August, so will hope to have some more progress on this soon :)

But, for now, this is where we are up to. We have tried it with the children and I can confirm that it glides so wonderfully. Those caster wheels were a chance find (one that we had not thought about until we fell across them in the local DIY shop)

Cheers,
Rich
 
Last edited:

Richard Insole

Western Thunderer
Small update on the carriage here...

Okay, well, I say small... a fair chunk of work spread over a couple of days that has required a fair amount of actual work!

It all started with myself taking an impromptu drive up to the local timber merchant to see if I could get my hands on an offcut of an 18mm thick plyboard. In typical fashion when I entered the office, the same chap that we managed to 'butter up' to get a nice little offcut for the up-and-coming LAT was behind the desk and I am greeted with "Oh, what do you want". (in a joking way of course).

All I needed was a bit that was approximately 30cm wide by 60cm tall. Sadly, the 'offcut' he had was much bigger than that at 70cm square. Oh... "It's alright mate, I can chop you off a bit from this piece but, I will have to charge you a cut fee," he says. Well, long story short, to get the wanted cut-down slice, was nearly as much as the 70cm3 piece so, that's what we went with. With wood in hand, I made my way over to the little workshop with the larger than needed cut of 18mm ply.

We set to work rather quickly with setting up the circular rip saw... pushing it to the limits (as we often do with most tasks, using tools to the limit of what they should and should not do), to cut out our end and middle parts of the carriage.

Due to the nature of using a big boy power tool, sadly not much in the way of photographic evidence of our heroic efforts to cut down the three individual parts. However, here are the after-shot (s) of the three said bits.

20210803_171624.jpg

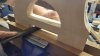
As you can see here, they are all marked up and ready for the next steps which involved us using a jigsaw to cut off the rather lovely curved edges, central half-circle, and coupling/drawbar hole? if that is what we are calling that?

As I said previously, using tools up to the very limit, whilst we found that the blade has a mind of its own, dancing all about going anywhere but in a straight line, it worked surprisingly well.
20210803_181441.jpg

After letting dad have the first go, it was only fair that I took over and carried on, taking care to not let the blade go off the path too much. We both agreed that really, this was way too thick to do this but, sometimes working with what you have got, can still work, and is very in fitting with what we are trying to achieve here. something totally unique without breaking the bank and more importantly, making something from nothing and spending quality time together. "Living the dream" for want of a better word.

20210804_160358.jpg

Yeah, that was not too fun but, we can smooth that up after.
20210804_161908.jpg

Never the less, all three 'tricky bits' were cut out, all be it rather roughly.
20210804_165543.jpg

We left it there for another day, as always, time seems to run away from you, and only just as progress seems to be moving, you realize that time has all but run out.

Skip forward a day or two, right back into it with cutting down the sides and shaving out and smoothing the cut edges.
20210804_170717.jpg

Of course this time, I had the boy with me and our little helper can be seen here helping to file it all down straight and smooth. All the while helping Grandad out by eating some of his small red pot of bacon crisps. Good lad.
20210804_175227.jpg

This is where we left off a couple of days ago, and some more have been done today to 'finish them off' today. I will update you on today's efforts shortly.

Cheers,
Rich
 

Attachments

  • 20210804_175101.jpg
    20210804_175101.jpg
    162.4 KB · Views: 9

Richard Insole

Western Thunderer
To catch up on where we left off on the last post, a photo that I didn't include on the last post due to having too many photos...

20210804_182516.jpg

a couple of days past and like a genius, I left my phone at home so have lost a day of updates for you all to see. To get all the nice curved edges smooth and looking good, I ordered some beefy sanding cylinders that could be chucked into a drill. Long story short, with quite a lot of sanding and soothing, we got the 3 sections here looking good. (the photo above is the day before with them still looking a bit rough and ready).

Jump ahead a couple more days to today and we got an early start and gave it a big push. We had also previously cut out the top where the seat will go so today's ambition was to do some of that.

We started today by returning to the 3 (bulkheads?) I'm not sure what to call them (haha). We still had the sharp abrupt ends to the outer curves which firstly needed to be marked out and then shaved off. We scratched our heads trying to find the best tool to mark this out... sometimes the easiest way is to just use what you have around you...

Thick and Creamy to the rescue!!!

20210814_120044.jpg

Silly school playground inuendos out of the way, a quick buzz on the belt sander to take away the meat and finish up with a good ol' bit of elbow grease and sandpaper. The curves were delightful to stare at and fighting the temptation to keep rubbing them and going "Oooooo... that's super smooth and sexy lookin", we pushed on...
20210814_120958.jpg

Time to cut the strips for the sides that would finally start putting all the 'bits' together.

Using Mr. O's wacky carpentry wizard tools (a cross-cut circular saw), all the side pieces and bracing bars were cut, all beautifully square and with tolerances so tight that you could barely fit a fag paper betwixt (I will add, the photo below is just placed together and not fixed in place before you say "Here, that ain't that close"). A rare situation considering that there is the usual amount of trial and error doing something for the first time and more times than not, pushing the boundaries of the tools we have available. All the same, a fantastic bit of carpentry if I do say so myself!

20210814_135217.jpg

Spurred on after a refreshing cuppa' and a cheeky sandwich we set about gluing and screwing it all in place... Whilst I left dad assessing and advising on how to go about the best fitment and screws needed etc, I nipped back down to the depths and proceeded to start sawing out the slots needed for the middle bulkhead, this time by hand! As quickly as Mr.O retrieved the lean mean carpentry machine, it was whisked away in favor of a nice sharp tenon saw. (it was the best way to cut them out by hand anyway)
20210814_150518.jpg
20210814_152141.jpg

With the sides glued up to the top, we clamped, glued, and screwed the bracing bars to help keep it all together and add screwing stability with the top.
20210814_155220.jpg 20210814_155423.jpg

All of a sudden, it all started to come together...
20210814_155638.jpg

We then gave the 2 ends the same treatment and finally...

20210814_182550.jpg

Utterly proud of what we managed to achieve today, this is where we left it. The bottom sides are purely held in by a fantastic snug fit and will be our next session's task. In the meantime, I will be giving it all a good sanding down to remove any unpleasant splinters and the likes...

Cheers,
Rich
 

Peter Insole

Western Thunderer
We certainly did have a great, and very satisfying building session yesterday! A happy mix of skills, experienced and experimental, using a handful of nice new tools and some more old, rather doubtful ones...

hzqSAM_6058.JPG

Those flat irons still continue to be useful in leu of clamps - another bit of bodging that is something of the norm in this household, and I fear might set a bad example ?!

hzqSAM_6061.JPG
hzqSAM_6067.JPG hzqSAM_6071.JPG

Well done Rich, thanks to the solebars being such a perfect fit, the structure was maintained with them just "dry" fitted, enabling that last photo to be taken - for both our posts.

Marking up and drilling loads of holes for all the ironmongery required to bolt the solebars, bolster beams, truss rods and step board brackets is going to be some fun to look forward to!

I rather think some fresh five and six mil drill bits would be a good idea, eh?!!

Pete.
 
Top