Yorkshire Dave
Western Thunderer
Of course, having done this, I’m looking at other diagrams and pre-Nationalisation designs… I really shouldn’t.
Railway modelling is an Odyssey for which the sirens are always alluring us to rabbit holes.....
Of course, having done this, I’m looking at other diagrams and pre-Nationalisation designs… I really shouldn’t.


Nice fettling, Adam. I took the easy route with the MEDFIT and made some cuts out of plasticard sheet, but yours will undoubtedly endure beyond mine!
Jan
Adam, would you mind sharing a pic of the deck of the Conflat S please, I have the kit and the deck is missing, so need to scratch build it. There's a drawing in the LNER wagons book and I just wanted to cross check with the kit.
Cheers
Tony

Ah, brilliant, thanks Adam for super quick reply. That concurs with the drawing and means some interesting carving of plastikard, although most of it can be hidden under the container.
Thanks very much
Tony
Nice work Adam, food for thought for me, I've got a half built Chivers one somewhere that needs a dose of thinning.
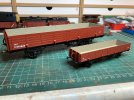
They are an improvement on those supplied with the kit. You can see the originals supplied on this one (the one in front is 4mm, the back one 7mm).The problem with Tubes and Pipes - anything with a lot of doors, really - is the accompanying detailing. I think the door control spring fittings were supplied as castings and I didn’t have those. Chances are they’d have been chunky and overscale so they’re no great loss, but you can’t very well afford to leave them off.
So what I’ve done is make up some triangles of brass, with a tail to insert through a hole I drilled through the solebar, from scrap. That provides the hinge pivot (left).
View attachment 217181
The arm that links that to the door is a bit of 0.7mm nickel silver wire filed square on three sides and bent through 90 degrees (I needed to file a Nick in that to allow the bend), poked trough a hole drilled through the planks. This was then soldered in place, through the door and to the pivot before being cut to length in situ.
View attachment 217182
Two done, six to do.
Adam
They are an improvement on those supplied with the kit. You can see the originals supplied on this one (the one in front is 4mm, the back one 7mm).


Wow that's a restoration challenge. Looking forward to seeing the results.Another long(ish) term wrestle. This Geen tank is made of very soft alloy and turned out to have a lot of epoxy holding it together. But it has brakes, is now broadly square, and is well on the way to becoming a tar tank. Additions since we last saw it include buffers, obviously, proper mechanical fixings from tank to chassis and retensioning of the retaining straps. There’s a new discharge pipe underneath for good measure.
Less obvious, but more significant, is the reprofiling of the ends which were very flat. I added a disc of 40 thou’ stuck on with some JB weld, took a big file to the result and tidied up with Milliput. It’s ugly (and parallax makes it look worse than it is).
View attachment 217748
I’m going to add heating inlets on one end and new end bracing, as well as solebar detail before thinking about a suitably anonymous small fleet owner eking out its last days. I have a kit for an Air Ministry tank in the drawer (from Rumney Models); I fear this is one instance where it might be better if they didn't appear in the same train...
Adam
Wow that's a restoration challenge. Looking forward to seeing the results.