AJC
Western Thunderer
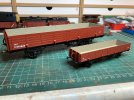
Late night line up:

It doesn’t look a lot, but advances have been made. I’m going to try to keep the pair of LNER vehicles going in parallel so both have all the ABS bits in place and now buffers. Meanwhile the SECR brake has had its handrails straightened and the chassis painted. Handrails will be whitened before bed.
Adam