Crymlyn A Shop Techniques. Ex. PTR 816

davey4270

Western Thunderer
301.

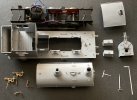
A start has been made on a new contract at Crymlyn A Shop. The Boyos have cut the frames and spacers. If you believe Steam Railway, as the frames have been cut, it already exists. Would anyone care to hazard a guess as to the prototype! I’ll give a clue, it has 6 wheels.
I won’t write up another blow by blow account, did I hear someone say thank ****, as I have previously done this on two occasions. I will, however, post occasional updates. If anyone is interested in these previous blogs, they can be found on this site.

IMG_3337.jpg
 
Last edited:

davey4270

Western Thunderer
302.

The frames have been cut to take sprung horn blocks and soldered together. The dummy firebox sides have been added and the various tabs filed flush with the sides. The coupling rods have been assembled and a start made on cleaning up and reaming out the rods to match the crank pin bearings. As you can see the rods will pivot on the central bearing.

IMG_3346.jpg
 
Last edited:

davey4270

Western Thunderer
303.

A weekly visit to Crymlyn A Shop finds the Boyo’s progress on ex Port Talbot Railway 816. The coupling rods have been reamed out to suit the crank pin bushes and Slater’s sprung horn blocks on the two leading axles have been assembled and aligned using axle jigs and the coupling rods. The crank pin bushes have been shortened to suit the thickness of the coupling rods and the axle box stops in the horn blocks have been adjusted to level the chassis. The centre axle box stops have been adjusted to give 0.3mm height clearance to allow the frames to sit on the outer axles. This will prevent the model from “rocking” on the centre axle. The centre axle will carry some weight when the springs are inserted. Also added are the front and rear guard/life irons and the representation of valve gear inside the frames between the leading axles. The brake block/hangers have also been laminated.

F61F0FAE-D011-48F7-A988-EF29DB7F7F96.jpeg
 

davey4270

Western Thunderer
304.

A weekly update on ex PTR 816. There’s little progress to show due to various other commitments. However the brake rigging has been assembled and fitted along with the rear sandboxes. There are 2 holes at the front and rear bottoms of the sandboxes but I think I’ll go with one new central hole for the sand pipe and a washer to represent the flange. The top of the box will interfere with the positioning of the rear top wipers and an early thought is to remove the upper parts of the front and rear of the boxes leaving the outer sides intact. The removed parts shouldn’t be visible behind the valances and the wiper contact should be able to pass through this hole.
The front and rear inner buffer planks have been added to the footplate along with the side valances, various rivets being “raised” during this process. The locomotive as built had a short bunker, this being enlarged by the GWR. An extension was added to the rear buffer plank and a new buffer plank added behind this with the footplate being extended to suit. The kit caters for this with suitable etches which will be fitted beneath the footplate to the left of the picture which has been inverted for clarity, or not.

F193864F-F2B2-42C0-BB8C-75541D7550E4.jpeg


davey4270

Western Thunderer
305.

The weekly update on ex PTR 816 sees the following progress:
The cosmetic driving wheel leaf springs meant soldering together 4 laminations. A fold up front for the splashers with a flat piece of brass to curve for the tops. The cut out for the springs weakened the parts so they wouldn’t curve evenly. Then there was the bottom piece, I soldered it at the back after supergluing it at the front. A day’s faffing about with little to show for it. Even worse it’ll probably be hidden underneath the tank!
The front spectacle plate window frames were soldered in position along with the beading around the cab side cut outs.
Rivets were raised on the fold up cab and sides and, no, I didn’t count them although I’m sure there’s less than on ex CM&DPLRly 29!
The cab was folded up with the rear spectacle plate Blutaced (a new word for the English dictionary?) in place and held together with a rubber band. Once I was happy that it was square and level on the footplate, it was tack soldered in place. A couple of tacks will make it easier to adjust if necessary. The top of the rear bunker, which is part of the cab side etch, was also shaped and soldered together.
I made 2 strips of scrap etch to fit across the chassis spacers next to the fixing holes which will prevent these and the floor of the loco from distorting when the chassis fixings screws are tightened.
Finally the 2 retaining nuts were soldered in position on the footplate. I paint the screws with brass blacking which prevents the solder from sticking to the screw. I know it’s suggested that the screw is fitted from above pointing downwards and the nut used to attach from below but I find it almost impossible to tighten the nut.

IMG_3412.jpg
 

davey4270

Western Thunderer
306.

A weekly update from Crymlyn A Shop sees the Boyos at work on GWR 816. The tank has been formed and the side handrail knobs fitted. The firebox has been constructed and soldered to the footplate and cab front. Some minor fettling has the tank sitting snugly in position.
Dai the Paint can be seen doing something at the rear of the locomotive with a few of the girls from the local leisure centre while Owen the Spanners and Percy Veerance work on the centre axle box. Our foreman and Baldrick, the Crymlyn A Shop gofor, chat with Orla Board the Irish canteen lady.

IMG_3427.jpg
 

davey4270

Western Thunderer
307.

A weekly update on 816 shows little visual progress but much has been done underneath the skin so to speak. 2 holes have been drilled through the cab front and the tank rear former.
2 x 14BA nuts have been soldered inside the tank former which allows the tank to be held tightly against the cab front using the various tank tabs to locate it and 2 screws passing through the cab front. A similar procedure has been used to attach the smoke box base to the footplate with 2 more screws passing up through the footplate. This is just visible in one of the pictures. This makes the tank removable for painting and detailing. Portholes and coal bunker top doors were soldered to the cab rear and the cab floor/bunker rear (or should it be front) panel assembled to check for fit. Everything seemed ok so the bunker sides were soldered to the footplate using the cab rear as a spacer which was then also soldered in position. This was soldered 0.5mm in from the cab side rear as there is a beading strip which slightly overlaps the edge. The smoke box base/rear was soldered to the lower boiler panel and also to the smoke box/tank front.
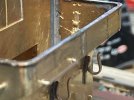
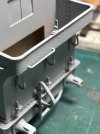
Visually the tank filler access handrails have been fitted along with the 2 front tank lifting brackets. The lifting rings will be fitted after painting. The instructions suggest fitting another 2 brackets in a similar position at the rear but a picture of Robert Stevenson built 816, ex PTR 17, shows a different arrangement. At the rear there is only a central lifting bracket and it is not very clear but the tank filler stop and tank vent also appear to be missing.
Which of Sod’s laws states that after packing away your rivet tool having done the bunker rear panel, you will find more on the cab interior floor/rear panel!

IMG_3448.jpg
img134.jpg
 

davey4270

Western Thunderer
I have footplated sister engine 813 and it's a very capable loco and gives a good ride.

Hi Phil.


Thank you for your comments. HWR816 that I have chosen to model was an earlier locomotive built by Robert Stephenson in 1898 and 813 and 813 was built by Hudswell Clarke in 1900/01. There appear to be minor detail differences between the two builders, eg the position of tank lifting brackets so I hope I can do it justice.
I have attached two pictures, one showing the model with its wheels and motion refitted as I intend dragging it around a test track I hope to visit next Tuesday and another of 813 on a visit to the now defunct Swansea Vale Railway.

IMG_3453.jpg

IMG_3330.JPG
 

davey4270

Western Thunderer
308.

The weekly update on progress with GWR 816 shows some work on the bunker and cab side handrails.
Firstly, a small problem with the cab floor/internal bunker front fitting not sitting on the floor was investigated and the 6 BA securing nut was found to be too high. This was duly filed down to about half its thickness with the securing screw fitted. This solved the problem and the modified fitting can be seen in the second picture. This view and modification is no longer possible due to the bunker rear being fitted.
The bunker rear panel was “bent to shape, rivets raised and filed to fit” as suggested in the instructions. Perhaps the less said about this the better.
Holes for the vertical doorway handles were drilled through the footplate and 0.7mm wire was soldered into the excess cab side cut out beading and beneath the floor where the wire protruded. The excess cab beading still needs filing back. 816 only had bunker handrails on the fireman’s side but had an extra vertical handrail on each side of the bunker just behind the cab doorways. This can be seen in the prototype picture in last week’s post. Any suggestions gentlemen?
The wheels and motion had been refitted for some “running in” which was accomplished by towing it behind various “consists” around the test track at Pantyfynnon last Tuesday evening.

B1BF10E3-CE1D-443E-9D55-BBEB9CB4C825.jpeg

956E4DC6-94D9-4CBE-8CA9-3FE7114A73FA.jpeg
 

davey4270

Western Thunderer
309.

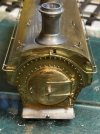
816 update shows the model dismantled with the smoke box front overlay added. My chosen prototype appears to have a plain GWR style door but of the 2 castings supplied, the correct style is too big while the dished Dean type is the correct size but the wrong style. I might have a suitable spare otherwise it’s a job for a good file. I’m glad it’s a white metal casting.
The side panels for the lower smoke box sides are fractionally too small to sit on the outside and soldering inside will be a real chore. The jury is still out here on making new panels as they will be mostly hidden behind the rather large sandboxes.
At the rear the lower bunker rivet strip overlay has been added along with the top overlay. The reverser has been made up and added to the floor/bunker front fitting which has also been fitted. Just visible in the picture is the extra vertical handrail fitted to the bunker side adjacent to the cab doorway.
There appear to be “L” section brackets attaching the tank rear supports/firebox sides to the footplate and below the tank. These are not represented correctly with the kit so as this is mostly hidden behind the injectors, Percy the Pipe will assemble these and see if anything will be visible before attempting to represent them.

IMG_3499.jpg
 

davey4270

Western Thunderer
310.

Forgive me Father for I have sinned. I have fallen from the true path by the distraction of a vintage Lambretta.
However, the smoke box sides have been fitted along with the front tank support brackets.
Crymlyn A Shop’s Percy the Pipe has made a start on fitting up the pipework for both injectors. The etched holes in the cab front did not align th 816’s pipe runs so new ones have been drilled. I’m not saying they are wrong but didn’t suit my prototype.

A30019DB-3717-46BF-8AF8-46F458F2DF20.jpeg
 

davey4270

Western Thunderer
311

Progress on ex PTR 816 sees the chassis painted and 2 sets of wheels fitted. The centre wheels have the balance weights fitted, are painted and these will be fitted when the paint has hardened. The motor/gearbox has also been fitted.
Regarding the outer wheels, balance weights across 5 spokes didn’t look as good as the shorter option over 3 spokes. So I could take the easier option of shortening the etched weights rather than make new ones.
The coupling rods can then be refitted along with top wiper pickups which will give a running chassis.
Hopefully this will give me encouragement to complete the body.

7ED057EB-4FF6-4243-92B9-9D96BE849BDE.jpeg
 

davey4270

Western Thunderer
312.

That was a stroke of luck, a spare cast brass door in my spares box which is the perfect size and shape for the door fitted to 816. I’m not sure about the 6 bolts but they can be filed off if necessary. There’s a circular disc supplied for one of the w/m doors so I think I’ll also fit this to represent the “seating ring” if that’s what it’s called. I also found pairs of brass gauge glasses and backhead clack valves. Must rush out and buy a lottery ticket while my lucks in.

59359BDA-24D1-4B9A-AD0B-2C24AD8F57C7.jpeg

385CB850-5366-49B9-B2B9-77AB0A7B4174.jpeg
 

davey4270

Western Thunderer
Looks like the back left buffer's in need of some TLC.
Dave
Unfortunately it had some TLC from my soldering iron. The housings are not very good but came with the kit. I’ll try a repair with some low melt otherwise it’s a new set.
 

davey4270

Western Thunderer
313.

It’s been a while since any progress has been made on GWR 816 which is mainly due to the disruptive influence of house builders. However a couple of hours this morning saw the missing tank/cab front bracket made and fitted, it’s only soldered to the cab front allowing the tank to be removed for painting, and both vacuum pipes and pipe work to be fitted.

D433AD30-E867-466F-A0A0-C543039A9E0C.jpeg

525871B7-D052-4493-99E9-5572A31B41E5.jpeg

410E0A6C-375E-493A-B7DB-7EB7D5206BA1.jpeg
 
Last edited:

davey4270

Western Thunderer
315.

I’m still suffering from a lack of motivation due to building work but made some progress today.
Further details as captions with the pictures:

IMG_3899.jpg
An upside down view of the firebox. I like to make my fireboxes removable for ease of painting. The tab and slot fitting at the base is clearly visible, I have filed a slot in the spectacle plate and soldered a piece of 0.7mm wire to the inside of the firebox to clip in place and hold it securely.

IMG_3897.jpg
Percy Veerance has been hard at work forming the main handrails. Fresh from his Christmas holidays he successfully formed it in one piece and even remembered to thread the central knob in place! Also added are the smoke box dart and door handle as fitted to this prototype along with a L/H steam cock. Top lamp iron still to be fitted.

IMG_3896.jpg
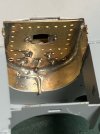
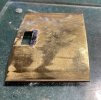
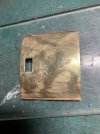
The cab roof was etched to represent preserved 813 which has the vent to the rear with the cover sliding forwards. 816 has a different arrangement with a smaller vent in front of the steam pipes to the whistles with the cover sliding to the left. By reversing the roof the cut out provided was close to my prototype but slightly too wide. I soldered a piece of scrap to fill some of the oversized cut out.

IMG_3898.jpg
After cleaning up the modification. The front still needs about 1mm removed before adding the sliding cover.

IMG_3900.jpg
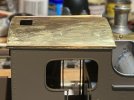
In place on the cab.

img134 (2).JPG
The prototype. The cut out isn’t visible but by enlarging the cropped picture you can see the sliding cover.
 
Last edited:
Top