Dan's Workbench - Slater's PMV

Dan Randall

Western Thunderer
4th July 2010

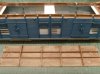
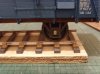
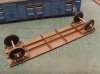
Right then, who remembers this?....
SNV32622.JPG
I started this ages ago (in my pre-S7 days), but was having a few problems with the rather large amount of lead I'd put inside! When it was built in O/F with no suspension and clunky flanges, track holding probably wasn't an issue.

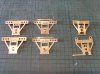
With the long wheelbase and the finer flanges involved with S7, Cynric pointed out that I probably ought to have some form of suspension. As an ex P4 modeller, I couldn't argue with that, so I bought some Slater's sprung W-irons.

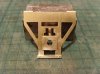
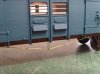
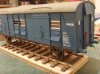
Unfortunately, there was so much lead inside, the brass springs were bottoming out, so it was still effectively a rigid underframe. I then managed to get some replacement steel springs from Eileen's but these still weren't strong enough to overcome the lead. I decided to cut out the portion of the floor to which the lead was attached, remove some of the lead and replace the floor. The floor had been well and truly attached to the solebars with MEK, so getting it out was a little messy to say the least....
SNV33008.JPG

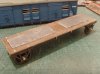
The lead came off easily enough, but the floor and underframe girders were a bit chewed-up....
SNV33010.JPG

SNV33011.JPG


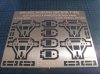
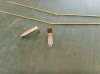
Slater's are pretty good at selling spares, so I decided to purchase a new floor and underframe moulding from them....
SNV33013.JPG


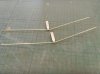
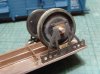
I cleaned-up the inner edges of the solebars and then, to make a neater, easier job, removed more of the floor, using this nifty saw blade....

SNV33014.JPG

SNV33015.JPG

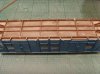
The new underframe was then trimmed to size....

SNV33016.JPG
 

Dan Randall

Western Thunderer
(Continued)

Having fitted it to the floor, it was tried for size....
SNV33017.JPG

SNV33018.JPG


That was all some time ago and when I revisited the project, I decided I wasn't very happy with the Slater's sprung W-irons, as the working parts were quite noticeable....

SNV32496.JPG

I discovered that Bill Bedford listed some SECR/SR W-irons that appeared to be a match for the Slater's ones, so I placed an order. Unfortunately, they were not stock items and took about 3 months to arrive. When they did come, I discovered that although they looked the right shape, they were dimensionally wrong for the PMV. :(


I decided that if I was ever going to finish this thing, I would have to do a drawing and get my own etches done and here they are....
SNV33415.JPG


I put them together yesterday evening and am pretty pleased with the results...SNV33416.JPG .


My etches are to the left and middle, with Slater's on the right for comparison. Under load, the sprung cradles will not be visible from the outside. The ties at the bottom of the W-irons should have some retaining rivets or bolts and although I included half-etched dimples on the back, they didn't emboss as well as I'd hoped. I decided to drill right through and in due course, will fit something suitable from the Scale Hardware range....

http://www.scalehardware.com/


I'll come back to this project when I get a spare moment or two and will post any updates on here. :)


Regards

Dan


My other workbench threads:

Hawksworth Full Brake, S7 (Hurn Models)

7028 Cadbury Castle, S7 (Mitchell/JLTRT)

D 1031 Western Rifleman (JLTRT)
 

Attachments

  • SNV33416.JPG
    SNV33416.JPG
    200.4 KB · Views: 151
  • SNV33415.JPG
    SNV33415.JPG
    191.3 KB · Views: 151
  • SNV32496.JPG
    SNV32496.JPG
    183 KB · Views: 153
  • SNV33018.JPG
    SNV33018.JPG
    208.4 KB · Views: 153
  • SNV33017.JPG
    SNV33017.JPG
    209.1 KB · Views: 153

Ressaldar

Western Thunderer
Hi Dan,

some very neat butchery there, well done.

I built a pair of these 'as supplied' quite e few years ago and as you would expect, they were 'particular' as to the radius that they would traverse without derailing. About a year ago I was asked to build another pair and this time I used the 'alternative' suspension kit - no problems, even without any additional weight.

I am soon to embark on the new layout and yet another pair are on the horizon - the question is, would your etches be available, and would they be suitable for finescale?

regards

Mike
 

bogusman

Western Thunderer
Hi Dan
Nice to see you are still using precision tools for your modeling :lol: . I must admit that the axle guards look very nice made up (the etching sheet looked good when I visted you last week). Keep it up.

Regards
Pete
 

Dan Randall

Western Thunderer
Ressaldar said:
Hi Dan,

some very neat butchery there, well done.

I built a pair of these 'as supplied' quite e few years ago and as you would expect, they were 'particular' as to the radius that they would traverse without derailing. About a year ago I was asked to build another pair and this time I used the 'alternative' suspension kit - no problems, even without any additional weight.

I am soon to embark on the new layout and yet another pair are on the horizon - the question is, would your etches be available, and would they be suitable for finescale?
regards

Mike
I do have a couple of spare etches though I'm not sure how much I'd need to charge for them yet. Also, if you're not desperate for them, I'd suggest holding on until I've installed mine and seen how they perform! They ought to be suitable for finescale and just screw to the floor hard against the solebars, like the Slater's sprung version. I've made a mental note of your interest, but if it goes a bit quiet on here, feel free to give me a reminder if I'm slacking. :)


bogusman said:
Hi Dan
Nice to see you are still using precision tools for your modeling :lol: . I must admit that the axle guards look very nice made up (the etching sheet looked good when I visted you last week). Keep it up.

Thanks Pete - glad you liked them. :)


Regards

Dan


My other workbench threads:

Hawksworth Full Brake, S7 (Hurn Models)

7028 Cadbury Castle, S7 (Mitchell/JLTRT)

D 1031 Western Rifleman (JLTRT)
 

Ressaldar

Western Thunderer
Hi Dan,

I'll keep in touch on this one. As I said, I am about to start a new layout, so a long way to go yet.

regards

Mike
 

Dan Randall

Western Thunderer
I've been doing some work on the running gear of the PMV recently, but was having some difficulty getting the thing to sit properly on its new sprung W-iron etches. Although the wheels were all sat nicely on the track, parts of the W-irons that should have been hidden, were peeping out below the solebars.

After studying things for a while, I realised that instead of being nice and flat, the floor/chassis member mouldings had started to curl downwards near the corners. It's pretty common knowledge that if you start laminating styrene, it can do funny things once you start sloshing some solvent around, but it didn't occur to me at the time that I should have bonded it to the body straight away to prevent warping. :headbang:

So, yet another floor and underframe moulding (3rd time lucky!), was ordered from Slater's and in pretty short order, I assembled them, fitted the chemically blackened W-irons, added a more restrained dose of lead to the upper side and glued them into the body....

SNV33441.JPG

SNV33442.JPG

SNV33443.JPG

SNV33445.JPG

SNV33447.JPG
The PMV now trundles smoothly and quietly along my yard of S7 track, but I must build a turnout soon and see how it performs through that. :)

To eliminate the rather large amount of sideplay between the bearings and axle ends, I had to space the bearings away from the sprung carriers, using a rudimentary jig made from some paxolin. This was a bit of a drag to do and to make life easier next time (for both myself and potential purchasers), I intend to modify the W-iron etches to include some spacing washers (something I should have done in the first place..!). :rolleyes:


Having got that side of things sorted, it was time to replace the Queen posts (I think that's what they're called) and add the trussing that accompanies them. I think the original Queen posts were part of the solebar moulding and bit the dust a long time ago (along with the Mk1 floor!). I was fortunate in having one of my very rare moments of common sense at the time and did a dimensioned sketch (and even took a photo), so I'd be able to make some replacements at some point.

They didn't take long to do and were fashioned from some Nickel Silver fret waste and some Nickel Silver strip, whilst the trusses were formed from brass wire supplied with the kit....

SNV33449.JPG

SNV33450.JPG

SNV33453.JPG
They're just in temporarily at the moment and need to be chemically blackened before permanent installation. I can then think about installing the V-hangers and other brake gear components. :)


That's all for now.


Regards

Dan


My other workbench threads:

Hawksworth Full Brake, S7 (Hurn Models)

7028 Cadbury Castle, S7 (Mitchell/JLTRT)

D 1031 Western Rifleman (JLTRT)
 

Attachments

  • SNV33453.JPG
    SNV33453.JPG
    163.1 KB · Views: 62
  • SNV33450.JPG
    SNV33450.JPG
    206.8 KB · Views: 62
  • SNV33449.JPG
    SNV33449.JPG
    209.8 KB · Views: 62
  • SNV33447.JPG
    SNV33447.JPG
    174 KB · Views: 63
  • SNV33445.JPG
    SNV33445.JPG
    203.6 KB · Views: 64
  • SNV33443.JPG
    SNV33443.JPG
    214.9 KB · Views: 63
  • SNV33442.JPG
    SNV33442.JPG
    200.8 KB · Views: 63
  • SNV33441.JPG
    SNV33441.JPG
    193.7 KB · Views: 63

Dan Randall

Western Thunderer
CME & Bottlewasher said:
I thought it was only me that had to butcher and then make good - I like the way that you have gone about it though, thanks for Posting :thumbs:

Hi CME

It all went very well when I first started building it in OF. I'd glued about 14oz of lead inside and with the clunky flanges, it was never in any danger of leaving the rails. It was only because I decided to convert it to S7 and fit suspension, that I had to resort to some major surgery.

I'd like some more of these vehicles in due course (and, perhaps, the CCT variant too), but building them in S7 from the outset will present no problems at all. :)


Regards

Dan


My other workbench threads:

Hawksworth Full Brake, S7 (Hurn Models)

7028 Cadbury Castle, S7 (Mitchell/JLTRT)

D 1031 Western Rifleman (JLTRT)
 

Jordan

Mid-Western Thunderer
Dan Randall said:
I started this ages ago (in my pre-S7 days), but was having a few problems with the rather large amount of lead I?d put inside! When it was built in OF with no suspension and clunky flanges, track holding probably wasn?t an issue.
That's my current strategy... :oops: but it does raise a question- (sorry if this is a thread hijack)

What sort of weight is recommended for O scale wagons, and does it differ between rigid and suspension chassis? You mention a "more restrained amount of lead" in a later post, what does the wagon weigh now?
 

28ten

Guv'nor
Jordan said:
[quote=""Dan Randall"":12tyvp50]
I started this ages ago (in my pre-S7 days), but was having a few problems with the rather large amount of lead I?d put inside! When it was built in OF with no suspension and clunky flanges, track holding probably wasn?t an issue.
That's my current strategy... :oops: but it does raise a question- (sorry if this is a thread hijack)

What sort of weight is recommended for O scale wagons, and does it differ between rigid and suspension chassis? You mention a "more restrained amount of lead" in a later post, what does the wagon weigh now?[/quote:12tyvp50]
I use about 200-250g in wagons and 300g+ in coaches, but I like my stock to to have a bit of mass :laugh:
 

Dan Randall

Western Thunderer
Jordan said:
"Dan Randall"":2c9cl2jz][/quote][/FONT][quote="Jordan said:
I started this ages ago (in my pre-S7 days), but was having a few problems with the rather large amount of lead I?d put inside! When it was built in OF with no suspension and clunky flanges, track holding probably wasn't an issue.
That's my current strategy... :oops: but it does raise a question- (sorry if this is a thread hijack)

What sort of weight is recommended for O scale wagons, and does it differ between rigid and suspension chassis? You mention a "more restrained amount of lead" in a later post, what does the wagon weigh now?[/quote:2c9cl2jz]

Hi Jordan

I dug the kitchen scales out a little while ago and can tell you the PMV now weighs just over 7oz, so it's about half of what it was before. I keep thinking it feels too light, but that's probably because I was used to it feeling like a brick. :lol: The weight may increase slightly as the other underframe components are added, but as they're mostly plastic, I don't expect too much of a change. I mentioned earlier that I'd like to build a turnout at some stage and once this is done, I'll be trying out the PMV and seeing how it performs. If I feel a little additional weight is called for, I'll bung some in between the chassis members.

Your question about weights got me thinking though, so I checked out the Gauge O Guild's web site and found a small piece on weighting rolling stock. They do suggest that adding a consistent amount of weight to items of plastic rolling stock is beneficial (particularly if stock is to be propelled through point work) and I think it's worth quoting their summary here: "We recommend that model rolling stock should weigh not less than 1 gram per millimetre of vehicle length (equal to approximately 1 oz/in), with a minimum weight of 125 gm (4.4 oz)".

If I'd known about this a few days ago, I might have added a little more weight to my model, as on that basis, my PMV should weigh in at 8 3/4 oz, but at least I'll know for future builds. :)


Regards

Dan


My other workbench threads:

Hawksworth Full Brake, S7 (Hurn Models)

7028 Cadbury Castle, S7 (Mitchell/JLTRT)

D 1031 Western Rifleman (JLTRT)
 

Jordan

Mid-Western Thunderer
Dan Randall said:
I dug the kitchen scales out a little while ago and can tell you the PMV now weighs just over 7oz, so it's about half of what it was before. I keep thinking it feels too light, but that's probably because I was used to it feeling like a brick. :lol:
Hi Dan, this post reminds me that my Mrs doesn't believe in Kitchen Scales (still a good cook, though! ;) ) so all this talk of weight is actually a bit academic for me so far- I have no idea what my wagons actually weigh- I just like them to feel a bit 'hefty'...!! :scratch: :oops:
Maybe I need to buy myself a set of scales for the workshop... they'd find no place in our kitchen!! :lol: :lol:
 

Dan Randall

Western Thunderer
28ten said:
28ten said:
if you had asked me - off the top of my head- I would have said 250g for the PMV

You wouldn't have been far wrong in that case Cynric - going on the GOG's figures, my PMV should weigh in at 222.25 grammes. :)


Jordan said:
Hi Dan, this post reminds me that my Mrs doesn't believe in Kitchen Scales (still a good cook, though! ;) ) so all this talk of weight is actually a bit academic for me so far- I have no idea what my wagons actually weigh- I just like them to feel a bit 'hefty'...!! :scratch: :oops:
Jordan said:
Maybe I need to buy myself a set of scales for the workshop... they'd find no place in our kitchen!! :lol: :lol:

I'd forgotten we even had some kitchen scales (even though I've used them in the past :oops: ), until you asked me how much the PMV weighed now! Now I know of the existence of the GOG's weighting guidelines, I can see them being used (by me at least), a lot more. ;) I reckon it would be well worth you investing in some - you only need something basic and they would probably be pretty inexpensive. :)


Regards

Dan


My other workbench threads:

Hawksworth Full Brake, S7 (Hurn Models)

7028 Cadbury Castle, S7 (Mitchell/JLTRT)

D 1031 Western Rifleman (JLTRT)
 

Dan Randall

Western Thunderer
Is this finished yet Dan?

Afraid not. Modelling time is very scarce since our daughter was born in January 2011 and in less than five weeks, there'll be another one! :eek:

I have to do my modelling on the kitchen table, but can only do that now after Verity has gone to bed, by which time, I can't usually be bothered to get it all out, do what needs doing, then put it all away again! However, having recently re-vamped the wiring diagram for my JLTRT Western, I did cut some Veroboard to size a couple of weeks ago, with a view to getting it re-wired and ultimately, finished. Unfortunately, I haven't actually got around to soldering anything to it yet!

My main modelling output these past few months (if you can call it that), has been doing some drawing work for various etches and I'm also getting to grips with 3D CAD. Funnily enough, I'm working on some 3D brakegear for the Slater's PMV, as the clunky plastic stuff supplied doesn't really do it for me. If it's a success, be assured there will be some further progress pictures on this very thread, as the brakegear is the main reason for the PMV's lack progress lately.

Thanks for you interest - it's nice to see one of my threads on the front page again! :)


Regards

Dan
 

iploffy

OC Blue Brigade
Dan do I remember right in the other place you did an etch for compensated wheel sets, or am I totally loosing my mind.
 

Dan Randall

Western Thunderer
Dan do I remember right in the other place you did an etch for compensated wheel sets, or am I totally loosing my mind.

It wasn't the other place, it was here - scroll up to post number 2. :)

Actually, I think I'll be re-visiting the suspension too before this project is finished. I'm leaning towards using Adrian Swain's (ABS), excellent cast whitemetal w-irons/springs/axleboxes, but with a similar discrete springing system behind. I think I've actually already drawn the etches for this, but I've got so many projects on the go, I can't say for certain! :oops:

Anyway, once I've sorted out the brakegear, I'll take another look at the suspension and will, of course, post any progress on here. Don't hold your breath though....


Regards

Dan
 
Top