You are using an out of date browser. It may not display this or other websites correctly.
You should upgrade or use an alternative browser.
You should upgrade or use an alternative browser.
4mm From an unpromising start - shop around
- Thread starter Neil
- Start date
Neil
Western Thunderer
Most work over Christmas has been directed at the chassis, both from toads, one Bachmann and one Hornby. The Bachmann has been a relatively easy hack as it's made from the sort of plastic susceptible to solvent which means that the extra bits required to give an impression of timber frames could just be stuck on.

Here it awaits filler for the solebars, extra footboards and thicker buffer beams.
The Hornby job is moulded in a plastic not unlike that used in washing up bowls and so the chassis had to be cut back at the ends, full length solebar fillers stuck in with Evo Stick contact adhesive and the ends of the chassis built up in plasticard and then stuck to the protruding solebar filler pieces.

It was all a bit of a faff and at one stage I thought of buying another Bachmann toad just for the chassis. Despite them being among the cheaper of the rtr vans on the second hand market, the Yorkshireman in me won out and I persevered with the Hornby one.

Here it awaits filler for the solebars, extra footboards and thicker buffer beams.
The Hornby job is moulded in a plastic not unlike that used in washing up bowls and so the chassis had to be cut back at the ends, full length solebar fillers stuck in with Evo Stick contact adhesive and the ends of the chassis built up in plasticard and then stuck to the protruding solebar filler pieces.

It was all a bit of a faff and at one stage I thought of buying another Bachmann toad just for the chassis. Despite them being among the cheaper of the rtr vans on the second hand market, the Yorkshireman in me won out and I persevered with the Hornby one.
Simon
Flying Squad
I'm glad the Yorkshireman won out, great to see things being more rather than less changed I think.
I have just looked at my very basic part hacked bright orange Jouef shunter and remembered the very lovely etched plates you gave me for it about a million years ago.
I probably need a small "Micro Francaise" in my life, your chopping and changing is inspiring me....
Simon
I have just looked at my very basic part hacked bright orange Jouef shunter and remembered the very lovely etched plates you gave me for it about a million years ago.
I probably need a small "Micro Francaise" in my life, your chopping and changing is inspiring me....
Simon
Neil
Western Thunderer
Since my last post I've faffed around a bit with the underframes adding buffers and bolt heads. With that done I turned my attention back to the bodies. The basic shell is OK but they need a roof overlay so that the missing overhang can be depicted. I always use 20thou plasticard for 4mm scale roofs and I always heat form it. I thought it might be useful to describe how I do it as it's the easiest way I've found.
For four wheeled stock I find that a large mayonnaise jar has about the right depth and diameter. I cut a long strip of 20 thou to a couple of mm longer than the roof, curl it up and insert it into the jar. Do not be tempted to use the cafetière, the repercussions will not be pretty.
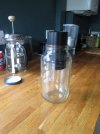
The longer the strip the better but it needs to go at least half way round the jar though further is better.
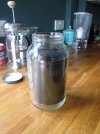
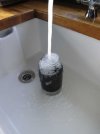
To avoid thermal shock the jar will need to be warmed, place it in the sink and run hot water into it for a minute. Empty, and now it's safe, pour boiling water from the kettle into it. Leave for a minute while the heat does its work and then cool by running the cold tap into the boiling water, this cools more gradually than emptying the boiling water and then filling with cold. I've never broken a jar doing this. I've several jars of different diameters I keep for doing this and a couple of tall storage tins for longer roofs. Works a treat with corrugated plasticard too.
For four wheeled stock I find that a large mayonnaise jar has about the right depth and diameter. I cut a long strip of 20 thou to a couple of mm longer than the roof, curl it up and insert it into the jar. Do not be tempted to use the cafetière, the repercussions will not be pretty.

The longer the strip the better but it needs to go at least half way round the jar though further is better.


To avoid thermal shock the jar will need to be warmed, place it in the sink and run hot water into it for a minute. Empty, and now it's safe, pour boiling water from the kettle into it. Leave for a minute while the heat does its work and then cool by running the cold tap into the boiling water, this cools more gradually than emptying the boiling water and then filling with cold. I've never broken a jar doing this. I've several jars of different diameters I keep for doing this and a couple of tall storage tins for longer roofs. Works a treat with corrugated plasticard too.
simond
Western Thunderer
Next time you’re purchasing something golden & warming and circa 40 degrees, consider the packaging. I have a couple of tins that were supplied with spirits bottles that are ideal for this kind of palaver. I tend to use an old pair of MrsD’s tights to hold the plasticard to the outside of the tin, once used, and dried, they are then stored in the tin for next time.
And no thermal shock issues to contend with.
what went wrong using the cafetière?
And no thermal shock issues to contend with.
what went wrong using the cafetière?
Neil
Western Thunderer
The cafetière, lets just say not a good idea to mix up model-making equipment with kitchen equipment.
Leaving the kitchen intact and unsullied sections were cut from the curved plasticard just fractionally over width for the carriage roof. Sticking them down with mekpak was a bit of a shit or bust operation. There's a large area to be stuck and the mekpak evaporates quickly so I flooded the carriage roof with a big brush full before slapping the overlay on top, lining it all up by eye.
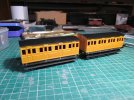
Having a fractionally oversized overlay allows for a bit of latitude with placement though there has to be some gentle sanding back to give the required overhang. Here are the bodies in a witness coat of grey, plonked onto the underframes to see how it all looks.
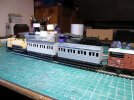
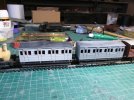
Leaving the kitchen intact and unsullied sections were cut from the curved plasticard just fractionally over width for the carriage roof. Sticking them down with mekpak was a bit of a shit or bust operation. There's a large area to be stuck and the mekpak evaporates quickly so I flooded the carriage roof with a big brush full before slapping the overlay on top, lining it all up by eye.

Having a fractionally oversized overlay allows for a bit of latitude with placement though there has to be some gentle sanding back to give the required overhang. Here are the bodies in a witness coat of grey, plonked onto the underframes to see how it all looks.


Neil
Western Thunderer
The carriages have entered the paintshop so while there's nothing to see I thought I'd take a look into the economics of the build and how it relates to our hobby.
Checking back with e-bay I find that the pair of Tomy carriages cost me three pounds twenty. If I'd bought a pair of Bachmann Annie and Clarabel carriages I'd be forty quid poorer and they'd still need work doing. Upping the spec a bit to the Hornby generic four wheelers or the yet to arrive Hattons examples would up the price again to sixty quid though the work I'd have to do would be limited to a possible repaint and a definite touch of weathering.
'What about all those extras you've used in the build' I hear you say. Both Hornby and Bachmann toads were picked up a good while ago for less than a fiver, they are the least in demand relatively modern spec brake vans; perhaps the popularity of the GWR has waned, certainly supply seems greater than demand at the moment. I've used some plastic, mainly from my offcuts pile and there'll be some paint and glue too but this stuff is really hard to accurately price up.
While I've made a cost saving the real benefit in taking the route I have is that I've had a lot of fun at the workbench along the way in half hour to an hour long chunks. Two gruesome toys are becoming pleasant (if not finescale models) with a high enjoyment to cost ratio. A result in my book.
Heather Kay
Western Thunderer
high enjoyment to cost ratio. A result in my book.
And this, I think, is the point.
Simon
Flying Squad
Brilliant. Apart from the fact that they look good, I love the re-using aspect of our hobby just as you describe it.
The signal box I'm currently fiddling with is using lots of ancient pieces and offcuts of Plastikard, I am making "timber" sections by cutting strips off sheet material and then chivvying with knives, files and wet and dry paper to make them into useable pieces in sizes that suit my requirements, much cheaper than Plastruct etc.
It makes one hell of a mess but I am finding it strangely therapeutuic and calming.
Er, got to go, I'm off to do some hoovering.....
Neil
Western Thunderer
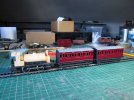
The carriages have passed through the paintshop (big cardboard box and rattlecans) and this morning had their door handles fitted. Here are the pair in a sort of NER dark crimson (Vauxhall burgundy red over oxide primer), carriage numbers applied and a sealing coat of Halfords matt lacquer on top.
The door handles are filed up from brass coated dressmaking pins. I held them in a pin chuck and used the flats to ensure I filed opposite sides.
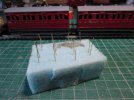
When cutting the handles back to a sensible length I held the tops in a pair of pliers with the bottom still stuck into the sponge and snipped just under the pliers. Nothing pinged away, I was concerned that if the pointed waste got away into the carpet I'd only find it by standing on it.
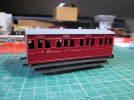
The handles were superglued into place, glue on the inside only. Next up glazing followed by engineering a chassis to body fixing.

The door handles are filed up from brass coated dressmaking pins. I held them in a pin chuck and used the flats to ensure I filed opposite sides.

When cutting the handles back to a sensible length I held the tops in a pair of pliers with the bottom still stuck into the sponge and snipped just under the pliers. Nothing pinged away, I was concerned that if the pointed waste got away into the carpet I'd only find it by standing on it.

The handles were superglued into place, glue on the inside only. Next up glazing followed by engineering a chassis to body fixing.
Neil
Western Thunderer
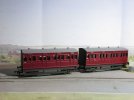
One of the difficulties I usually face is in finishing off. Once a project nears completion my mind drifts off to the next one I fancy doing. I think it may be because I like experimenting over ownership of the finished goods. Once all the challenges are done and it's just a case of the routine sorting out of the last bits and bobs my interest wanders off towards the problems to be overcome on the next build. Unfortunately if I don't knuckle down and complete I end up with a bench full of nearly finished but not quite there stuff. This time I vowed to complete the carriages before I'd allow myself the luxury of starting something new so just after dinner I finished fixing the now glazed bodies to the chassis and was able to call the job done.

Smokey Joe rebuild
Neil
Western Thunderer
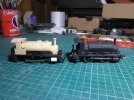
..... and the next candidate please. Perhaps something to pull the carriages? Time to get out my collection of Smokey Joes and make a start. One of the areas I want to address is the cylinders. I don't want to replace but I hope with a bit of sleight of hand to make some improvement. With a cutting disk I roughly chopped off the cylinder tops from the mazak footplate and then finished with an abrasive sanding drum and file. The undernourished Hornby cylinder has a section of plastic tube clipped over it to give it a better shape. Here the modded example is on the left, original to the right. More to do but better I feel.

simond
Western Thunderer
I think so too.
the thing that struck me most about those locos was the springs. They don't appear to be aligned with the axles (difficult to be sure with the angle of the photo) and they are too far outboard, as they surely should be directly above the axleboxes / frames, whereas they appear to be above the wheel tread. This may not be an easy fix as I guess the wheels are too far in, being 00 and the motor may be too fat to allow the springs be recessed at all. But if your prototype allows, I guess you could lose them completely?
the thing that struck me most about those locos was the springs. They don't appear to be aligned with the axles (difficult to be sure with the angle of the photo) and they are too far outboard, as they surely should be directly above the axleboxes / frames, whereas they appear to be above the wheel tread. This may not be an easy fix as I guess the wheels are too far in, being 00 and the motor may be too fat to allow the springs be recessed at all. But if your prototype allows, I guess you could lose them completely?
Ian@StEnochs
Western Thunderer
I think so too.
the thing that struck me most about those locos was the springs. They don't appear to be aligned with the axles (difficult to be sure with the angle of the photo) and they are too far outboard, as they surely should be directly above the axleboxes / frames, whereas they appear to be above the wheel tread. This may not be an easy fix as I guess the wheels are too far in, being 00 and the motor may be too fat to allow the springs be recessed at all. But if your prototype allows, I guess you could lose them completely?
Some Barclay locomotives have the springs above the wheels. There is a beam which goes right across the frames with the spring buckle at the outer ends and rods down onto the axleboxes.
simond
Western Thunderer
Some Barclay locomotives have the springs above the wheels. There is a beam which goes right across the frames with the spring buckle at the outer ends and rods down onto the axleboxes.
thanks Ian,
I was entirely unaware of that approach, which seems more complicated & more expensive than a conventional set-up.
Presumably getting the springs outboard allows a fatter, or lower, boiler.
cheers
Simon
Kylestrome
Active Member
You're not alone there, Neil. You've summed up in a nutshell exactly why I have so many boxes of still-to-be-completed models.One of the difficulties I usually face is in finishing off. ....................................................................
Unfortunately if I don't knuckle down and complete I end up with a bench full of nearly finished but not quite there stuff.
You're doing well so far, though.

David
Neil
Western Thunderer
I'm afraid that the springs will have to stay, they're a characteristic feature of the prototype and because the motor is a chubby little blighter I can't move them inboard. I have a dodge which I think/hope will improve this area of the model but it'll be deployed at the painting stage, so a while off yet.
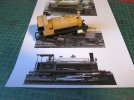
While thinking about the motor I lined up my three examples and each is different. At the front is my original 80's model which contrary to all received wisdom runs pretty well, even on a cheapo Hornby trainset controller of the same vintage. In the middle is what I believe to be a later production model which frankly disappoints. It cost me six quid and is the guinea pig for the mods as it's expendable. To the rear is a new China made chassis which again runs well, but only on a more modern Bachmann controller.
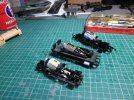
Each motor is different but the newest and oldest are remarkably similar.

While thinking about the motor I lined up my three examples and each is different. At the front is my original 80's model which contrary to all received wisdom runs pretty well, even on a cheapo Hornby trainset controller of the same vintage. In the middle is what I believe to be a later production model which frankly disappoints. It cost me six quid and is the guinea pig for the mods as it's expendable. To the rear is a new China made chassis which again runs well, but only on a more modern Bachmann controller.

Each motor is different but the newest and oldest are remarkably similar.
I’m really enjoying this thread Neil. As it happens, I was looking for some plans for Stanier 2-6-4 tank engines yesterday and finally found some in an old 1966 Railway Modeller I’d borrowed from my Dad. As I read through the other articles, I realised I’d forgotten just how creative people could be with the limited RTR and kit options available in those days. Those old Triang clerestories, Kitmaster Pugs and Airfix Drewry shunters were turned into all sorts of things. And here you are, showing the same creativity in 2022. Loving it!
Neil
Western Thunderer
Over the weekend I've turned my attention to the body, and in particular the cab. You can see from the photo in the post above that there's far less of the cab in the loco which has inspired the build. The first step was to reduce the size of the spectacles which had the bonus of moving them away a little from the cut outs which I would later cut out. Fortunately I had some plastic tube, which if I opend the spactacles out a smidge, I could glue in and shrink the opening down by almost 2mm. I filed and sanded all the ribs from the cab roof too as I will be fixing a larger overlay on top.
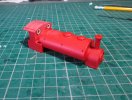
To help me reduce the spectacle plate evenly at each side I made a simple plasticard template which I could scribe round. It has a lip on both faces which holds it in place against the cab and bunker sides.
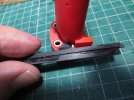
With careful use of abrasive discs and drums in the pendant drill I cut away the openings on the cab sides and spectacle plate, finishig off with files and knife.
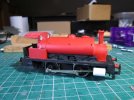
It's quite difficult to see what's been achieved in the bright red plastic so I've waved some Halfords grey primer over the body to show what's what.
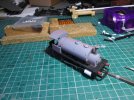
There'll be some final tweaking with emery but overall I'm pretty pleased with the finish and symmetry.

To help me reduce the spectacle plate evenly at each side I made a simple plasticard template which I could scribe round. It has a lip on both faces which holds it in place against the cab and bunker sides.

With careful use of abrasive discs and drums in the pendant drill I cut away the openings on the cab sides and spectacle plate, finishig off with files and knife.

It's quite difficult to see what's been achieved in the bright red plastic so I've waved some Halfords grey primer over the body to show what's what.

There'll be some final tweaking with emery but overall I'm pretty pleased with the finish and symmetry.
Neil
Western Thunderer
Today the weather has been so beautiful that I've done nothing at my workbench, instead we chose to take a picnic to Fairbourne Point, the terminus of the railway of the same name. Quite by chance as we drove up we passed a works train going in the opposite direction. Work is also happening on Barmouth's timber viaduct.

Walking back to where we had parked the car the Lleyn Peninsula came into view.

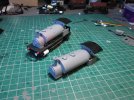
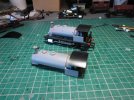
However though I've done nowt today I have been busier earlier on this week. The pug's cab roofs have had an overlay applied to give the characteristic overhang at the front and rear. The overlay is from the same section of plasticard that was heat formed for the carriage roofs; there's plenty left for other projects too. The body closest to the camera still needs trimming for width, that at the back has been done leaving just enough to cover the strips I need to apply to what's left of the cab side tops to replicate the scalloped vertical flange just under the roof.

Walking back to where we had parked the car the Lleyn Peninsula came into view.

However though I've done nowt today I have been busier earlier on this week. The pug's cab roofs have had an overlay applied to give the characteristic overhang at the front and rear. The overlay is from the same section of plasticard that was heat formed for the carriage roofs; there's plenty left for other projects too. The body closest to the camera still needs trimming for width, that at the back has been done leaving just enough to cover the strips I need to apply to what's left of the cab side tops to replicate the scalloped vertical flange just under the roof.


