Tom Insole
Western Thunderer
So I've "ummed and arrghhed"about whether to or not to post what I'm up to with how my last little project scratch build went with a maker beating me to making the same model when a few people showed interest.
For a while I've hankered to make something "steam" but battery powered now that my little Gmeinder is nearing completion with a LocoRemote card in the post as I write this. I'd not really decided on what nor could I make my mind up which railway to look at. Dipping in on the archives of 16mmngm back issues I stumbled on something that hit home as a eureka moment and I knew I just HAD to build it.
The only other versions of this loco are meth's fired metal body loco's the 1st ones I could find being 1980's Hugh Sanders model (the one I've found plans for that show me at least 80/90% of what I need to make a base model) and another made by Steve Acton. Both I believe were small batch loco's and I only know of a couple of them being about one or two of them being abroad!
Acucraft an PDF models have made some rather beautiful loco's of others in the fleet but nether seemed to do a Ker Stuart 0-4-2T Tattoo "Edward Thomas" Number 4 Locomotive on The Talyllyn Railway. So there's my gap! I don't really plan to sell off copies of it after Ive finished mine or share what I've made as I rather like the idea that someone could in theory just as easy source the same plans and have their own bash at it!
Enough of the chit chat here's both my start images and the beginning of my project. Both working with some brass, 3D printed in both ABS, and small bits of resin and laser cut Acrylic it's going to be a real mixed bag of media but hopefully it'll all come together in the end with some wheels I'll be asking a friend and colleague in the heavy tools workshop on the lathe when I'm ready for them:

The rather fab and very detailed plans kindly provided by Romney Marsh Model Engineering Society many moons ago to the 16mm society mag. All written out and measured in Inches! (D'oh!) so it's been a very slow process of inputting inches into CAD as I drew bits. One of the first things I did was have a bash at a chimney. Don't ask me why I just got curious how I'd draw the base of the funnel out to form that curved shape of the smoke box and the tapered top to the main body of the funnel.

It turned out far better than I expected it to!

So I painted it.
Next I tackled drawing up some frames. As per the meth's fired version I had a hunt around to see if anything matched the general measurement of a 2" radius boiler for a cardboard mock up. Woe and behold a paper towel we use in the lab had a "inner" that was exactly that size.


Excusing all the junk and mess on my desk. (I'm supposed to be doing some real work on there too so a few bits of a project are in the pile!)
Carboard and more 3d Printed test bits drew me half way to it starting to look something like a locomotive...

Yes. I know I'm a dreadful messy worker!
I then decided to tackle some cab work and drew up some cab panels to get a nice visual

Masking tape happy I stuck it all together! the 1st cab roof I printed fell over mid print as it was too thin so I had half cab half spaghetti! Never mind I Just took to using more masking tape and some card

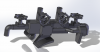
After I got to this stage I decided I really needed to make a CAD assembly to test bits before making physical copies to know things will mesh together (provided I get the right tolerances).

You can probably start to see the direction I'm headed with it!
I totally forgot to get images of how I formed some brass sheet into a water tank and stuck some Acetal ether end.

I then decided it was time to really tape up and glue a very few bits that I'm happy will stay together so that I was comfortable actually picking the model up safely

The smoke box skin needed cutting down as I drew it wrong and it was sitting far to tall. I still needed to trim a little more off at this point when I took the photo above. When I was happy with them I primed a couple of the non-grey bits to make it all match the same colour.

I've moved forward a little more since this but I'll show those soon as I probably should be getting to bed rather soon...
For a while I've hankered to make something "steam" but battery powered now that my little Gmeinder is nearing completion with a LocoRemote card in the post as I write this. I'd not really decided on what nor could I make my mind up which railway to look at. Dipping in on the archives of 16mmngm back issues I stumbled on something that hit home as a eureka moment and I knew I just HAD to build it.
The only other versions of this loco are meth's fired metal body loco's the 1st ones I could find being 1980's Hugh Sanders model (the one I've found plans for that show me at least 80/90% of what I need to make a base model) and another made by Steve Acton. Both I believe were small batch loco's and I only know of a couple of them being about one or two of them being abroad!
Acucraft an PDF models have made some rather beautiful loco's of others in the fleet but nether seemed to do a Ker Stuart 0-4-2T Tattoo "Edward Thomas" Number 4 Locomotive on The Talyllyn Railway. So there's my gap! I don't really plan to sell off copies of it after Ive finished mine or share what I've made as I rather like the idea that someone could in theory just as easy source the same plans and have their own bash at it!
Enough of the chit chat here's both my start images and the beginning of my project. Both working with some brass, 3D printed in both ABS, and small bits of resin and laser cut Acrylic it's going to be a real mixed bag of media but hopefully it'll all come together in the end with some wheels I'll be asking a friend and colleague in the heavy tools workshop on the lathe when I'm ready for them:
The rather fab and very detailed plans kindly provided by Romney Marsh Model Engineering Society many moons ago to the 16mm society mag. All written out and measured in Inches! (D'oh!) so it's been a very slow process of inputting inches into CAD as I drew bits. One of the first things I did was have a bash at a chimney. Don't ask me why I just got curious how I'd draw the base of the funnel out to form that curved shape of the smoke box and the tapered top to the main body of the funnel.
It turned out far better than I expected it to!
So I painted it.
Next I tackled drawing up some frames. As per the meth's fired version I had a hunt around to see if anything matched the general measurement of a 2" radius boiler for a cardboard mock up. Woe and behold a paper towel we use in the lab had a "inner" that was exactly that size.
Excusing all the junk and mess on my desk. (I'm supposed to be doing some real work on there too so a few bits of a project are in the pile!)
Carboard and more 3d Printed test bits drew me half way to it starting to look something like a locomotive...
Yes. I know I'm a dreadful messy worker!
I then decided to tackle some cab work and drew up some cab panels to get a nice visual
Masking tape happy I stuck it all together! the 1st cab roof I printed fell over mid print as it was too thin so I had half cab half spaghetti! Never mind I Just took to using more masking tape and some card
After I got to this stage I decided I really needed to make a CAD assembly to test bits before making physical copies to know things will mesh together (provided I get the right tolerances).
You can probably start to see the direction I'm headed with it!
I totally forgot to get images of how I formed some brass sheet into a water tank and stuck some Acetal ether end.
I then decided it was time to really tape up and glue a very few bits that I'm happy will stay together so that I was comfortable actually picking the model up safely
The smoke box skin needed cutting down as I drew it wrong and it was sitting far to tall. I still needed to trim a little more off at this point when I took the photo above. When I was happy with them I primed a couple of the non-grey bits to make it all match the same colour.
I've moved forward a little more since this but I'll show those soon as I probably should be getting to bed rather soon...


")