Trade HELJAN CLASS 31 DETAIL ETCHES

tomstaf

Western Thunderer
Hi,

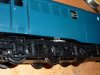
I've been working through my test etch of body parts for the HJ 31, and so far so good. Here are a selection of pics showing some of the parts. They are designed to be easy and very quick to attach. They simply need to be glued on, or folded up and glued on. No soldering is involved! It's all stainless steel for strength, and correct effect (eg window push down strips).

HJ 31 1 sml.jpg

You get:
  1. Headcode panels, and separate etched rings for the rubber grommets. I'd paint the rings black first, and then glue after the headcode panel is painted.HJ 31 6 sml.jpg
  2. Screen washer covers.
  3. Extra brackets on the cab handrailsHJ 31 2 sml.jpg
  4. Battery box clips - 2 types, straight and angled as they usually were. Again, I'd recommend painting these whilst on the fret and gluing to the model after.HJ 31 3 sml.jpg
  5. Strengthening plates on the bottom of the cab doorsHJ 31 4 sml.jpg
  6. Fold up high intensity headlight
  7. Windscreen wipers
  8. Window top push down strips.
All the parts are true to scale. I've measured up 3 of the preserved class 31s to ensure accuracy. I'll also be doing a chassis detail etch (cut away buffer beams etc.) in a couple of months.


If you want the body etch above I'll be ordering some at the end of the month. The body set is £10. If you want a set(s) let me know asap by PM.


Cheers

Tom
 

tomstaf

Western Thunderer
Tom,
Me too. Any thoughts on tidying up the window frames?
Steph

Hi Steph,

Ya, got that in the box of developments too. That'll be on the 'super detail etch' which covers redoing the windows and the walkways on the roof (they should have tread pattern on them not smooth. Even Lima did that on their OO one!

Cheers

Tom
 

tomstaf

Western Thunderer
Attacked the 31 a bit more over the last week and few more etches added to make it even more 31.

The exhaust always looked odd to me. Anyway, after climbing may way through the engine room and out of the hatches I found myself on the roof. Armed with camera, tape measure and calipers the first port of call were the exhausts. This is the result.31 130 exhaust port.jpg
HJ CLASS 31 Exhaust 1.jpgHJ CLASS 31 Exhaust 2.jpg

Next up the lifting lugs are tiny on the model.HJ CLASS 31 Lifting point old 2.jpg
I presume HJ did this so allow it to go round trainset curves. Anyway, I wanted something accurate (as ever) so measurements a bit of abracadabra and here's the result.HJ CLASS 31 Lifting point 3.jpg
And the bogie can still rotate easily.

Final part are the cut-away buffer beams. Not something for those who like them green but on lots of blue ones ;)
CUT AWAY BUFFER BEAM.jpg
Cheers

Tom
 

Attachments

  • HJ CLASS 31 Lifting point 1.jpg
    HJ CLASS 31 Lifting point 1.jpg
    324.1 KB · Views: 3

tomstaf

Western Thunderer
So Tom when are we going to get our hands on these ?

Richard

Are you after cut away buffer beams too?

I've been working my way through the test etches a have a few tweaks to do Richard. I don't want to supply etches that are awkward to fit/assemble. I don't do this for a living you know so have to slot these things round daily life. But they're certainly not far off now though:thumbs:

Cheers

Tom
 

richard carr

Western Thunderer
Tom

I don't have an immediate need for anything at the moment but its always nice to get your hands on something new. I know what you mean though when you say you only want to supply good etches that means you need to test them thoroughly and I appreciate it takes time.

Richard
 
Top