Been there, got the T shirt………..More progress on the JLTRT Star, it's always the little bits at the end that take the greatest time, you think I'd have learned that after five years.

You are using an out of date browser. It may not display this or other websites correctly.
You should upgrade or use an alternative browser.
You should upgrade or use an alternative browser.
7mm Mickoo's Commercial Workbench
- Thread starter mickoo
- Start date

Compton castle
Western Thunderer
When you ( hopefully) 3 D print the elbow style steam pipes I’ll have a set off you for my Star.

Paul Cheffings
Active Member
Hi
I’ve always found that 80% of a build gets done in 20% of the time and the last 20% of the build takes the remaining 80% of the time.
Cheers
Paul
I’ve always found that 80% of a build gets done in 20% of the time and the last 20% of the build takes the remaining 80% of the time.
Cheers
Paul

3 LINK
Western Thunderer
Ditto, for my Castle, although bound to be a different shape, curve and diameterWhen you ( hopefully) 3 D print the elbow style steam pipes I’ll have a set off you for my Star.
…
mickoo
Western Thunderer
This Star is totally different to Castles as far as I know, it sweeps back around and dives under the boiler behind the saddle, not into the top of the outside cylinder blocks.Ditto, for my Castle, although bound to be a different shape, curve and diameter
I've already done a set for a Castle, the later big fat pipe variant.


mickoo
Western Thunderer
I did the white metal ones on the first castle and vowed never again.Good morning Mick, I thought you might have replaced those steam pipes as the original offerings were rather abysmal . I’ll drop you a pm later, cheers.
Martyn.

mickoo
Western Thunderer
End of build for the JLTRT Star, some bits to add on strip down and some when back from paint; steam pipes are loose to allow easier for painting of boiler front and will be secured after paint.
Some photos show a lozenge shaped patch on the RH boiler side so just checking it if needs that for the clients date line. Also speedometer bracket to fit when I can find one as not in the kit


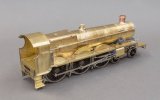
Some photos show a lozenge shaped patch on the RH boiler side so just checking it if needs that for the clients date line. Also speedometer bracket to fit when I can find one as not in the kit
Last edited:
Compton castle
Western Thunderer
Some stars did indeed have early style castle outside steam pipes when they gained new out side cylinders. The elbow pipes were for new smoke boxes but original outside cylinders.


spikey faz
Western Thunderer
Its these kind of additions that add character and help bring a model to life.Boiler patch finally added, took longer than anticipated but done and dusted now.
View attachment 268058
It's easy to forget that the full sized engine was a working machine with fire and steam conspiring to bring wear and tear to components.
Mike

simond
Western Thunderer
And blokes with spanners, shovels and hammers who were perhaps less concerned with appearance than getting the job done and the loco in service so the train could run on time.Its these kind of additions that add character and help bring a model to life.
It's easy to forget that the full sized engine was a working machine with fire and steam conspiring to bring wear and tear to components.
Mike
The boiler patch reminds me of a visit to Thai Railways (SRT) steam depot when I lived there. SRT had built new boilers for two of the locos and there they were on shed - one of the two had an ugly patch on the nearly brand new clothing, presumably where the shed fitters had cut away for attention. Unfortunately most of the photos were lost in a computer disc failure.
mickoo
Western Thunderer
So this week we're back to the JLTRT King and working on the upper works, I've been here before so the odd niggle is easily worked out and progress is swift, three days basically for the footplate and cab to be virtually complete, valances, cab side sheet steps, lamp irons are outstanding.
The sanding levers will go on after paint and I'll box the top of the fire iron tunnel once the firebox is in place.
Sadly the blue lump is not suitable for our purposes, don't get me wrong it's lovely and as can be seen with no work it fits almost perfectly. However it's not heavy enough and even digging out the balsa wood core won't give enough capacity; but that aside the biggest problem is the slot for the ABC motor gearbox combo isn't going to cut it.
So it's out with the crayons, scissors and string to measure and make a new one front to back, to be honest the most time consuming aspect is punching all the rivets out on the smoke box wrapper and the rest will just drop into place. I could 3D the smoke box but by the time you've drawn it in CAD and then post processed it it's very much quicker to cut a new one from brass sheet and roll.
So let's see where we're at Friday evening....


The sanding levers will go on after paint and I'll box the top of the fire iron tunnel once the firebox is in place.
Sadly the blue lump is not suitable for our purposes, don't get me wrong it's lovely and as can be seen with no work it fits almost perfectly. However it's not heavy enough and even digging out the balsa wood core won't give enough capacity; but that aside the biggest problem is the slot for the ABC motor gearbox combo isn't going to cut it.
So it's out with the crayons, scissors and string to measure and make a new one front to back, to be honest the most time consuming aspect is punching all the rivets out on the smoke box wrapper and the rest will just drop into place. I could 3D the smoke box but by the time you've drawn it in CAD and then post processed it it's very much quicker to cut a new one from brass sheet and roll.
So let's see where we're at Friday evening....