jonte
Western Thunderer
There might to be a sympathy button.
Thanks, Alan. I thought it was all going too well

Jonte
There might to be a sympathy button.
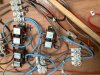
 The turnout is just below the slot at the right end of the brass tube. I used 0.6mm steel wire, it can be easily bend and is a bit resilent.
It is a bit late, but did you ever consider using Servos?
View attachment 146516 The turnout is just below the slot at the right end of the brass tube. I used 0.6mm steel wire, it can be easily bend and is a bit resilent.
plus: Put them where you want (some of mine are 50cm away from the turnout
plus: Adjust them precisely with the controlling PCB
plus: use the wire you want
plus: easy to mount
minus: some added complexity because of additional controller.
Michael

Just caught up with your fascinating thread Jonte. I built Minories many years ago when I was a young man, but it was scrapped due to a house move - I had one of those jobs at the time - and my interests moved on to other scales. It is a fascinating project and although design for the steam period does lend itself to modern multiple unit stock if required........no doubt that will be a decision made by the young recipient of your work. I look forward to seeing your progress.
Regards,
Roger


are you using the Megapoints board to operate your servos?
Hi Jonte,
Although I don't have a layout built / completed as yet I did invest in Dave's Megapoint Servo controller and have nothing but praise for it.
An extremely easy item to use and adjust as required for both pointwork and signals ( and a nice bounce too ! ).
I decided to go down that route as my pointwork is O Gauge handbuilt so it needed to have a softer mechanism to operate for my requirements, that said, they will easily cope with standard Peco pointwork from N to O Gauge.
Usual disclaimers etc.
G
Jonte,
I’m enjoying your frequent updates.
Anyone who would like less frequent updates can decide not to read alternate ones…
keep up the good work!
Simon


Incidentally, are you using the Megapoints board to operate your servos?

Jonte, I have been using my own PCB-design to operate them. Just another one of my countless hobbies.
I didn't like the ones available because of "too high price", "not enough features", "no polarity switching" or "servos making continuous noise".
Michael


oh my!
just wondering, the solenoids are not pulling with much force. Are the switch blades with the attached sleepers moving absolutly unrestricted?
Michael

Hello @jonte
AARGH! I feel your disappointment. It sounds odd to me that that they’ll ALL work one way but not the other. Smacks of some sort of feed issue, to me; especially as you’ve gone to all that trouble to equalise the throw. Before you go removing them all, maybe it’s worth having an an investigation of just one?
Cheers
Jan
Hi Michael, and thanks for your help.
They do indeed, Michael, which is puzzling. In the video, the guy implied that if the point could be switched by hand with the motor attached, then it was job done, which was the case here.
The benefit of my location is that I can pop to Hattons and back within an hour, so with a couple of embryonic ideas in mind - before ripping everything up - I popped into the showroom (which is now open again, thankfully) and purchased this:
View attachment 146672
Yes, it’s another Peco motor AND an extended pin variety!
You see, it occurred to me that when I bought the non extended pin variety the other day, on test, touch one wire and the pin went to the coil that side and stayed there. Touch t’other wire and the pin went across to the other coil - and stayed there! Now, the reason I’m mentioning this is because when I tested the extended pin varieties, they either went to a pin one side but not the other or just hovered in between. Not having a ‘control’ to calibrate them by, having never used them in anger (or at least without a plate /base thingy attached) I wasn’t sure how they were supposed to function. So, what if they are supposed to act just like the non-extended pin variety that I bought the other day? Surely that would mean they’re duff (don’t call me Shirley - yeah, I know) ? So, thought I’d rush out and buy one to test before the shop shut.
Just having a cuppa so will pop out and test it and let you know. If it works, then I’ll still have to centre it, but at least I’ll know the motor works to start with. And if it also works in situ, I’ll pop back to Hattons Tuesday (when the shop’s next open) and buy 5 more.
If not………
Thanks again, Michael. I’ll let you know.
Jonte