michael mott
Western Thunderer
Some time ago I agreed to make 4 signals for a chap in Maine as my part in a swap for 123 issues of Narrow gauge and industrial review. So have finally got around to finishing them. I was given a page out of one of the Garden Rail magazines for a simple semaphore signal with basically an open invitation to make some changes.

I did a quick drawing in Corel and started a couple of years ago, then put it aside to sort out a few things. Currently the signals are now ready to be painted .
At first I began following the basic design which included some plated top and bottom To retain the control rods I used some 7ply aircraft plywood. But found these to be a bit difficult to deal with from an assembly and maintenance point of view. so opted to change this element.
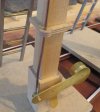
I did a few tests with some copper wire to create a forged look to a bolt on bracket.
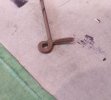
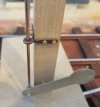
This led to a couple of days worth of trying out different ways to flatten and shape some annealed copper wire, I was not really happy with the results so opted for a fabricated bracket. With my recent experience of winding up large wire for the spring on the air loco I wound up some 1/16th dia. annealed brass rod to make thick Jump rings. which led me to trying to roll up some 1/16th square rod to make some square section Jump rings.
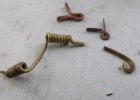
Then I laughed because I realized that a bit of brass rod with a hole bored to the correct diameter would be so much easier to make the square section rings.
After turning up said rings I decided that the round section rings were more pleasing to look at and so proceeded along those lines.

The soft soldered brackets were blackened with Jax bronze and black solution. the square bolts were made from some 3/32 square brass rod and threaded 1x72 and used as self tapping screws into the maple post.
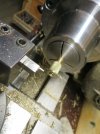
I used a small home made pin chuck to get the heads all clean after they had been parted off . Adapting a C5 collet chuck for my Myford has been a boon to being able to hold hex, square, and round stock accurately and repeatedly.
Still need to rivet the ladders to the brass post brackets then take them apart to be painted. The signal are 13 inches high post is 1/2 in square tapered from the base to the top down to 3/8. steel sides of the ladders are 1/8 square.

Michael

I did a quick drawing in Corel and started a couple of years ago, then put it aside to sort out a few things. Currently the signals are now ready to be painted .
At first I began following the basic design which included some plated top and bottom To retain the control rods I used some 7ply aircraft plywood. But found these to be a bit difficult to deal with from an assembly and maintenance point of view. so opted to change this element.

I did a few tests with some copper wire to create a forged look to a bolt on bracket.


This led to a couple of days worth of trying out different ways to flatten and shape some annealed copper wire, I was not really happy with the results so opted for a fabricated bracket. With my recent experience of winding up large wire for the spring on the air loco I wound up some 1/16th dia. annealed brass rod to make thick Jump rings. which led me to trying to roll up some 1/16th square rod to make some square section Jump rings.

Then I laughed because I realized that a bit of brass rod with a hole bored to the correct diameter would be so much easier to make the square section rings.
After turning up said rings I decided that the round section rings were more pleasing to look at and so proceeded along those lines.

The soft soldered brackets were blackened with Jax bronze and black solution. the square bolts were made from some 3/32 square brass rod and threaded 1x72 and used as self tapping screws into the maple post.
I used a small home made pin chuck to get the heads all clean after they had been parted off . Adapting a C5 collet chuck for my Myford has been a boon to being able to hold hex, square, and round stock accurately and repeatedly.

Still need to rivet the ladders to the brass post brackets then take them apart to be painted. The signal are 13 inches high post is 1/2 in square tapered from the base to the top down to 3/8. steel sides of the ladders are 1/8 square.

Michael
Last edited:

