Simon's workbench

Simon

Flying Squad
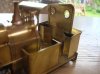
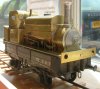
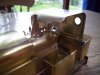
Been doing bits to the MW, state of progress this morning after another late night in the shed.

[attachimg=1]

I had done the valves and pipework and linkages earlier, last night was getting the safety valves done. Being determined to solder everything, I found this more than a bit challenging. The whole thing got knocked to the floor in the process, but "luckily" only the buffer beam and footplate got bent and partly detached from the smokebox edge :headbang: I managed to bend it all back and re-solder the saddle edge.....

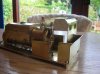
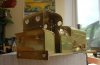
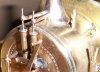
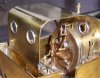
Here is a close up job of the finished job, a bit less tidy than I wanted it to be but I think its all in the right place.

[attachimg=2]

I have started work on the cab sheet now but can't decide if I'll be able to paint the backhead if I solder the cab in place before painting.

Oh, and it needs its chassis finishing too, mainly just brakegear and siderods left to do.
 

Attachments

  • BHead2.jpg
    BHead2.jpg
    26.2 KB · Views: 245
  • Backh1.jpg
    Backh1.jpg
    49.7 KB · Views: 246

Ressaldar

Western Thunderer
Hi Simon,

nice work there, keep it up.

And there was me thinking that I was the only one that made more work for myself by knocking things onto the floor!

regards

Mike
 

John D

Western Thunderer
Nice job Simon  :thumbs:
It is possible to paint the cab interior with the roof on , I did it OK on 'Defiance' .....


Simon

Flying Squad
As penance for thoughts of DCC and sound chips, I managed another session in the shed.

Pictures to follow but I have bent up the cab and its starting to look the part. I have deviated from the instructions (deliberately this time) to give a wrap over cab with its rear finishing towards the front of the bunker rather than the rear of the flare. This causes interference with the handbrake operation if put on the front edge so I have brought it down to the back edges of the sandboxes, which has meant extending the cab rear with scrap brass fret.

Bit of adjustment and I will have the cab roof horizontal, back to the shed tonight :thumbs:
 

Simon

Flying Squad
Managed to get the cab roof horizontal and all the window frames and strapping attached. I added a small extra pair of straps at the cab rear to help fix the assembly to the sand box backs.

This is all guesswork as I can't find any pictures that cover this aspect of "my" type of cab. Must have been something like this though.

[attachimg=1]

There's a bit more cleaning up to do and a bit of fiddling to get the assembly to sit properly square to the footplate when viewed "in plan", if I see what I mean ::)

[attachimg=2]

Pressure gauge and whistle control and I think I'm done with the body - apart from the buffer planks and steps. 
 

Attachments

  • Cab1.jpg
    Cab1.jpg
    49.1 KB · Views: 166
  • Cab2.jpg
    Cab2.jpg
    29.9 KB · Views: 171

John D

Western Thunderer
That is freakin' brilliant my man  :thumbs: :thumbs: .....with regard to a photo of that style of cab, isn't there something in the WS Selsey Tramway books showing similar?

    Keep up the good work  ;D
 

John D

Western Thunderer
Re: the last post .....an afterthought, there's a photo in Harman's book on MW's of an L with this type of cab on it....
 
S

Simon Dunkley

Guest
John D said:
Re: the last post .....an afterthought, there's a photo in Harman's book on MW's of an L with this type of cab on it....
I wonder if Simon can find a good bookshop, so he can have a look?
1.gif

PS - I agree with your other post: superb workmanship, but also a superb kit. ;)
 

Simon

Flying Squad
After much pondering of pictures and further consultation with Professor Old Original, Last night I took the mini blowtorch to the bunker to re-arrange the sandboxes and cab rear.

I then re-assembled the key bits in a different order to provide what is hopefully a more credible arrangement.

The pictures show the revised set up, I think the bunker space may be a little smaller then it ought to be, but I'm not taking it apart again - this is the probably therefore first example of what became known as the "Dale Castens Ergonomic Cabspace" locomotive, quite popular at the turn of the Century with the NFCI and other enlightened employers :)) :))

89vgcr1
 

Simon

Flying Squad
Apologies, intervention of Dusty the cat. While I nipped out to take Charlie to school, she sat on the keyboard, created a cryptic message, and managed to post it here :eek:

89vgcr1

While I ponder this message from the cat world, here are the pictures:

[attachimg=1]

[attachimg=2]

The sandbox tops need fitting, I may need to cut out some new ones as the sandboxes ended up being a slightly deeper size and also one went on the floor and is yet to be found :headbang:
 

Attachments

  • abunk1.jpg
    abunk1.jpg
    32.9 KB · Views: 112
  • abunk2.jpg
    abunk2.jpg
    41.1 KB · Views: 112

Rob Pulham

Western Thunderer
It looks lovely Simon. :drool: :drool: :bowdown: :bowdown: I could be very tempted by one of these myself - but I had best not let the wife hear that :eek:
 

Jordan

Mid-Western Thunderer
Simon said:
Apologies, intervention of Dusty the cat. While I nipped out to take Charlie to school, she sat on the keyboard, created a cryptic message, and managed to post it here :eek:

89vgcr1

While I ponder this message from the cat world....
Probably trying to place an Order for dinner with her other Owners, at the local Take-away.... :scratch: ;D ;)
 

Simon

Flying Squad
Shamed by the industry of that clever fellow in Shepshed, I last night went out to Simonshed.

After longer than I'd like to admit and a lot of fiddling and farting, I have got to the next stage, the sandbox tops were a complete pig owing to poor fit after my re-arrangements and are not a very pretty sight, neither is the bracket for the gauge too clever:

[attachimg=1]

[attachimg=2]

I badly need a new bit for my soldering iron, although I know a bad workman always blames his tools :))
 

Attachments

  • acab1.jpg
    acab1.jpg
    47.6 KB · Views: 336
  • acab2.jpg
    acab2.jpg
    43.3 KB · Views: 337

John D

Western Thunderer
That's brillo Simon  :thumbs: :thumbs:  now keep going and finish it off  8).........

BTW...Sphinx the Minx and Spion Kop.......sounds like they should be in the 2.30 at Newmarket  :))
 

Simon

Flying Squad
Just in from late night shed session :eek:

All remaining etched fiddly bits now made up and soldered into place on the body. I've cleared myself to move on to sticking buffer planks, smokebox door and chimney on to the body and then IT'S FINISHED :thumbs:

Completing the chassis next, which is mostly done :wave:
 

Simon

Flying Squad
I started sticking the castings on last night and the body is beginning to look more like a locomotive.

I brought it in to the shop to put in the window next to the boxed kit, you never know...

Sitting on one of my 1307 wagons in the window, the wagon has been sitting in extreme sunlight for months now, proving that resin is much more durable than some would have you believe ::)

[attachimg=1]

A view from the back, I decided to put the fire iron brackets on the rear of the bunker.

[attachimg=2]

I am really enjoying this bit and have to say again that the quality of the components and design and fit of the etches etc is really first class, thanks very much to John Dale :thumbs:
 

Attachments

  • Casted1.jpg
    Casted1.jpg
    239.9 KB · Views: 271
  • Casted2.jpg
    Casted2.jpg
    142.6 KB · Views: 269

Dikitriki

Flying Squad
Simon said:
the wagon has been sitting in extreme sunlight for months now, proving that resin is much more durable than some would have you believe

Yeah, but it was a five plank wagon 6 months ago :))

Looks nice though.

Richard
 
Top