You are using an out of date browser. It may not display this or other websites correctly.
You should upgrade or use an alternative browser.
You should upgrade or use an alternative browser.
Simon's workbench
- Thread starter Simon
- Start date
Simon
Flying Squad
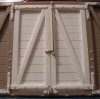
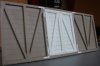
Partly as an antidote to the enormity of the garden project, fancying a bit of light modelling on the kitchen table with simple handtools, I have dusted off my partially butchered Slaters Midland box van kit.
The cunning plan is to turn it in to an S&D pattern van, I made the basic "cupboard" doors ages ago but have started the hinges and strapping.
[attachimg=1]
The project stalled as I realised that the sliding door van has asymmetric sides whilst "my" van was symmetrical about the door, but what the heck, I've started so I might as well finish.
It is quite nice to be poddling with Plastikard again.
Attachments
ceejaydee
Western Thunderer
Looks like it will be a very attractive variation of the Slater's wagon.
Personally I do like the heavy outside framed style of van.
Could be an option for Slater's to offer an alternative wagon by substituting just a couple of sprues in the kit?
What livery have you chosen for the van?
On a slight tangent but still with 1:32 vans..... I had a chat with the guy from Gramodels at Guildex on Sunday and it looks like he may be producing a couple more 1:32 resin bodies to compliment the LSWR 5plk open.
I tried again to persuade him to go for the LSWR outside 'X' framed van (can't remember the dia without looking) but seem to remember when we discussed it at Woking I thought it was on a 10'6" w-b chassis and I'm not sure Peter Korzilius makes one.
However if investment is made then quite a few other options for pre-group wagons open up on the same chassis.
Simon
Flying Squad
Thanks Chris, hopefully it will look good, even though it is slightly "wrong".
The van will be finished in S&D livery to go with my pre grouping stuff and Pomparles Siding, which has an invite to RailWells next year.
I haven't come across Gramodels before, what is the wagon that they do and what is it like?
I fancy one of those LSWR vans too, (the lower roofed diagram 1410/12 would suit me) the S&D had 10 of them I think and you are right the wheelbase was 10'6" according to my Southern Wagons volume 1.
Of course I have a spare pair of sliding doors now, the very short Midland van looks appealing, but there would be quite a lot of bodywork to grow around the doors!
Simon
Simon
Flying Squad
28ten said:Any paint on the Manning Wardle yet?(good to see the 'bench back in action too)
Ah yes, er no, ahem....
In my defence the greenhouse has mostly been used for plants this year but I would like to get it painted this year nonetheless.
On the Manning Wardle front I did sort out my less than clever brake shoes/hangers to the point of acceptability last week and have also soldered up the gear mount.
It is nice to be doing something again, other than packing books and pondering stock control irregularities - no I'm not complaining, I'm a very lucky chap in my current situation.
I will endeavour to do a bit more to the van, at least it will all go together very quickly once I have finished fiddling with the sides as nothing else requires modification from "standard".
Simon
ceejaydee
Western Thunderer
And sewed on the rivets himself ")
Amazing how the parts come to life as you add the details; are they slices of rod/strip that you have cut yourself?
Going back to Gramodels; the kit they make is the resin body for the LSWR/SR 10T 5Plk open sold by Peter Korzilius; I'm sure that I originally found out about it from reading your website but can't find the specific page at the moment.
Simon
Flying Squad
ceejaydee said:And sewed on the rivets himself
Amazing how the parts come to life as you add the details; are they slices of rod/strip that you have cut yourself?
Going back to Gramodels; the kit they make is the resin body for the LSWR/SR 10T 5Plk open sold by Peter Korzilius; I'm sure that I originally found out about it from reading your website but can't find the specific page at the moment.
I haven't come across Gramodels so it can't have been from my site, although I think I have mentioned Peter's work before.
The nuts are slices of Plastruct 0.8mm hex rod, once they are glued I then file across the face to attempt to get them all about the same thickness - I find it impossible to slice off consistently small pieces.
Simon
Simon
Flying Squad
Utter disaster in the shed first thing this morning. I was out there to build the next piece of track and in raising the blinds for a daytime session I dislodged my digital radio (complete with rechargeable battery pack - ie v. heavy) from its shelf which fell full square on to the cab roof of the Manning Wardle sitting on the workbench below 
Cab assembly completely detached and "modified", brackets bent, safety valves banjaxed, bent pipework and some handrails detached.
It took me three hours of agonising sweat to repair the damage, harder than the initial build because of additional details being in place and distortion of wrapover cab etc.
It is all back together and looks OK but isn't as neat a job as the first time around - talk about radio interference!
I did build some more track and do some serious wiring up out on the line, pictures to follow when I find the lead for the camera.
Simon
28ten
Guv'nor
You have my sympathies, I have done something similar and it is never easy to dismantle and repair models.Simon said:Utter disaster in the shed first thing this morning. I was out there to build the next piece of track and in raising the blinds for a daytime session I dislodged my digital radio (complete with rechargeable battery pack - ie v. heavy) from its shelf which fell full square on to the cab roof of the Manning Wardle sitting on the workbench below
Cab assembly completely detached and "modified", brackets bent, safety valves banjaxed, bent pipework and some handrails detached.
It took me three hours of agonising sweat to repair the damage, harder than the initial build because of additional details being in place and distortion of wrapover cab etc.
It is all back together and looks OK but isn't as neat a job as the first time around - talk about radio interference!
I did build some more track and do some serious wiring up out on the line, pictures to follow when I find the lead for the camera.
Simon
ceejaydee
Western Thunderer
28ten said:You have my sympathies, I have done something similar and it is never easy to dismantle and repair models.
I'll echo that comment; I'd have been furious and upset all at once :-[
S
Simon Dunkley
Guest
Very nasty.Simon said:Utter disaster in the shed first thing this morning. I was out there to build the next piece of track and in raising the blinds for a daytime session I dislodged my digital radio (complete with rechargeable battery pack - ie v. heavy) from its shelf which fell full square on to the cab roof of the Manning Wardle sitting on the workbench below
Cab assembly completely detached and "modified", brackets bent, safety valves banjaxed, bent pipework and some handrails detached.
Total respect to you there: such an event would have put me off modelling for a few weeks.It took me three hours of agonising sweat to repair the damage, harder than the initial build because of additional details being in place and distortion of wrapover cab etc.
It is all back together and looks OK but isn't as neat a job as the first time around - talk about radio interference!
I did build some more track and do some serious wiring up out on the line, pictures to follow when I find the lead for the camera.
Simon
Flying Squad
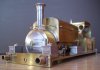
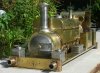
Thanks for the comments, here's the rescued item drying out in the sun after I used a blast from the hose to get rid of the phosphoric acid flux and fibreglass brush bits.
[attachimg=1]
It was the worst "modelling moment" of my life I think, surpassing the terminal short circuit at Camerton on its one and only exhibition outing by some margin.
I had to sort it out then and there because I was pretty certain that leaving it in its banjaxed state might have stopped it ever getting finished, apart from leaving me feeling very fed up.
Simon
Attachments
S
Simon Dunkley
Guest
Lovely piece of workmanship, Simon.
Top notch!
Top notch!
Simon
Flying Squad
Thanks for the comments, I knocked the radio off the shelf again today but luckily I had moved the loco body out of the way 8)
After today's running, some of it on wet rail, I decided to clean up and lightly oil some of the stock wheels, including the Class 22.
Mindful of the sound chip, after cleaning the wheels I decided to strip it down to consider how to best install everything.
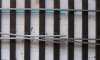
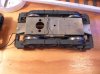
As presently set up, you have to remove the bogies to get the underframe off the body as two securing bolts are above and obscured by the bogies and all the wiring is effectively "below" the chassis. I figured that by cutting out extra holes in the bogie top plates, I would be able to get the complete chassis in and out of the body, meaning that I can lay out the wiring and chip etc logically and securely on the chassis.
Here is the unpowered bogie marked for the first hole.
[attachimg=1]
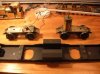
Here are both bogies drilled with access holes next to the chassis.
[attachimg=2]
I am hoping that working on this will give me a familiarity with the kit that will encourage me to start work on D6315, for which I already have the Mark Wood wheels.
After today's running, some of it on wet rail, I decided to clean up and lightly oil some of the stock wheels, including the Class 22.
Mindful of the sound chip, after cleaning the wheels I decided to strip it down to consider how to best install everything.
As presently set up, you have to remove the bogies to get the underframe off the body as two securing bolts are above and obscured by the bogies and all the wiring is effectively "below" the chassis. I figured that by cutting out extra holes in the bogie top plates, I would be able to get the complete chassis in and out of the body, meaning that I can lay out the wiring and chip etc logically and securely on the chassis.
Here is the unpowered bogie marked for the first hole.
[attachimg=1]
Here are both bogies drilled with access holes next to the chassis.
[attachimg=2]
I am hoping that working on this will give me a familiarity with the kit that will encourage me to start work on D6315, for which I already have the Mark Wood wheels.
Attachments
Simon
Flying Squad
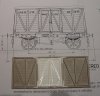
Meanwhile, back in the wagon works
Both sides of the Midland van now represent the Somerset and Dorset version with cupboard doors, so I can now simply build up the kit as per the instructions, which should be very quick, even for me...
Here is one of the sides showing the modifications.
[attachimg=1]
Simon
Both sides of the Midland van now represent the Somerset and Dorset version with cupboard doors, so I can now simply build up the kit as per the instructions, which should be very quick, even for me...
Here is one of the sides showing the modifications.
[attachimg=1]
Simon