7mm The Leather and Webbing Railway. All change again. Free layout for anyone who wants it.

Jim Read

Active Member
Hello all,

A back story to suit the track plan and will continue when I need to make an excuse for something.

1916 .. The War Office was looking for Agency factory sites to be managed by the Government Agency Dept. The estate agreed to have some small factories. A line was hurriedly laid, an Army loco was found and some very short wagons bought from a defunct colliery in Moxley.

1931 .. We had a government of appeasers and a rise in dictatorships abroad. This time though there was some preparation, just in case, they would be called Shadow factories and managed by the owners. The estate of course agreed to restart theirs. The loco had been scrapped, the estate owners found a badly damaged petrol loco in a quarry. One of the estate workers was adept at repairing machinery. The wagons had been tarpaulin’d and were still in fair condition.

And the track plans.

I started with this I wanted to have the fiddle bit at the back and not at the side.
52710535183_56d1ce6ef0_c.jpg
I thought surely I could make it smaller
52710468940_6b5b885983_c.jpg
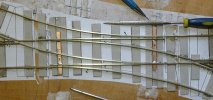
And this is what I began to make but a bit longer and with a 28” radius Barry slip
Made it for 0 Gauge, the siding on the right was a bit too close to the traverser hole.
Stripped it all off remade the slip to 20” radius and rebuilt to NG.
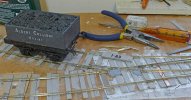
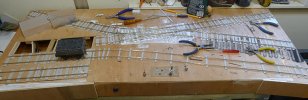
Lost interest in the NG, now converting it back to 0 Gauge.
This is what you find :)
 
Last edited:

Simon

Flying Squad
Oh I really like the look and sound of this, hope you progress it.

Your final line reminds me of one of my favourite singers and his lyrics;

"a sense of humour is required - amongst our bacon rind"

This what we find
 

Jim Read

Active Member
Oh I really like the look and sound of this, hope you progress it.

Your final line reminds me of one of my favourite singers and his lyrics;

"a sense of humour is required - amongst our bacon rind"

This what we find
I hope so too Simon.
Just found some rail spikes (I knew they were somewhere) after ordering some more yesterday.
This is also what you find, and I used to love crispy Bacon rind

Cheers - J
 

Jim Read

Active Member
Hello all,

This was the 20" radius Barry slip made for NG. I had cut the sleepers down to 7mm in situ.
52709533947_9fb867ed1f_c.jpg

And the slip fell into pieces so I had to glue it all back and test it with the wagon.
52709533952_5f76473a53_c.jpg

This is the whole layout
52710468910_09405acb26_c.jpg

And this is what I'm doing at the moment, replacing all the track spikes.
52710535128_7bd8120261_c.jpg
It takes some time to do this and the next task is ballasting.

Cheers - J
 

Attachments

  • 52709762226_02253ef00c_o.jpg
    52709762226_02253ef00c_o.jpg
    120.8 KB · Views: 54
  • 52710242253_fff5103db7_o.jpg
    52710242253_fff5103db7_o.jpg
    135.1 KB · Views: 55
  • 52709762216_5d6e131cb6_o.jpg
    52709762216_5d6e131cb6_o.jpg
    99.7 KB · Views: 57
  • 52710242243_50dfa4947b_o.jpg
    52710242243_50dfa4947b_o.jpg
    99.6 KB · Views: 57
Last edited:

Jim Read

Active Member
Hello Jordan,
Thanks for the welcome good of you.
I did try the Peco ones but the wheel flanges bounced on them.
The ones I use now are made by K B Scale and sold by the Light Railway Stores the ones on this page on the left.
Cheers - J
[edit] I am using Code100 FB rail so something a bit bigger would be OK with the Peco ones.
Hmmm thinking about it I do use old Hornby wheels for my locos so some posh ones may also be OK with C100
 
Last edited:

Jim Read

Active Member
Hello all,

I'm still having a go with the baseboard, got all the track pins in and am fiddling with the ballast. It's some war game stuff I sieved out the few larger lumps.
52730044131_dc443d76b6_c.jpg

It's cold where the layout is so I thought I would start to make a loco.
52730456665_7248733b0e_c.jpg

I used the Y8 drawing to give me an idea of the spacing.

Cheers
 

David Waite

Western Thunderer
Hi Jim thanks for the video and the history lesson I really enjoyed it. I do have various die stones but never thought of using them on a knife blade I often I break the point off anyway which renders them useless.
David.
 

Jim Read

Active Member
Hello David,
Many thanks for the comment, I do have a 3,000 word back story but decided to just do the outline, thinking it would be too long (and errrr Boring. Ed.) I scrounged that stone it had broken off the Delapina rig at a honing place in Dudley, you could hear the place 1/4 mile away.
Hello Jonte.
Nice of you to say that I just hope I can live up to it.
Cheers both
 
Last edited:

Jim Read

Active Member
Hello all,

Failure! My card as an axle guide instead of horn blocks didn't work, when I cut the card the cuts are at an angle especially with the 2mm card, leaving a knife edge that will wear away very quickly

I've gone back to using artists mount board.
52750991326_aeb19f88c8_c.jpg

The two slots will hold the horn blocks I've ordered with a bit of wiggle room.

This is what you find :)

Cheers - J
[Edit] I forgot, I've got a 5ft 6" wheelbase diesel loco, The Lady Armstrong wot I made in the early 80's. Tried it with one of my little wagons through the 20" Barry slip it worked fine, no buffer locking, and its got quite an overhang. I've altered the wheelbase of my 100mm loco to 5ft it might just look a bit better than the 6ft, you just never know!
 
Last edited:

Jim Read

Active Member
Hello all,

The horn blocks arrived and some Epoxy resin glue
52757149804_d29299d996_c.jpg

I do the bottom half with the bushes first and line that up with the sides.
Glue the spacers in top and bottom, I always have to get those square afterwards.
The horn blocks next, one side with a bit of play in the slot to wiggle it a bit.
I add the glue in tiny blobs with a pin to hold the blocks in.

Cheers - J
 
Top