7mm The Sparrow

Giles

Western Thunderer
Having prepared various locos and stock, and most of a ship in preparation, I should really come clean with the layout that is about to commence, proper..... 'THE SPARROW' (10' x 3' plus fiddle)

The actual 'Sparrow' being the ship - a 120ft steam coaster more or less in its last days, picking up a cargo in a small harbour.


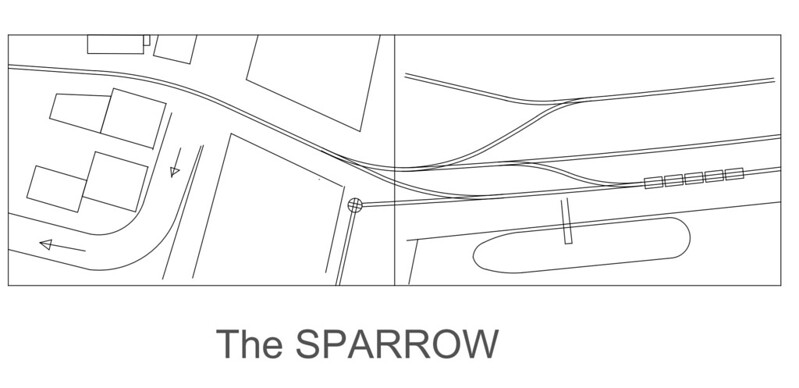
The harbour is of course served by a 2ft gauge railway, and nowadays also by road transport from other local quarries.


AdeMoore

Western Thunderer
Excellent stuff Giles found you on YouTube to last night before I even saw your thread here.
Watching with interest.
Cheers
 

David B

Western Thunderer
Very, very nice Giles - I’ve always loved harbour-based models ever since Chris Leigh produced a very characterful Weymouth Tramway pastiche in a late 1960s Model Railway Constructor. If the bridge and your NG trains are anything to go by, this one is going to be an absolute cracker.
 

Giles

Western Thunderer
Thank you folks.

Doing everything in the wrong order, I have started the first bit of trackwork for the layout ' the little bit on the bridge - which I want to tramway in, and also incorporates a point. This is using code 100 rail, and I have used strips of nickel-silver as flange rails .


This is only made viable by the very kind Christmas present if a small Warco Formit from Di, which shears very nicely - otherwise I should be struggling to make the strip.....


The other consideration with this formation is that the toe of the blades is over the arch of the bridge, making any point motor permanently inaccessible. I therefore printed a combined tie-bar/pivot-bar, allowing the point motor to mount 6" away. There are 1mm N/S droppers silver soldered to the blades, so they won't come off, and they drop into slots in this print which hold them at the right distance apart, whilst moving them sideways as required. Also seen are the pivot tubes for the heel of the blades. (Rubbish photo)


garethashenden

Western Thunderer
Hi Giles, I have an identical looking shear/brake/roller sold by Micro Mark in the States. Mine is all grey, yours has some green on it, I suspect they're made by the same factory. Anyway, how do you cut thin repeatable strips? I can't see a way to get the backstop close enough to the blade. Best part of an inch away is the closest it gets.
 

Giles

Western Thunderer
Bless you Neil!

Hi Gareth.
The strips so far, I have scribe the desired width on the sheet and lined each cut up by eye. However, long term that is too much like hard work.... I had been thinking of making sprung stops that get pushed down by the blade by each cut, but it may be a fiddle to adjust them. For the moment I have ordered a 150mm steel rule, marked in 0.5mm increments and (with the aid of a square) clamped it off (hard) under the very short side guide they provide. This gives you a fence square to the blade.
So if you offer up your sheet and take a trimming cut just to square it off, offer it up to the blade again (Mark the side of your sheet with black marker pen or engineers blue if it is still used) and scribe a mark adjacent to a 10mm line on the rule, open the blade and push the sheet through however much you want, keeping the edge against the (squared) rule
It's only approximate- I.e. reading off a steel rule - but It's not bad, and a good deal better than nothing...
 

Ian@StEnochs

Western Thunderer
Bless you Neil!

Hi Gareth.
The strips so far, I have scribe the desired width on the sheet and lined each cut up by eye. However, long term that is too much like hard work.... I had been thinking of making sprung stops that get pushed down by the blade by each cut, but it may be a fiddle to adjust them. For the moment I have ordered a 150mm steel rule, marked in 0.5mm increments and (with the aid of a square) clamped it off (hard) under the very short side guide they provide. This gives you a fence square to the blade.
So if you offer up your sheet and take a trimming cut just to square it off, offer it up to the blade again (Mark the side of your sheet with black marker pen or engineers blue if it is still used) and scribe a mark adjacent to a 10mm line on the rule, open the blade and push the sheet through however much you want, keeping the edge against the (squared) rule
It's only approximate- I.e. reading off a steel rule - but It's not bad, and a good deal better than nothing...

Giles,

On my guillotine there is a fence which keeps the sheet in line but I use the depth gauge function on my digital callipers to set the width of cut. I set the required dimension on the calipers and then with end of the probe held against bottom blade the sheet is pushed through until it touches the body.

Ian.
 

Giles

Western Thunderer
Having finished the point, I've been having a play with Das Stone in regard to the road surface - namely cobbles around the track and what will be tarmac over the rest. The cobbles are embossed, and after painting will have soil and ash brushed into the cracks to back-fill. The tarmac, I've had a play with the surface whilst still wet with embossing a sanding block and a very fine wire brush, and we will see what that is like as a base when it is dry. This is a very thin layer on 2mm MDF - so it will be very interesting to see if we have any cracking (or warping) over such a large surface.


I dropped the bridge the other day, from a reasonable height with very little damage indeed - just a very small amount of weathering! I'm extremely impressed with Das Stone so far!


Top