Scubaidh Dubh
Western Thunderer
I'm conscious of the fact that most of my output on the forum so far is weathered RTR locos and stock so, wanting to show that my skills extend beyond this field I though I would share some other stuff here.
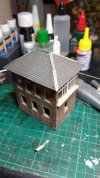
As a starter, I produce this NBR standard signal box.
This is from a Pop-Up Designs kit. Although these kits are fairly basic, they form the basis for a very nice model for those who, like me wish to take them further. The structure goes together easily enough although given that the sides essentially interlock at the joints, a bit of effort spent disguising the joins rewards the builder.
Once the model was at a suitable stage, I gave it a good coat of white primer and the next day started the Painting process with an overall coat of a suitable shade for mortar. I use Vallejo acrylics for this work but whatever your personal preference, it will probably do also. The next stage was to drybrush the basic brick red colour.
After that it was just random picking out of individual bricks ; I just nine shades in total including mortar and base brick. The darkest, well fired shade is a mixture of blue and black.
I personally enjoy this part of the process very much as it is virtually a meditative process by means of the repetition and concentration required.
The last stage is to rub a pale, mortar toned powder over the whole assembly. Again, what you use will be a personal choice. I used Ammo brand 'Ballast dust' from the 'Rail Center' range (available from Squires).
Last edited: