Rippers
Western Thunderer
Its not often someone gives me models to refinish without any specifics on what they want doing with them. However just such an oppotunity presented itself of late and by way of helping a fellow modeller with a backlog of models that were giving him ear-ache (of the wife related sort......you know the 'when are you ever........!) ") )
)
[attachimg=1]
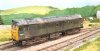
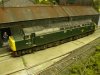
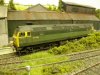
Hence this largely standard Bachmann offering has been subject to my own whim in gaining a quick workover so as to feature the somewhat faded and sleightly dogeared look that many of the remaining green 47's sported in the early TOPS era 70's.
[attachimg=2]
A reasonable coat of flat matt varnish takes back the shapness of the original finish which is then subject to a several washes of lighter green, grey and some underframe dirt type colours mixed in with odd bits of patch repainting to complete the look.
[attachimg=3]
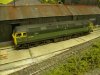
The models finished based on photos of the prototype operating on the WR. Note the original numbering painted out at one end, yet at the other the whole cab side was repainted!. I like adding characterful prototype details like this to models. ;D
[attachimg=4]
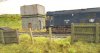
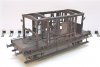
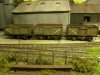
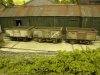
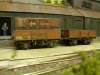
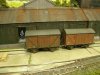
His locos (of which there are a few) were also accompanied by a whole box of wagons or varing standards which have slowly been passing accross my workbench over the last month.
[attachimg=5]
These are only a sample but at the rate im going with his Minerals he will have a whole windcutter set before long! 8)
[attachimg=6]
Still keeps me occupied and I dont mind helping mates out with their projects.
[attachimg=7]
)[attachimg=1]
Hence this largely standard Bachmann offering has been subject to my own whim in gaining a quick workover so as to feature the somewhat faded and sleightly dogeared look that many of the remaining green 47's sported in the early TOPS era 70's.
[attachimg=2]
A reasonable coat of flat matt varnish takes back the shapness of the original finish which is then subject to a several washes of lighter green, grey and some underframe dirt type colours mixed in with odd bits of patch repainting to complete the look.
[attachimg=3]
The models finished based on photos of the prototype operating on the WR. Note the original numbering painted out at one end, yet at the other the whole cab side was repainted!. I like adding characterful prototype details like this to models. ;D
[attachimg=4]
His locos (of which there are a few) were also accompanied by a whole box of wagons or varing standards which have slowly been passing accross my workbench over the last month.
[attachimg=5]
These are only a sample but at the rate im going with his Minerals he will have a whole windcutter set before long! 8)
[attachimg=6]
Still keeps me occupied and I dont mind helping mates out with their projects.
[attachimg=7]


")