Cookie's G3 Workbench

Steve Cook

Flying Squad
Some more brass bashing today, but with larger bits, so less swearing and moaning about it :)
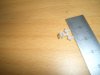
Some U shaped brass strip was cut down its length on its back, then 2.5mm strips cut off the ends. With a bit of clean up file work that gave me 4 L shaped pieces to represent the cast lamp irons for the veranda corner posts on the brake van. Some 0.5 etch was filed, drilled and cut to length to give me four bases to attach to the posts.

GER Brake 75 Lamp Iron bits.JPG

The L shaped pieces were soldered to the bases with short lengths of 1mm rod added to represent the fixings and give me pins to glue into the resin corner posts. A quick scrub and they were dunked in chemical black - as they stick proud from the body I can see them getting caught quite easily and the paint isn't going to last well.

GER Brake 76 Lamp irons assembled and blackened.JPG

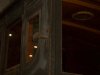
With holes drilled into the corner posts, the brackets were superglued into place - I'm hoping the glue will yield before the post in the event of it catching anything, or indeed prevent the van from being dragged off the track. I really hope I never have to find out though :)

GER Brake 77 Lamp irons in place.JPG

I have no idea what the blocks under the lamp irons are for, but they've been made from 2 x 2.5mm Evergreen strip, glued in place and then had 0.5 rod stuck into holes for fixings. A set of replacement rivets were made and dropped into the holes in the arrow brackets too.

GER Brake 78 Get the glue out.JPG

I reckon I'm about 95% done on the fabrication front, its time to start gluing all the relevant bits into place :) There are lamp irons to be mounted on the ends - I shall solder the rivets in place and drill suitable holes, but again they are vulnerable so will probably be the last job before primer. There is the small matter of the horizontal handrail to content with but having read the instructions, I've prepped for everything else mentioned and finished my tick list, the air will be thick with the smell of Araldite this week then...
Steve

PS Apologies for the over use of the 5 pence piece this weekend, it just makes explaining the size of things much easier to work colleagues on a Monday lunchtime.

Steve
 

Dikitriki

Flying Squad
I know those brackets are only small fixings, but they are well thought out and really neatly and squarely constructed. It's little things like that that really impress me about your work:thumbs:
 

geoff_nicholls

Western Thunderer
you are making a very good job with the brake van. The lamp bracket is a very effective solution. When building mine, I drew a bracket that I'd seen on the eastern Counties carriage at the NRM and had it printed. Unfortunately I drew the lamp handle slot a bit too large. I had intended to have it cast in brass after re-drawing it, but then decided on the later pattern of lamp brackets, as it fitted better with the rest of the layout.
If I've worked out correctly how to do, there will be a photo attached to this.
 

Attachments

  • ger lamp bracket 1 007.JPG
    ger lamp bracket 1 007.JPG
    934.5 KB · Views: 41

Steve Cook

Flying Squad
Thanks for the kind comment gents :)

Hi Geoff - nice to see you on here.
At least I now know what shape the lamp irons are supposed to be - I struggled to make it out from the photos and wasn't 100% sure that the drawing was right. In some respects its a shame I've got it wrong, but hopefully they don't look to far out from the side and importantly will be robust in normal use - I look forward to finding out :)
Steve
 

AndyB

Western Thunderer
:)
Hi Geoff - nice to see you on here.
Was about to say the same - a welcome addition to the G3 contingent here.
Geoff - Please start a thread of your own to show what you're up to - especially as Steve wouldn't have a GE Brake van kit to play with if you hadn't made it possible.......

Andy
 

Mike W

Western Thunderer
Well said Andy. Welcome Geoff and I'm sure a thread, even one added to only now and then, about your new (sic) project would be of general interest on here.

Mike
 

geoff_nicholls

Western Thunderer
Thank you for the warm welcome. I do have a couple of things on the go in gauge 3, I'll start a thread and upload some photos, when I've worked out how to do it. in the meantime I'm attaching a photo of an actual GER early lamp bracket from the ECR carriage in the NRM. It's a bit grainy, as the carriage is in a dark corner of the hall.
 

Attachments

  • CIMG0562.JPG
    CIMG0562.JPG
    401.8 KB · Views: 26

Steve Cook

Flying Squad
Thanks for posting that up Geoff, on a side profile mine aren't a million miles off :)

The holes for the handrail knobs have had the counter bores deepened slightly to get the handrails closer to the body

GER Brake 79 Counterbore for handrail knob.JPG

After some mocking up and measurements, the vertical handrails are notched to accept the horizontal 'rail

GER Brake 80 Notch the handrails.JPG

The horizontal rail was then laid in place and the measurements double checked, as well as good look over, comparison next to a straight edge etc etc

GER Brake 81 Lay the horizontal handrail in place.JPG

220 C solder was then used at the joints for strength. The whole assembly was carefully extracted from the body, the handrail ends trimmed to length (slightly overhanging to represent the end fixing) and the solder filed to shape to give the impression of a casting

GER Brake 82 Shape the solder joint.JPG

It has all been put back into place so I can check from various angles whether it is all sat straight and parallel...if all is OK I shall do the other side tomorrow.

GER Brake 83 Fix back for check.JPG

Other jobs today have been the preparation of all the other parts - making up a set of captive nuts to screw the chassis fixings in to and the blackening and priming of everything else in the kit.

GER Brake 84 Priming and blackening session.JPG

The penultimate fabrication job was the strangely shaped but enjoyable to make lamp irons to go on the van ends.

GER Brake 85 Lamp Irons.JPG

Double checking, soldering and more gluing is on the cards for tomorrow, it would be nice to get it in a position where the body can be shot in primer next week and a dry assembly run can take place.
Steve
 

geoff_nicholls

Western Thunderer
Steve,
a quick note about the brake push rods. the shorter one, which attaches to the lower end of the crank is straight, both on John Watling's drawing, and the NRM one of a 10' 6" WB van. The longer rod, attached to the upper end of the crank is shown bent below the axle, so there are two doglegs. I'm sorry this wasn't clear from the kit instructions. Other than that (which is hardly visible) everything you've done has really improved the kit.
I think the hardest part is the joint between the vertical and horizontal handrails, I fudges mine with a blob of glue, I don't know how long it will last.
And make sure the chimney is in the correct corner, both I and Mike (sorry) got that wrong first time.
 

Steve Cook

Flying Squad
Thanks for the observations Geoff :)
a quick note about the brake push rods. the shorter one, which attaches to the lower end of the crank is straight...
I can't do that unfortunately as the rod would pass straight through the centre of the axle.
The longer rod, attached to the upper end of the crank is shown bent below the axle, so there are two doglegs.
How did I miss that, doh :oops: I looked at that section of the drawing many times when figuring out the brake gear and only caught the first one. Nevermind, duly corrected.

GER Brake 86 Double dog leg.JPG

There is just enough clearance so that when on full droop, paint molecules can happily jump from axle to pullrod when they get dizzy.
I think the hardest part is the joint between the vertical and horizontal handrails, I fudges mine with a blob of glue, I don't know how long it will last.
Depends on how many miles she does :D
And make sure the chimney is in the correct corner, both I and Mike (sorry) got that wrong first time.
I think I caught that one :)

All put together with blackened handrails so I can eyeball it over the next couple of days and complete the fitting part of the job. Looking forward to blowing it apart for painting now.

GER Brake 87 Fitting and shuffling.JPG

Steve
 

Steve Cook

Flying Squad
Door handles made from scrap etch and soldered into place.

GER Brake 88 Veranda door handles.JPG

The body has had a good scrub with Jif in preparation for paint - I pinged one of the new handles off so that has been re-soldered into position and the body washed again. Given the forecast for this week, I shall have time to give it another wash over as a banker, got my fingers crossed for next weekend.

Steve
 
Last edited:

Scale7JB

Western Thunderer
I saw a G3 layout at ally pally about 2 or 3 years ago..

Relatively basic, compared to something like West Mersea or Pendon, but it was by far the most exciting layout at the show.... and Happisburgh was just down the road...!

JB.
 

Mike W

Western Thunderer
JB - Some G3 exhibition layouts are basic, but have you seen St.Ives?

And if JB or Flying Squad are at a loose end on 15th Feb pop down to Biggleswade for the big G3 show of the year. No pressure to get involved, just a friendly show with the likes of WT members Cookie, Jamie Page (fabulous MSWJR carriages), WT newby Geoff Nicholls, AndyB, that great all rounder Ken Cottle etc etc.

Of course you might well go home with a G3 kit, but there's no pressure . . . . honest . . . . heee heee

Mike
 

Arty

Western Thunderer
And if JB or Flying Squad are at a loose end on 15th Feb pop down to Biggleswade for the big G3 show of the year. No pressure to get involved, just a friendly show with the likes of WT members Cookie, Jamie Page (fabulous MSWJR carriages), WT newby Geoff Nicholls, AndyB, that great all rounder Ken Cottle etc etc.

I hope to get there Mike, but not early enough to do a demo or sell any kits.

Richard
 

Steve Cook

Flying Squad
And if JB or Flying Squad are at a loose end on 15th Feb pop down to Biggleswade for the big G3 show of the year. No pressure to get involved, just a friendly show with the likes of WT members Cookie, Jamie Page (fabulous MSWJR carriages), WT newby Geoff Nicholls, AndyB, that great all rounder Ken Cottle etc etc.
Of course you might well go home with a G3 kit, but there's no pressure . . . . honest . . . . heee heee
Sorry Mike, I'm sure you'll all have lots of fun but prior commitments mean I'm unable to attend again :(


I don't do very well at making this event, it always comes during a very busy period of the year for me which is a real shame.
Steve
 

Steve Cook

Flying Squad
Sun :)
Wind :rant:
S*d it, prime it anyway :eek:
Get away with it :oops:

GER Brake 89 Body in Primer.JPG

There are a few bits to rub down and I'm going to add a smear of filler on the underside of the veranda framing as I didn't manage to completely smooth a moulding line present, but its good to see it in a unifying coat of paint at last :)
The spraying order was interesting as I didn't want to get too much paint on the surfaces.
First thing this morning the body was completely masked to leave just the bottom face of the body and the solebars exposed. These were primed and the body given a gentle blow over with a hair dryer. The newspaper masking shield was then cut to expose the insides faces of the van, the cut edges of the mask being sealed to the body so I could concentrate on just getting primer into all of the veranda corners. This was left to dry for a bit longer, then all the masking was removed.
The body was held upside down so I could focus on priming the underside of the veranda posts, all of the framing and the details - the sides getting a light coat in the process. When this had dried, the body was mounted the correct way up on my spray stand (held in place with wire through the roof mounting holes), the last coat then added a second coat of primer to the sides, ends and corner posts.
A bit long winded (much like the description) but nothing missed and an even finish.

I can't wait to mock it up again :)
Steve
 
Top