Dan's Workbench - D1031 Western Rifleman

Dan Randall

Western Thunderer
Thanks guys. :) It's a great feeling crossing jobs off the list and I feel like I'm getting somewhere now. However, I've been avoiding doing the crew figures, but until they're done and installed, I can't really assemble the body, so I'm going to have to go for it soon. :|


Regards

Dan
 

28ten

Guv'nor
You and me both with the driver figures. I'm not entirely happy with mine. If I can get the bulkhead off I will leave the driver until later...... Nothing like putting a job off!
 

iploffy

OC Blue Brigade
I am absolutely astounded with what you and other members can do with a normal kit the amount of detail you add and the level of modelling expertease you show leaves me speachless

Ian
 

Dan Randall

Western Thunderer
Jordan said:
file.php


Oh, shame... I'm disappointed now.... those headcodes look SO good from the outside I was expecting to see working roller 'blinds' inside... :oops: :rolleyes: :lol: :lol: :thumbs:

Yeah, sorry about that Jordan. ;) I'm sure if we could persuade Scale7JB to build a diesel, he'd be up for the challenge, but I've made enough work for myself as it is. :lol:


iploffy said:
I am absolutely astounded with what you and other members can do with a normal kit the amount of detail you add and the level of modelling expertease you show leaves me speachless

Ian

Thanks Ian. :) The JLTRT Western is the only version in any scale, that actually looks like a Western. That said, there's still room for one or two improvements that, as well as improving the loco's final appearance (hopefully!), will enable the builder to add some individuality to it.


Regards

Dan
 

Dan Randall

Western Thunderer
28ten said:
You and me both with the driver figures. I'm not entirely happy with mine. If I can get the bulkhead off I will leave the driver until later...... Nothing like putting a job off!

Hi Cynric - I actually made my bulkheads removeable, but I won't know how easy it will be to get them in and out until the body and cabs are together for good. In the interests of making life easy though, I reckon it's got to be better to get the crew and seats in before assembling the body. I'm a great one for putting things off too, but if I ever want to finish this kit, I'll have to bite the bullet soon. :)


Regards

Dan
 

lancer1027

Western Thunderer
Hi Guy's, i put my driver's/secondman in the "tomb" before the bulkhead. The down side is you cant get to anything once its fitted to the cab. My next one however i think i too will make the bulkhead removable :thumbs:
 

28ten

Guv'nor
I have ordered another driver so I now have a couple to choose from, but then comes the figure painting :headbang:
 

Dan Randall

Western Thunderer
28ten said:
I have ordered another driver so I now have a couple to choose from, but then comes the figure painting :headbang:

Funny you should mention that, as I bit the bullet yesterday and decided to have a crack at my loco crew. Here are a few piccies....
[attachment=5:gfboj8vh]SNV33232.JPG[/attachment:gfboj8vh]
[attachment=3:gfboj8vh]SNV33234.JPG[/attachment:gfboj8vh]
The right hand figure is from Omen (with hat removed), whilst the other two are from S&D models. All three have had hair styled from filler.
The left and middle figures started life looking like the top left/bottom right figures in this view....
[attachment=0:gfboj8vh]SNV33054.JPG[/attachment:gfboj8vh]


The guy in the middle had his jacket detail removed, as I wanted to portray him wearing a shirt with rolled-up sleeves. This was done by slapping some filler around his chest area and prodding it into shape with various implements. You can tell it's the 1970s - just look at that collar! :lol:
[attachment=4:gfboj8vh]SNV33233.JPG[/attachment:gfboj8vh]


After a quick wash and blow dry this morning, they were ready for a lick of white primer....
[attachment=2:gfboj8vh]SNV33235.JPG[/attachment:gfboj8vh]


They look a bit better now, probably as a result of being a unified colour, but the primer has shown up a few areas that will either need a visit from a file or some thick paint!....
[attachment=1:gfboj8vh]SNV33236.JPG[/attachment:gfboj8vh]


I've been putting this job off for ages, but it didn't take as long as I expected (it's funny how that happens!). I think they're as good as they're going to get and hopefully, a lick of paint will render them acceptable.


Regards

Dan
 

Attachments

  • SNV33233.JPG
    SNV33233.JPG
    175.5 KB · Views: 77
  • SNV33232.JPG
    SNV33232.JPG
    188.9 KB · Views: 78
  • SNV33054.JPG
    SNV33054.JPG
    175.9 KB · Views: 75
  • SNV33236.JPG
    SNV33236.JPG
    179.9 KB · Views: 74
  • SNV33235.JPG
    SNV33235.JPG
    184 KB · Views: 74
  • SNV33234.JPG
    SNV33234.JPG
    187.9 KB · Views: 75
  • SNV33233.JPG
    SNV33233.JPG
    175.5 KB · Views: 74
  • SNV33232.JPG
    SNV33232.JPG
    188.9 KB · Views: 74
  • SNV33054.JPG
    SNV33054.JPG
    175.9 KB · Views: 76
  • SNV33236.JPG
    SNV33236.JPG
    179.9 KB · Views: 76
  • SNV33235.JPG
    SNV33235.JPG
    184 KB · Views: 76
  • SNV33234.JPG
    SNV33234.JPG
    187.9 KB · Views: 76

28ten

Guv'nor
I think the one on the right is the best, are omen available on line? IMHO the middle one is a little 'ape-like' in the upper body :laugh:
 

Dan Randall

Western Thunderer
28ten said:
I think the one on the right is the best, are omen available on line? IMHO the middle one is a little 'ape-like' in the upper body :laugh:

Yes, the middle one is a little ape-like (on one side at least) and is one of the reasons I need to break the files out! I think this is where I soldered his arm on at the shoulder, to make him adopt the right pose.

I'm not sure if Omen are available on line to be honest. Actually, I think the head on the Omen figure is too big - he looks like a Thunderbird puppet to me! :lol:

I struggled with all three figures to get them and the seats to fit in the cab. All the figures seem rather large and the seats, in comparison, seem rather small. Having said that, I still had to remove the collar from the seat pedestals to enable them to sit lower in their bases and allow the driver's legs to fit under the desks. Good luck with yours! ;)


Regards

Dan
 

28ten

Guv'nor
I'm getting tempted to leave the crew out, I'm not putting a driver in both ends so ther will be times when the driver is in the wrong end anyway!
 

Dan Randall

Western Thunderer
28ten said:
I'm getting tempted to leave the crew out, I'm not putting a driver in both ends so ther will be times when the driver is in the wrong end anyway!

That sounds like a cop-out to me, but it'll certainly save you a lot of time and hassle. :lol:


Regards

Dan
 

28ten

Guv'nor
It probably is :lol: but but I have yet to see very many convincing 7mm figures, I never put passengers in coaches for that reason.
 

lancer1027

Western Thunderer
Hi Dan, I know what you mean about getting the drivers into their seats :headbang: A couple of my drivers have had to have their foot chopped off so i can manipulate their legs to fit under the desk :vista: . So after all the extra work on the loco ,getting it to look as good and accurate as poss, you end up with a disabled driver :scratch: Just hope he does'nt need a crew change in the millenium :lol:
 

28ten

Guv'nor
That could almost be my two :shock:
I found Omen on the Scalelink website so have ordered a couple
 

Dan Randall

Western Thunderer
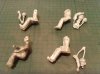
I managed a little work on Rifleman today, specifically, making some tweaks to the crew figures, and then getting some paint on them.

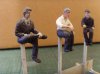
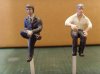
A recent coat of primer had highlighted a few blemishes. Some were taken care of with a file, others with a little more filler. The biggest change was to this chap in the middle?.
[attachment=4:18fob4f1]SNV33236.JPG[/attachment:18fob4f1]
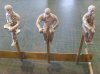
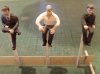
As Cynric had pointed out, he looked a little ape-like, so I attacked his upper right arm and shoulder with a file and scalpel until things looked a little more balanced. Using a little more filler, I gave him a hair transplant too. :lol: Having done the necessary mods, it was out with the paints and here are the results?.
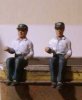
[attachment=3:18fob4f1]SNV33237.JPG[/attachment:18fob4f1]
Sorry about the poor focus on the one above.... :oops:
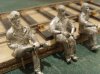
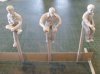
[attachment=2:18fob4f1]SNV33238.JPG[/attachment:18fob4f1]
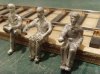
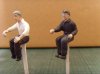
[attachment=1:18fob4f1]SNV33239.JPG[/attachment:18fob4f1]
[attachment=0:18fob4f1]SNV33240.JPG[/attachment:18fob4f1]
I?m not actually sure what colour uniforms were in the early 70s, so I opted for a darkish blue/black finish. This was a mixture of Precision Engineers Blue Brick (Matt) and Precision Matt Black. Shirts were picked out in Precision Matt White and the flesh tones were a mix of Precision Matt White and Railmatch Bauxite.
I put some Gloss Varnish on their hair, but it?s too shiny and will be gone over with some Satin Varnish once everything?s dry.

The chap in the white shirt is a strange looking cove, but you have to remember these images are about 4 or 5 time actual size. Despite using matt paints, there?s a bit of a sheen to all of their clothing, so again, once everything?s dry, I?ll attempt to kill the sheen with some Matt Varnish and maybe some talc.

I?ve come to accept that figures are going to be the most unsatisfactory part of any model I make and think these ones are probably as good as I?m going to get them. The good news is, I can hopefully get them (and the seats), installed in the cabs soon and start sticking the body together! :)


More updates, as and when.


Regards

Dan
 

Attachments

  • SNV33236.JPG
    SNV33236.JPG
    179.9 KB · Views: 113
  • SNV33240.JPG
    SNV33240.JPG
    172 KB · Views: 114
  • SNV33239.JPG
    SNV33239.JPG
    163.6 KB · Views: 112
  • SNV33238.JPG
    SNV33238.JPG
    169.6 KB · Views: 112
  • SNV33237.JPG
    SNV33237.JPG
    176.5 KB · Views: 113
  • SNV33236.JPG
    SNV33236.JPG
    179.9 KB · Views: 112
  • SNV33240.JPG
    SNV33240.JPG
    172 KB · Views: 113
  • SNV33239.JPG
    SNV33239.JPG
    163.6 KB · Views: 113
  • SNV33238.JPG
    SNV33238.JPG
    169.6 KB · Views: 113
  • SNV33237.JPG
    SNV33237.JPG
    176.5 KB · Views: 113

Dan Randall

Western Thunderer
Jordan said:
Just a quick question... the chap on the left with his leg crossed; is there room for him at the desk in that pose? I assume you've checked!! ;)
Just asking as it seems from comments before (might be this thread, can't remember!! :oops: ) that room for driver's legs is one of the biggest problems with fitting crew in cabs... :headbang:

Hi Jordan - well he certainly fitted before the painting stage, so I'm hoping a few coats of paint won't have any adverse effects. :lol: I thought I'd give him crossed legs just to be a little different. Apart from a choice of two seperate heads, he and the chap in the white shirt started life looking pretty much the same. They were both actually bus driver figures, but I remodelled the other chap's jacket to look (hopefully), like a shirt, with rolled-up sleeves. As for getting the figures and seats in the cab, it is indeed, very tricky. There's a lot to be said for modelling steam locos.... :lol:


Regards

Dan
 

Phill Dyson

Western Thunderer
Dan Randall said:
I?m not actually sure what colour uniforms were in the early 70s, so I opted for a darkish blue/black finish.
This link shows the then new BR uniform in 1966 : http://www.scienceandsociety.co.uk/resu ... imagepos=3 , but I would have thought this would be about right for 1970's, but without some of the braiding for a driver & second man : http://www.railpictures.net/viewphoto.php?id=277199 .

Dan Randall said:
Despite using matt paints, there?s a bit of a sheen to all of their clothing, so again, once everything?s dry, I?ll attempt to kill the sheen with some Matt Varnish and maybe some talc.
I find WarGames acrilics are best for painting figures. Have a look at these & see what you think ?

[attachment=0:386tgrnw]Drivers%20002-1.jpg[/attachment:386tgrnw]

Cheers Phill :thumbs:
 

Attachments

  • Drivers%20002-1.jpg
    Drivers%20002-1.jpg
    46.8 KB · Views: 87
  • Drivers%20002-1.jpg
    Drivers%20002-1.jpg
    46.8 KB · Views: 87

Dan Randall

Western Thunderer
Thanks for the link Phill - most interesting. :thumbs:

Acrylics versus enamels - I have about 50 or 60 bottles or tins of enamel knocking around and I'm very comfortable using them, to be honest.

I think I've used the same figure as you for the guy on the right, but I removed his hat to make him less time specific. Having seen yours though, I might repaint the top part of his uniform white, as I now think it looks more like a shirt than a jacket. :)


Regards

Dan
 
Top