Hunslet Works in 7mm

Andy Ross

Active Member
Hunslet Works update.

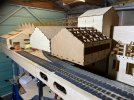
After a view false start I have managed to put together the second bridge structure.

IMG_1717.jpeg.c678e0d78ec8dc24605cb9f6ad4eb6a1.jpg

Originally this was to cover the crane tracks that ran from the machine shop to the boiler shop.

By myth time this was still in use but only to bring items out of the machine shop. The doors into the boiler shop had been bricked up and some building as added. all that is left is the upper lifting door but this was locked in place and built unto as can be seen in the photo below.


rack-Hudswell.jpg.8cc70ab4080f034e081f89ccb0b9beb5.jpg

I have included photos of the buildings before the bridge section was added.

IMG_1709.jpeg.a560073b5d34d1d0b20c5dc4590c3e5f.jpg


IMG_1710.jpeg.41534e07f9886068db91ed2574c633e8.jpg

The upper doorway was fragile and I broke the first one so when cut is has a sacrificial support frame which will be removed to add the door frame.

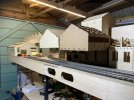
I am not sure how much will be visible at exhibitions under the roof so at the moment there is a representation of the frame work and trusses all laser cut. There is some overlays and a couple of steel columns to add that go down to the floor which I will probably get etched.


IMG_1724.jpeg.0c9080f53b53dcb4477cc26c6e1a3745.jpg


IMG_1725.jpeg.4cf6042b582dbe1aed782e144b8e2476.jpg

The rest of the photos are just general views.

IMG_1722.jpeg


IMG_1716.jpeg.6e795bc0fe03007de366acab8313b837.jpg
This is as far as I am going before the Swindon show next weekend.

If you would like to see the progress in the flesh, then please come along to the Swindon Railway Festival at the steam museum on the 9th and 10th September. Please say hello.


Andy
 

Attachments

  • IMG_1718.jpeg.8999861db29a2d3214390cb022173461.jpg
    IMG_1718.jpeg.8999861db29a2d3214390cb022173461.jpg
    907.2 KB · Views: 12
  • IMG_1722.jpeg
    IMG_1722.jpeg
    238 KB · Views: 7
Last edited:

Andy Ross

Active Member
Hunslet Works update.

Another first tonight.

When we decided to take the small board to Swindon it was meant to be a static display.

However I had an opportunity tonight to install some temporary wiring and I will be able to drive standard gauge locos up and down the yard.

The link below is the first loco to go from the workshop up the yard.


https://youtu.be/MqOOJx2LTnY

Between now and Easter we will have time to fit chips into rest of the locos. (some with sound).

That's it now before Swindon - tomorrow I start packing it all up for the weekend.


Andy
 

Andy Ross

Active Member
Thank you to everyone who said hello at Swindon exhibition over the weekend. I took this video and from this angle watching the loco go up the yard, it was like I was back there in the early 80’s.


Next confirmed outing will be York next Easter we’re there will hopefully more to see including a small fiddle yard and more Working locos on different gauges.

Andy
 

Andy Ross

Active Member
Several weeks have passed since I last posted anything and ti fair to say not a lot has been done until this weekend.

When we got back from Swindon it was a case of unpacking the car and within 24hrs were loading it again for a two week long waited holiday.

The photo below should give you a clue on where we went.

IMG_1854.jpeg.2861c9a3c90acc9ff7d5684f7a486d4d.jpg

Since we got back it has been very difficult to get motivated again especially now the Leeds Exhibition has had to be cancelled due to building work at the venue.

I know that I need to get on with more design work for the building from roof panels to sorting out the floor panels and control panels etc.

Despite this I have decided the best way to get going again is to solder up some more parts to fill the shop. So I have started with some trestles and progressed on to some locomotive parts. IMG_1898.jpeg.1f2940a60bf3cbead0b14d705514f03d.jpg

The trestles are quite fiddle and until you solder the legs up, very fragile and easy to bend out of shape, but once they are done they are very strong.

IMG_1901.jpeg.6ba198d81bf174a512c11e8427b06275.jpg

It might be easier to 3d print these but they would be far too brittle and would need building up which will not look as good as the etched ones.

I also decided to build some parts up for a Bord na Móna loco that would help fill up the boiler shop. I am not sure how I bent the cab up last time but this time I used the Tamiya bending fixture. This was OK, but to get al the bends I had to modify it by cutting some of the legs off.

IMG_1897.jpeg.5544cfb832a8c308d0dadce9670c063e.jpg IMG_1896.jpeg.18e117100ec4b8e0695b261b6775bd84.jpg

Its quite a complex fabrication with a false floor and built in sandboxes etc.


IMG_1899.jpeg.821b763c15cc70153241dfe7df7f66d9.jpg


IMG_1900.jpeg.08bda613d53e45f82b567d044add3b3b.jpg

I am quit please with progress and there are few more different bits I need to do including more trestles and a lot of benches.

All being well this will motivate me to get on with the design work for the layout in the next few weeks.

Andy
 

AdeMoore

Western Thunderer
Just caught up these 3 lovely pages. The thread was/is like a book you can’t put down.
Wonder on every page.
Brilliant modelling Andy looking forward to more.
 

Andy Ross

Active Member
Hunslet Update.

The run up to Christmas has not seen much activity on the layout. Well in Leeds anyway.

Pete Kirmond has been busy down in Gloucestershire making the fiddle yard board and sorting out the creating for the narrow board. This had gone through several design reviews but in the end we reverted to a very simple solution.


image0.jpeg.1d6fd7339478a3e0b92fcdf3fd0baa6e.jpg IMG_5652.jpg.4ff19dca1249cbcec14a5cff02363c0a.jpg

The fiddle yard board only needs to be 1 metre long so a 1/2 metre section is added to allow for creating. This may be used as a set up board for the dcc with all the different gauges on it.

I collect these just before Christmas and in the next few days they will be put up in the garage so I can lay the track across the board and start on the wiring.

Back in Leeds there has also been some activity. As the layout is starting to receive invites to Shows, all be it as a work in progress, I have been asked if I have any lighting, as some the halls have poor lighting for models. This has led to several interesting discussions, especially with Peter. With the buildings being so high and the layout being set at eye level how do you try and light it without a huge lighting structure. The conclusion at the moment is that we don't.

The majority of the activity is inside the building, so what we need to do is light the interior. The other issue with lights outside would be that there is no guarantee how much would get in through the windows. As we add more roof details, the worse this will get.

For the North light I had thought abut making the external structure as separate units, like a hat for each one. So how do I get the lights inside. I wondered if I could get some LED's on the window face to simulate light coming in through the windows. To accommodate the LED strip I made the window face 3mm deep. This has pinched a bit of the gutter but it will not be too noticeable.

IMG_2015.jpeg.90ceeafeb9855e517481b3b6a5148999.jpg IMG_2017.jpeg.59565a41852c37e7001c5b18a017e0d3.jpg

As you can see I used 2 rows of LED's. I also put all the inner roof details on the tiled face as I needed to check it sat down right on the structure.

IMG_2006.jpeg.b909b5cfbd0b850c4a72797b473e95ce.jpg IMG_2010.jpeg.fb12800c9ab9e15386bd0377721f92fd.jpg

When I put the test assembly on with two rows of lights it is way too bright, especially with another in the next bay. So I disconnected the top row and there was still more than enough light. This will also mean I can move the strip a bit further up so you cannot see them from most angles. I might also fit a thin diffuser, but I am not sure what difference this will make so close to the light. I am not sure if this will work in the long run and the boiler shop section with the pitched roof is going to need another idea. There is also the issue of the narrow board / test rack area to consider, but one step at a time.

I have also noticed some areas in the size of the end panels but this will not take long to correct. The next thing to do is make a couple more and see how they all sit together.


Andy
 
Last edited:

Andy Ross

Active Member
Hunslet works update.

North Lights, mark two.

After the first attempt to light the erecting shop from under the roof, I was not 100% happy. But I felt I was on the right track.

I had already decided that two strips of lights was two bright and if I went to one I could lift the bottom one up a bit further which would move it out of the field of view.

I was also concerned that it was also still a bit too white. So I had look on Amazon and came across a version that provided on continuous light and was slightly yellow. They also came with a dimmer control.

L._AC_SL1500_.jpg.836336ecac16f31e4076bdb7dc7ed300.jpg

The light in the shop were sodium and these were a more yellow/orange light.

I have built up one of the assemblies.

IMG_2024.jpeg.90e668fe92ebc9088b650317b1290826.jpg IMG_2023.jpeg.3e1583be0dec099f5be711c34637c2c5.jpg

This gives off a far better colour of light. What I need to do is build some more assemblies to see how bright it will be with more than one.

IMG_2019.jpeg.9abc9c3fd8aa43b3d7dd8dc371b3133b.jpg IMG_2020.jpeg.173174f9dd3f46457acd338cbe3a8f9d.jpg

So Back to the laser cutter tomorrow.

The boiler shop end will still need some thought but as I have said before, one problem at once.


Andy
 

Andy Ross

Active Member
Hunslet Update.

So I have finished making all the Hat Structures for all the North lights section of the roof during the week.

IMG_2038.jpeg.f70f84e498ae89cfd119c34f93303583.jpg

Each one has a LED strip fitted and there are small plugs and sockets between each one.

IMG_2041.jpeg.2f7def29000f9681f7d7100691a200ce.jpg

The little plugs were a pain to connect but it was really the only way to do it.

IMG_2047.jpeg.b2c6c2163403e39ce47901591becfe95.jpg

When everything is painted and these go on for good the plug should tuck away behind the purling out of site.

This has worked out really well, even when I turned all the garage lights off, you can see how well that end of the layouts illuminated.

IMG_2049.jpeg.e7405da0f1a423d94e7cbade794b1699.jpg

I also believe we can do something similar in the boiler shop roof but that might need to wait for now.

I am really pleased with this, especially y with the colour of the light. its not too white and gives the look of the sodium lights we had in the real shop.

There is one issue we have found, all this continues damp weather has not been kind to the layout. The garage has proven this winter to be far more damper than previous years and this has caused a lot of the Nickel Silver structure to go black and patchy, it is particularly bad on the doors. I am sure it will be ok but it has emphasised the need to get everything painted this summer. I will have a go at cleaning this all up before Easter.

IMG_2050.jpeg.e1b1c68e8d0841ddaea329213d544c2b.jpg

Once everything is painted I am sure it will be ok.

Next job all being well is to get the new fiddle yard up and sort the last bit of track out when the bits arrive from C & L. I then need to sort some permanent wiring out as it is all a bit temporary at the moment.


Andy
 

Andy Ross

Active Member
Hunslet Works Update

Just before Christmas I picked up the fiddle yard base board from my good friend Peter Kirmond. The intention was to get this up and fitted over the holidays and get the track laid. I thought I had the rail and sleepers to do this, but this was not the case so this was put on hold while I ordered the parts. These took longer to arrive than I hoped and in the meantime I was taken ill which stopped almost everything for a couple of weeks and to be fair I am still not 100%.

Despite this, today with Jills help, we managed to put the board up and later in the day I glued all the sleepers down. If its not to too cold tomorrow I will fit the rails.

IMG_2073.jpeg.69974b54a5948f92d6193c665387c76b.jpg

This board is 1m long making the total layout length 4m which almost fills the garage.

IMG_2074.jpeg.5d154db931a6477143f2087276c303ff.jpg

I had also decided that as this is only to run locos and the odd wagon on and off scene, most of which will be rigid six or four wheelers, there was no point messing with sector plates or point-work, as we can just lift the stock on and off as and when we need them.

This will also be left open to view so the different loco types can be seen when they are not on the test track or in the erecting shop.

The screen for the slide show will also be mounted on this board.


Andy
 
Last edited:

Andy Ross

Active Member
Hunslet works update.

Slow progress over the last two weeks in garage due still not being 100% well. But I have managed to solder the rails in place, and today I found and fitted the strip for the check rail across the joint. I also took the opportunity to Ballast this short section. God knows how long it is going to take the glue to dry with the cold weather.

IMG_2083.jpeg.85cd7f7073414bee01586f4ae14ae495.jpg

IMG_2082.jpeg.80804b9cc4e644ad2981dce20818dc81.jpg

In parallel with this I have been busy doing drawings to send for etching to help add to the variety of parts in the boiler and erecting shop. One etch is just general parts for the structure etc, but the second is far more interesting with cabs and casing parts for two very different locos - can you work out what they are?

-04at17_45_48.png.cc55ec0ad4ee44ac68a99ab16b499d0b.png
If you want to see the layout in various stages there are a couple of outings coming up.

Narrow Gauge North is on the 9th of March at Pudsey Civic hall, Leeds. I will be putting on a demonstration stand which will be based around the narrow test track board. I will not be taking the main board with the cranes etc. but there will still be plenty to see.

Easter at York will see the first show for the complete layout, all be it as a work in progress. On saying that it will all be operational. This will be a major milestone in the development of the layout.


Andy
 

Andy Ross

Active Member
Hunslet works update

Over the last few weeks there has been various activities across the layout, see below.

I have been drawing parts to help fill different areas of the layout. Most of which have already been produced with the 3d printer.

1. Wheel sets for the wheel shop .


-24at23_12_10.png.654c3b095f00e02768d704ca70520821.png -24at23_11_31.png.0b83b270226b6faa883f7623f661a0bd.png

IMG_2126.jpeg.db34d153be18b0dfe86c0b0468079f4c.jpg

These are for the big Scunthorpe Bo Bo. What I am particularly please with is that I have cracked drawing gears.

2. Fiji Loco frame

-24at23_09_18.png.26f1a2d444b255a0e28423b551070eda.png IMG_2121.jpeg.373e1994785ff3afd3ccf573a65cd78f.jpg

This will fill a corner in the boiler shop.

3. 300hp Mines bogie frame

-24at23_07_23.png.5a6414d82c350c29c3cb5d6ee7ce01cc.png IMG_2124.jpeg.929348f7a1689f34385170af66e16fa5.jpg

These will go in the erecting shop.

4. Blocks, angle frames and bed plates.

IMG_2118.jpeg.192cf5ec799cd2dfacdc8f7c7737b6dc.jpg

These are needed for the boiler shop and will be used to position fabrications.

I have also been working on motorising one of the MOD locos so it can be lifted onto the test track and run up the yard on test.

IMG_2131.jpeg.3c87d12b452f26e9477e9b30df8f4315.jpg

The motor will fit up int the fuel tank. I have had to be a bit brutal with one of the ballast weights in the frame.

IMG_2132.jpeg.882141b1c23a49692d29e8e288596316.jpg

Still a bit more to do but I am getting there.

I have also made a start on the wiring. Compared with some layouts there is not a lot to do and at the moment I still have to finalise control panels. I need to operate all the layout to understand what needs to be on each panel or if we can do it all on one.

Some can be done properly now such as under the layout.

IMG_2117.jpeg.f6af65618056ae905fc41fe279d4a257.jpg

I have also worked out how to switch the rails to the power on the test track. This now has a rotary switch.

IMG_2128.jpeg.b319f0007cfa5eeeef075955bd49c465.jpg IMG_2127.jpeg.9d634f18abea82d1b899ee0e4e2ec4b8.jpg

Position 0 - Turns all the Test track off

Position 1 - Standard gauge and 5'6" gauge

Position 2 - 2' gauge

Position 3 - 2'6' and 3' gauge

This will be mounted for York in a temporary enclosure.

I have also been looking at the boiler shop roof and I think I have a plan to get some lighting added to this area.

More updates over the next few weeks.

Don't forget the test track board will be at Narrow Gauge North at Pudsey Civic Hall on the 9th March.

The complete display will be at York over Easter.

Andy
 
Last edited:
Top