Let's roll - Finescale of a sort

Tom Insole

Western Thunderer
I've got to say I was quite impressed with these little wagons.
Today me and the young Apprentice dropped in for a brief visit as we were out on a day out, on our route home it would have been rude not to make a minor detour coming off the 14 at BS.Ed's and down to a particular branch line that the PW gang were in full swing.

We made the exception on note of also not having the correct attire not to report the lack of Hi-Vis adorned by the gang whilst walking the line.
Although I never committed to taking the PTS exam I read the paperwork and knew a vis was essential for all those walking the lines.
Not even a look out on duty as the second in command was out on other duties.

none the less, we enjoyed seeing the progress made and I'll save the other image for another thread on why there was only one small pot boiled up in the booking office and not down trackside.

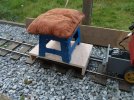
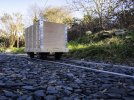
Scarlett took no hesitation when offered a seat within the single wagon I carried down a path (sign seemed to be missing noting limited clearance). Pushed upon freshly laid rail she was maiden to the furthest travelled since PW gang had been quite busy.
Wagon on fresh rails lite.jpg

Next time we'll have to make a day of it and bring our correct wears to help the PW gang.

Until the next time.
Tom. (and apprentice, Scarlett)
 

Peter Insole

Western Thunderer
I'm losing track a bit with all my postings on various threads, but as I have made a start on some new rolling stock I thought it should go here!

The wheels that Giles so generously offered are particularly ideal for some heavy duty, utility wagons - including one that can be fitted out with a removable seat to form a driving truck (or trolley more like) for the "Speeder"! A need for that - and of a notably different design to the (temporarily borrowed) Horwich engine tender is really pressing.

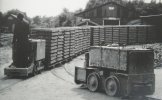
Originally intended (I believe) for use on cradles or overhead cranes to allow heavy weights to be moved along steel joists/girders, the small tread diameter of these wheels is no handicap for our purposes. Upon receiving them, I was immediately put in mind of these:

zquWingrove and Rogers  Crowborough brickworks13782940855_826c3f3a77_o.jpg (Copyright image, shown for illustration only)

The Crowborough brickworks wagons were not only extremely low-slung, but worked by the inspiration for our own locomotive...

Perfect!

With the risk of such wagons being all too frequently overbalanced, derailed or otherwise tipped up, - especially when being exuberantly operated by our own train crews! - the very low floors, plus the addition of headstocks set just sufficiently above rail height, should hopefully have a damage limiting effect?!

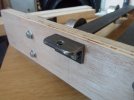
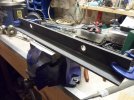
The first task, already alluded to in another thread, was cutting to length, aligning and drilling the heavy angles chosen for two pairs of sturdy solebars:

zrSAM_9140.JPG

I'm afraid that I bottled it on the second pair, claiming utter exhaustion from sawing, for the immediate time being anyway!

The simple task of drilling aligned, 12mm bore holes for the wheel bearing stub axles unexpectedly turned out to be quite a task as well - and for the daftest of reasons:

I had, not so very long ago, used a 12mm bit to open out the holes in the loco wheels, so I knew I had one available. Keen to get going (and take advantage of that pesky "noise window") I went looking for it. Goodness knows how much time I wasted re-arranging everything while searching for the damned thing - but with no joy? Waiting for the next bus to come along for a shopping trip would have eaten up the remaining time of day, so I elected for the only solution I could think of:

Drill the holes the next size down that I could find... Then...

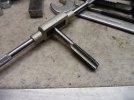
zrSAM_9142.JPG

Drive a 12mm tap all the way through!

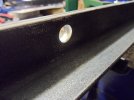
I wish I could have just left it at that, and simply threaded the stubs in directly - but no, there is a shoulder on said items, so the bores need to be the full size! At least by tapping them first, there was considerably less metal to file away with a rat tail.

zrSAM_9141.JPG

Still an awful lot to shift before getting a good fit though!

The wagon should travel in a nice, straight line - after all that work, it had better?!

zrSAM_9143.JPGzrSAM_9144.JPG

I think I shall treat myself to a new bit before tackling the next one!

You all know how it always goes:

It's the law... I will discover the missing object about twenty minutes after the job is completed!

Pete.
 

Peter Insole

Western Thunderer
Not quite a week since my last post, but quite a bit to catch up with. While I was determined to crack on with the task, it is probably true to say I wasn't really in the best place, either mentally or physically as it happened!

The effort required to cut and fettle eight sections out of some 20mm steel angle surprised and frustrated me a little...
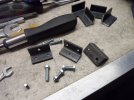
zrSAM_9145.JPG

By the time I drilled four of them out I'd had quite enough of that!
Incidentally, the sharp eyed amongst you might have noticed that the twin holes are offset, or oriented towards one edge on each angle! That was deliberate, in order to make allowance for the angle at the rear of the solebars... At least, that was the intention anyway! I still managed to get it wrong though!
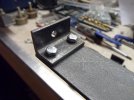
zrSAM_9146.JPG

I had completely forgotten about the nut... After a whole lot of faffing about, the top bolts would still not settle flat on three out of the four brackets!

Worse was to come...!
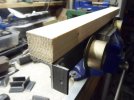
zrSAM_9148.JPG

I was concerned about structural strength of the underframes, particularly bearing in mind that the wheels are bolted to the outside of the solebars - with no axles in between to resist twisting under load. I had already decided to screw the bars onto substantial timber "joists", which when firmly attached under the floors, should prove to be strong enough. (?)

I did say I was not thinking clearly enough though?

Having bolted up the first pair of frames worth, it finally dawned that I had cut every one of those wretched angles short - only covering the steel sections, and not all the way up to include the timbers. The issue was further compounded by having now chopped up too much of my remaining angle held in stock!

I could have cried at the prospect of having to do it all over again, let alone the waste of materials!

My bus pass is taking a right hammering with all these unscheduled trips to the nearest DIY emporium - although the loaded returns can be amusing, and almost guaranteed to raise the odd eyebrow! I can almost hear the conversation in the crew rooms:

"Hey Rich, I 'ad your ol' dad on my bus earlier - an' you'll never guess what he tried to get on with this time?!"
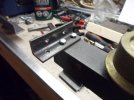
zrSAM_9149.JPG

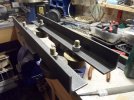
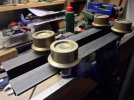
I got away with it again - and after much huffing and puffing, the above and following two images shows how the brackets were meant to be in the first place!
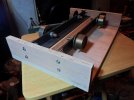
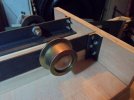
zrSAM_9153.JPGzrSAM_9154.JPG

By the way, the "joists" were only located for trial purposes when photographed - and that turned out to be just as well too...!

Oh, the errors were turning into a catalogue!

I really thought I had been so careful to insure that the solebars were square, accurately and centrally marked out - and that all the holes in the headstocks were properly aligned - particularly as the arrangement has a critical bearing on maintaining the precise back-to-back measurements! Amazingly, I had got that bit pretty much spot on by the close of play (?)

The following morning I decided to test the beastie out on the track...

It ran lovely and smooth - until it reached the points! It wouldn't go through them without derailing - every damned time!

Checked the BtoB's again... but still an absolutely perfect 121mm! What the hell was going on?!

After spending what seemed like an age down on my knees, pushing the thing to and fro, the lights eventually came back on! I had, quite naturally been assuming that the BtoB was an inviolate rule. However, the steel flanges on these new wheels are significantly narrower than those of our existing stock - simply meaning that the wheels can laterally travel further over before there is any contact with the check rail!

There was only one way to confirm the notion - and that was by stripping the chassis back down, and then clamping up to increase the width of the solebars by increments, then repeatedly testing to see if it would work!
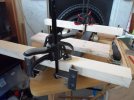
zrSAM_9158.JPG

It did in the end - thereafter running consistently sweetly at an astonishing increase to 128mm back-to-back!

Fortuitously, I had already cut the additional, second floor and pair of headstocks from the same piece of ply on my "el cheapo" bench saw, (thus at least giving myself half a chance that the parts might actually match each other) so I was able to drill and set up the second, unsullied pair of headstocks to the revised dimensions. My reasoning was that the originals could be dowelled and re-drilled later on.

Really! I mean, what a dozy twit am I..?!

A lovely, pristine chassis might now glide impeccably through the P and C's...
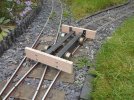
zrSAM_9161.JPG

When all I had to do was slip some 12mm washers between the frames and axle shoulders to achieve the same effect!

That didn't occur to me until the following day!!

There is one little saving grace concerning the waste material from earlier though:
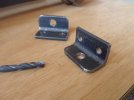
zrSAM_9164.JPG
zrSAM_9165.JPG

By opening out one hole in each of the previously regarded redundant angles, along with a few minutes worth of re-shaping, I now have a functional set of simple couplings - that match both loco's bar-and-pin arrangement!

Finally, just to prove it:
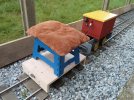
zrSAM_9172.JPG
zrSAM_9173.JPG

The ride is quite hard, hence the cushion, and joyously "lively" behind the "speeder", thanks mainly to the small wheel diameter with narrow flanges and short (9 inch) wheelbase, allowing the wagon to take the infamous top curve with barely noticeable resistance. It is also amazingly stable!

It has also proved beyond any doubts I may have harboured, that it will be quite safe to go ahead and design a seat for riding side-saddle! Past experience reveals that might be a boon for grownup drivers wanting to keep a wary eye on their juvenile - and occasionally unpredictable passengers!

Pete.
 

Peter Insole

Western Thunderer
Jumping over here from the "Speeder" thread, (perhaps it was a mistake to have so many separate after all??) and as if there are not enough jobs to tackle already, I'm about to launch into yet another project!

The unexpected success of the recent running sessions has revealed a dire need for some additional passenger carrying stock! Top of the list is a Guard's/brake wagon... or at least a vehicle with a seat that permits bi-directional travel... in pretty much the same fashion as the "Speeder" driving truck!

The nylon "TEP Technica" wheels are still proving to be perfectly durable and practical after re-profiling the flanges, so I went ahead and ordered more of the same.

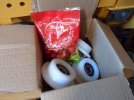
Every previous batch sent to me has included a small freebie item of confectionary in the packaging... usually lollipops! Look what turned up this time though:

zsSAM_9741.JPG

Wow! Looks like my Diabetes medication is going to have to work overtime shortly?!

Pete.
 

Chris Veitch

Western Thunderer
Scarlett took no hesitation when offered a seat within the single wagon I carried down a path (sign seemed to be missing noting limited clearance). Pushed upon freshly laid rail she was maiden to the furthest travelled since PW gang had been quite busy.
A lovely caricature of the early FR coal waggons - excellent stuff and a very entertaining diversion. The WWF* would be proud of you!

*The Wooden Waggon Federation is the Festiniog Railway volunteer group which specialises (mostly) in wooden waggon restoration.
 

Osgood

Western Thunderer
A lovely caricature of the early FR coal waggons - excellent stuff and a very entertaining diversion. The WWF* would be proud of you!

*The Wooden Waggon Federation is the Festiniog Railway volunteer group which specialises (mostly) in wooden waggon restoration.

Mrs. Osgood would like to know what they've been doing with all the money she's been sending, and asks about progress with the Rhino re-introduction program.
 

Peter Insole

Western Thunderer
Mm! If it were true that I really have achieved "Favoured Customer" status, they must be getting a bit desperate by now?!

Pete.
 

Peter Insole

Western Thunderer
Those two little Festiniog representations are so useful, they are taking a fair old battering, and may soon be in need a bit of restoration themselves?!

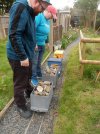
Part of the garden works required shifting a pile of pebbles, and Mrs. I and Glenn came up with the fun task of filling the wagons up by the children...

At first, the small people very much entered into the spirit of the exercise, and gleefully brimmed the wagons:

hhSAM_9697.JPG

What all the grownups completely failed to appreciate was just how heavy a loaded wagon could become! Expecting to be able to simply lift and tip the contents by the pond proved to be wildly optimistic, so had to be lightened by chucking individual stones across the gap!

Needles to say, the labourers quickly got bored waiting for the empties to return, and abandoned their posts!

Pete.
 
Top