Oz7mm's occasional meanderings - 5" Gauge Met Bo-Bo

Oz7mm

Western Thunderer
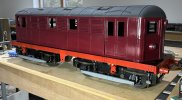
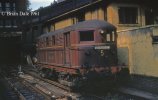
Minor update. Thanks to Paul Tomlinson (see above) I did get some reflectors which I think will perfect. They're not going in yet as I haven't finished painting. On that topic I was looking at some photos today, and in the late 1950s (when I remember them) the maroon colour seems rather faded. Were they that colour? (cue Yorkshire Dave) or is this just an unfortunate colour reproduction by old colour film? If that faded look is appropriate, any suggestions for a suitable colour?

The loco has had its first test runs on my near(ish) neighbour's track. It's probably covered a mile or so now. Despite the track having suffered the ravages of the last 3 years since it was used, the loco rode the bumps, tight curves and ballast washaways without mishap, which is more than be said for the riding truck I was sitting on. It feels ridiculously powerful. I'm hopeful of being allowed to run it on a club's raised 5" gauge line soon and running a bit faster.

Pictures soon.

John
 

Oz7mm

Western Thunderer
Small update on a rainy afternoon.

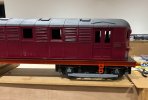
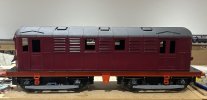
A bit more paint though I'm still not happy with the colour. As the loco is rather too big for my paint booth, I usually spray outside so any further painting will have to wait for the spring.

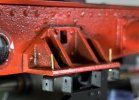
Meanwhile a few oddments have appeared to add more detail to the otherwise empty chassis. The steps and brake shaft bracket were kindly profile milled by @Eastsidepilot from some laser cut patterns I made by scaling my original drawings for Ken de Groom's 0 Gauge kit. The fuse box on the left hand shoebeam was3D printed by @Boyblunder from my very dodgy drawing.

Handrails are all made up and will go on when painting and lining is complete and I really must tackle the glazing.

The loco has now visited the Chelmsford club's track on a quiet Monday morning. It's not a rocket ship but I'm confident it will pull quite a few adults. It covered about 2 miles with no issues and makes quite a prototypical noise.

John

20231104-2.jpg
 

oldravendale

Western Thunderer
That is a thing of beauty and sits alongside the Fowler and Fairburn tanks and the Brighton K Class as my favourite loco. Ken de Groom suggested to me that the colour of these should be a sort of ox blood and Cherry Paints used to make one which was alleged to be correct. I guess that none of this is much help unless you are prepared to go on the search...

Good luck and keep us advised. :D

Brian
 

Yorkshire Dave

Western Thunderer
It'll be a relatively tricky colour to match as each photo will slightly different depending on the lighting and subsequent processing.

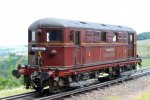
For mine (acrylics) I started with Vallejo German Red-brown (RAL 8012) surface primer and added drops of red and dark red until I ended up with something which looked right to me based on various photos - knowing I would be lightly weathering the model.

Met 123.jpg
 

Yorkshire Dave

Western Thunderer
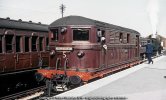
I like this shot John, is this more the colour your looking for ?

Met. Bo-Bo..jpg

For the record this photo was taken at Amersham during the 1963 Metropolitan Railway centenary celebrations.
 

Oz7mm

Western Thunderer
Thanks everyone for your help. I'll look into the colour issue further. Great loco by Dave. Is that a Ken de Groome kit?

Regards

John
 

Oz7mm

Western Thunderer
A occasional bulletin.

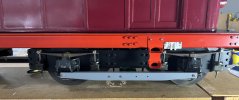
One thing that has been annoying me is how high the loco sits on its bogies so I have reduced the gap between the bogies and the chassis plate by 7mm. Not too tricky just a matter of milling 7mm off the contact areas on the bogie cross member casting.

Or so I thought. This results in the corners of the bogie frames fouling the back of the buffer beam casting which is very thick. So some disassembly was needed to get the buffer beam casting out and the some more judicious milling. It doesn't require the removal of a lot of material.

I think the result is worth the effort. Now on with the other bogie.

JohnLowered bogie.jpg
 

Oz7mm

Western Thunderer
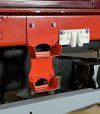
Esteemed Love Lane colleague @S-Club-7 has acquired a 3D printer which can print a very strong plastic. Two initial examples are the lifting lugs and the bracket below the buffer beam that constrains the movement of a buckeye coupler if it is fitted. I'm told the Bo-Bos all carried one in the cab should they be required to move T Stock fitted with them. I have subsequently spotted that I have attached the right lug on each side in the wrong place. A job for this afternoon.

The screws attaching the lifting lug almost are hex headed. They will be dome headed without slots to match the false rivet heads on the print. These aren't the final version so I have not cleaned them up as much as I will on the final ones.

This view really highlights the fact that the chassis members are C section channel. The prototype has a second reinforcing plate at the top of the chassis member. It's tempting to add this to hide the curve of the channel, but it's much less noticeable from normal viewing angles.

Lifting lug.jpg

The bracket is only temporarily attached.. Close up photography is rather cruel and exposes the rough surface of the cast aluminium buffer beam. There's really not much I can do about it.
Front bracket.jpg

The first pick up has been assembled. I think the links are a bit short and it sits rather high though that may help to avoid obstacles. Only 7 more to do. The chassis is beginning to look more "busy".

Pick up.jpg

Now, to move those lifting lugs.

John
 
Last edited:
Top