7mm Polbrock - About a Camel and a Badgers Pool

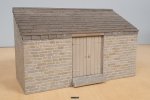
Stone shed finished
  • Jelle Jan

    Active Member
    So Pollbrock was my choice. A photo of the real location appears on the following page, about 60% scrolled downwards.
    <Bodmin to Padstow>

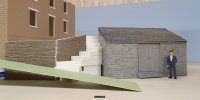
    At first, I started making the stone shed some months ago, that appears in the foreground of several photos. Just like the cottages at Helland Bridge I used Slaters 0420 stone sheet on a few layers of 1.5mm plasticard with an internal strengthening construction to prevent any warping. The roof became those large Cornish slates, individually cut from 0.3mm plasticard. Some of them became a little too wide, but the whole thing looks pretty good, I think. Painting was done with Vallejo acrylic paints.
    20220104_151818_1500x1000.jpg

    Jelle Jan
     
    Last edited:
    Both cottages started
  • Jelle Jan

    Active Member
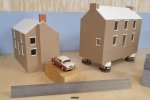
    Now it was time to start making the cottages. Using the same contruction as always, they looked like this on 14 november 2021. Even at this early stage the Dairy Farm from nearby St. Kew is delivering its fresh milk and eggs:

    20211114_185540_1500x1000.jpg

    But work continued, as the following photo shows. The chimneys are becoming there shape, the corners of all walls were finished and the base for the roof is there. Again, to prevent warping, caused by all those thin slates that need to be glued down, I started with 3 sheets of 1.5mm plasticard, hanging between the walls, resting on strips on the inside of the end walls. Then a final layer is glued on top, creating a flat service for the slates. John Jago had a Sunbeam Rapier, which I don't have in this scale, so I parked the similar Hilman Minx outside his cottage, on this photo of 28 november 2021:

    20211128_183314_1500x1000.jpg

    Jelle Jan
     
    Last edited:
    Corners of plasticard houses
  • Jelle Jan

    Active Member
    Looking at your work you look to have cracked corners - do you have a secret method?
    Two of the walls are given a 'normal' top sheet, for the other two walls I give the top sheet some overlength. This makes them a little delicate during all the work of making the window and door openings, but I haven't ever destroyed it. Here is a drawing:

    CornersOfWalls.png

    Now I glue the walls together, I even have two sides in each corner for the glue to make a strong corner. After this is dry, I put enough glue on the OUTSIDE from my Revell needle bottle, to fill any gap, again I let it dry. Then I put the building with the left side downwards on my table, so I can cut away the overlength with a knife, simply along the other wall. Then I scrape and file away the last remains until I have an absolute smooth corner. The last step is of course adding the masonry joints with a small file. When I remember well, Geoff Taylor describes this very same method in his first book about modelling buildings.

    In my drawing I also added my trick to put a thin sheet on the inside, to create a symmetrical wall, that gives more protection against warping.

    Jelle Jan
     
    Last edited:
    First retaining wall and stairs
  • Jelle Jan

    Active Member
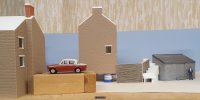
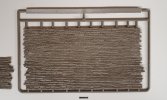
    The chimneys of both cottages needed some last detailing, but after that I stopped working on the cottages. They are handled so much (positioning in the landscape, to check the whole picture), that further detailing would make them too delicate. So I switched to the first retaining wall and the stairs. For the retaining walls I used an Auhagen sheet, I will discuss that sheet in more detail later. A pencil drawing on a large sheet of paper helped positioning everything.

    20211205_174835_1500x750.jpg

    The height of the steps is huge, but this is the number of steps I counted on Streetview. Just compare this with the cottage of Helland Bridge in my first post, which also has very high steps.

    20211205_175017_1500x750.jpg

    Studying photos I discovered that the difference in height between both cottages should not be MIG but Humbrol/Revell, so 10mm less. After the photo session I discovered that both cottages still need 5mm to rise in relation to the stone shed. The steep climbing road is simulated here with a cardboard strip from an older Evergreen bag on my steel ruler. And yes, I still had to putty the last view holes in the retaining wall, when I made these photos on 5 december.

    Jelle Jan
     
    Auhagen stone sheet 42649, second retaining wall
  • Jelle Jan

    Active Member
    Yesterday I promised to show more about that Auhagen stone sheet 42649. These sheets are 15cm long and the great thing is, they can be interconnected easily, and the joint is hardly visible.

    20220105_094533_1500x900.jpg

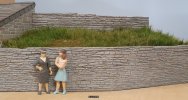
    On the next photo the joint is between the ladies, on the next retaining wall that I added to the scene, although one lady covers some of the joint with her left arm.

    20211220_133103_1500x800.jpg

    I couldn't wait any longer to add some grass on 20 december, a few hours before I made this photo.

    Jelle Jan
     
    Grass and bushes
  • Jelle Jan

    Active Member
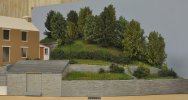
    Thanks for all the likes and interest. Then the christmas holiday came... two weeks of modelling. It started with shaping the hill, not directly the most interesting part, but then it was time for all the green stuff. A few days ago the following photo appeared elsewhere on WT, here it is again:

    20220102_dsc_5865_1500x800.jpg

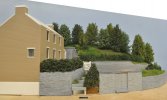
    The area to the left of the stone shed still needed some work, but look what happened in the last few days:

    20220107_dsc_5871_1500x900.jpg

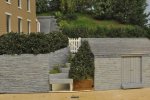
    And zooming in on the latest work:

    20220107_dsc_5872_1500x1000.jpg

    The hole below the stairs and the brown spot to the right of it will disappear behind the steep climbing road.

    So that's the current state of Polbrock, with some work to do in the garden behind this hedge.

    Jelle Jan
     
    Last edited:
    Top