You are using an out of date browser. It may not display this or other websites correctly.
You should upgrade or use an alternative browser.
You should upgrade or use an alternative browser.
Trumpeter 1:35 scale DRG Baureihe 86 display model.
- Thread starter P A D
- Start date
Richard Spoors
Western Thunderer
Peter, to complement your research photographs of the 13 preserved BR86 can be found here dampflokomotivarchiv.deMick,
Many thanks for for link to Harry's modelshop. I can see now why you consider Zander Heba an expensive source for German prototype drawings.
As to a large scale 01, I think I would most certainly put my hand in my pocket for one, although I'd be happy with the boiler it came with. I get the impression on the LZ website that they are making some kits (or having them made) as injection mouldings rather than resin and I believe the proposed BR80 and one assumes the 01 will be plastic???
Here are a few photos of my early dabblings with the kit when I was just going to build it "out of the box". Having then seen several upgraded builds on various forums, it was clear that would be a waste, so after much googling (albeit without finding Harrysmodels) various magazines, books, drawings and the aftermarket parts were sourced. Not cheap, but still a fraction of the cost of a RTR gauge one loco of any sort.
It comes with a plastic plinth and length of rail to display the finished model. The plinth has moulded ballast and without lots of fettling it would be very difficult to get the rails in after the sleepers were fitted from underneath. In any case, plastic ballast has about as much appeal as plastic coal, so those parts went straight into the recycling. The rails and sleepers on the other hand look OK, of will do after painting and weathering, so I will use these and make the plinth from wood and ballast it up ( or ask my brother to do it as I don't do civil engineering).
View attachment 113299
I suspect the rail chairs are a bit lacking compared to the real thing, but after it's ballasted I can live with it.
View attachment 113297
Here's the fire box after the front lower corners were rounded as per the prototype. Not quite out of the box!
View attachment 113298
On this side, some moulded on pipework has been removed, but at this stage the rear boilercladding band was still on the front end.
View attachment 113301
The left hand side of the boiler after removing the moulded pipe that runs from the cab to the steam operated bell behind the chimney.
View attachment 113300
T'other side. The cladding bands were taller than Everest so they had to come off.
View attachment 113302
Scraping and rubbing down the bands took a while, but styrene is a much easier medium to work than white metal for example. The bands were replaced with strips cut from brass shim to the same width as the originals. After carefully rubbing down the boiler joint at the top (and bottom), I then re-scribed a line to represent the cladding joint and added a representation of the fixing screws from tiny brass rivets.
View attachment 113295
After receiving the drawings, I noted that the sand domes were a little short, so a disc of plastic card was glued to the top of the base, then the edge rubbed down to match, and the top piece glued to plastic card disk. By now out of the box was out of the door.
View attachment 113296
Thinking more about Dikitriki's earlier question in post #3, I would guess that it will take a lot less time to build this kit than for example, the MOK or David Andrew's 2-6-4s, as there is a lot less preparation of parts required and almost no cleaning up to do after joining the parts. I've got most of the extra /replacement parts that, after minimal preparation, will just need fitting, so scratch building of parts will be minimal. I'm using a product called Plastic Weld (Methylene Chloride) applied to the joint with a small brush. After the joint dries, a little rubbing down with a fine grade Emery paper is all that's required. The etched parts will be fixed to the plastic with super glue and where a brass to brass joint is required, then I will solder before fitting to the model.
In terms of reference works, I sourced this excellent publication from a book seller in Greece, at a very good price compared to many others that I found. It doesn't give any history of the class, building dates, allocations etc., but contains dozens of high quality colour photos of three of the preserved locos including many shots inside the cab and as such is an excellent aid to building this kit. An equivalent version for the BR52 Kriegslokomotive is also available in the series, which is mainly dedicated to combat aircraft and armoured fighting vehicles.View attachment 113306
Cheers,
Peter

Cheers
Richard
P A D
Western Thunderer
With the coronavirus lock down I don't have access to my workbench and kit as it's at my brother's house. However, I managed to pack up the BR 86, plus a few hand tools and materials before my final visit early last week. I've ordered a few more raw materials on line, but I'm not sure what, if anything will get delivered before the fan gets covered in  . For family reason I'm restricted to an odd hour here and there in the evenings on the kitchen table, so despite the lockdown, this will be a slow build.
Anyway on with the build. My objective is to build a display model with more detail than is provided in the kit, using aftermarket detail sets and some scratch building as appropriate. However, I'm not going to be too anal about getting everything correct for a particular loco in a particular period, so the end result will be a bit "generic". There are for example lots of changes that can be made to the frames, that whilst making them more accurate, don't really enhance the appearance, being mainly hidden from view. That said, I decided to add some missing bolt head and rivet detail which is visible. Here are the bolt heads added to the side of the frames which I cut from 1mm hex section styrene rod. Since I added these some weeks back, I managed to source some suitable aftermarket parts in resin for use in other areas.
On top of the frames rivets from Prime Miniatures were added after first marking out and drilling the holes for the shanks.


At the minute I'm jumping about a bit just getting a feel for the kit, but once I know for sure what materials I have to work with, I'll get a bit more focussed and stick with one section at a time. With that in mind I had a look at the back head and decided to scrape off the moulded pipe work. Here it is dry fitted to the firebox.
It's not the best of fits but I don't think the joint will be visible when the cab front is in place

The water tanks need some correcting as they come with cross hatching on the tops, when they should be smooth and the front corners are 90 degree angles when they should be curved. I tried to remove the ribbing in the flat but the part it too flexible, so I built the tanks first.

Here the left tank is complete and rubbed down, whilst right one needs the top fitting before sanding off the detail.

Both tanks completed along with the backhead. I lost a bit of detail near the bottom front edge of the tanks but that will be replaced with some styrene later. The front vertical edges have been curved but could probably do with some more rubbing but I'm concerned about rubbing through, not having any filler at the moment

Here's the boiler placed on the frames. The wheels and pony trucks are not fixed yet and it's likely that a good deal of painting will need doing before that happens. Assuming the paint I ordered arrives.

Cheers,
Peter
. For family reason I'm restricted to an odd hour here and there in the evenings on the kitchen table, so despite the lockdown, this will be a slow build.Anyway on with the build. My objective is to build a display model with more detail than is provided in the kit, using aftermarket detail sets and some scratch building as appropriate. However, I'm not going to be too anal about getting everything correct for a particular loco in a particular period, so the end result will be a bit "generic". There are for example lots of changes that can be made to the frames, that whilst making them more accurate, don't really enhance the appearance, being mainly hidden from view. That said, I decided to add some missing bolt head and rivet detail which is visible. Here are the bolt heads added to the side of the frames which I cut from 1mm hex section styrene rod. Since I added these some weeks back, I managed to source some suitable aftermarket parts in resin for use in other areas.
On top of the frames rivets from Prime Miniatures were added after first marking out and drilling the holes for the shanks.
At the minute I'm jumping about a bit just getting a feel for the kit, but once I know for sure what materials I have to work with, I'll get a bit more focussed and stick with one section at a time. With that in mind I had a look at the back head and decided to scrape off the moulded pipe work. Here it is dry fitted to the firebox.
It's not the best of fits but I don't think the joint will be visible when the cab front is in place
The water tanks need some correcting as they come with cross hatching on the tops, when they should be smooth and the front corners are 90 degree angles when they should be curved. I tried to remove the ribbing in the flat but the part it too flexible, so I built the tanks first.
Here the left tank is complete and rubbed down, whilst right one needs the top fitting before sanding off the detail.
Both tanks completed along with the backhead. I lost a bit of detail near the bottom front edge of the tanks but that will be replaced with some styrene later. The front vertical edges have been curved but could probably do with some more rubbing but I'm concerned about rubbing through, not having any filler at the moment
Here's the boiler placed on the frames. The wheels and pony trucks are not fixed yet and it's likely that a good deal of painting will need doing before that happens. Assuming the paint I ordered arrives.
Cheers,
Peter
Eastsidepilot
Western Thunderer
I'd like to build one of these and turn the plastic wheels down and fit steel tyres 
Col.
Col.
P A D
Western Thunderer
Steel axles and brass bearings too, then fit steel crank pins and you'd be away.
It has crossed my kind several times in the past, especially for the 52.
Came across a video on U tube where some guy had done just that with the 52 Mick. He had it running back and forth on some track but I don't know what gauge.
Eastsidepilot
Western Thunderer
That would be the way to go, and some home made track.Steel axles and brass bearings too, then fit steel crank pins and you'd be away.
It has crossed my kind several times in the past, especially for the 52.
Col.
P A D
Western Thunderer
Being a plastic kit that has to be glued together, it is not as user friendly as a metal kit which can be built to completion then dismantled for painting. I will be building it as numerous subsections then finally assembling after painting. Here are the front and rear trucks. They have been simplified by Trumpeter and lack a lot of bolt and rivet detail. How much of that I will add, I haven't decided yet, but at some point I will drill out the lightening holes on the beams. I've seen some superb builds of this kit (the best on a Russian forum), where the builders have added every last detail to the truck, but once in place, you simply cannot see it.

I'm going to concentrate on the frames for a while, and have begun adding some of the Eduard etched parts. The wheel boss overlays plus various others have been added. The wheels are just located for the photo.

One area requiring quite a bit of work is the support bracket that holds the expansion link and lifting link brackets. Here's the parts as they come. The lifting link brackets are filled in when there should be an aperture and webbing. The expansion link brackets come as two separate parts, when in fact they are a one piece inverted U.

This has been cropped from an image of 86 333 downloaded from the web.

First, I trimmed a few mm off the tops of the expansion link brackets.

After gluing them in place, I added a length of " square section" plastic across the tops of the brackets. I have limited raw materials at home so I'm having to improvise and used 5 lengths of 20 tho laminated together. Once the glue had fully set, the curve at the top was filed through.

Then the outer face is filed to the required profile. The two superfluous location holes above the curve have been filled with polyfiller. Again I'm having to use what I've got.


To modify the lifting link brackets, the infill is first cut out. This was then place on the plastic card to mark the perimeter for the webbing which was then scored ready for removal from the sheet. Before that however, the aperture was marked, cut out and filed to shape as it's easier to hold the sheet of plastic.

Here the webbing has been glued into the brackets and the flange around the expansion link bracket added. I've cut it short on the inside to avoid fouling the rear of the slidebar which locates in the vacant slot.

After further tidying up, I'll add the rivet and bolt detail and finally the hood which curves over the top. The mould pin dimples have been rubbed down to disguise them and don't look too bad to the naked eye. The dimples are very shallow and I did not think the polyfiller would be up adhering to the plastic during rubbing down.

Finally I've had a bit of a dabble with the Knorr compressor. I started assembling it as per the instructions with the lubricator on top at the front. However, I think this is mainly relevant to the BR 52 and other larger prototypes and it should in fact be on the inner edge at the rear. It is also different to the one on the 86 so needs modifying.
Here's a view from the rear. I have since removed the lubricator, modified it to suit the BR 86 and relocated it in the correct place. Unfortunately I overlooked to take a photo but will post one later. The top and bottom parts are not glued yet as some adjustment of the alignment is needed. The valve gizmo at the rear is 6 separate pieces and to make it more robust, I drilled and pinned them together with 0.5 mm brass rod, rather than just relying on super glue. The methylene chloride plastic weld doesn't glue the resin by the way.

Cheers,
Peter
I'm going to concentrate on the frames for a while, and have begun adding some of the Eduard etched parts. The wheel boss overlays plus various others have been added. The wheels are just located for the photo.
One area requiring quite a bit of work is the support bracket that holds the expansion link and lifting link brackets. Here's the parts as they come. The lifting link brackets are filled in when there should be an aperture and webbing. The expansion link brackets come as two separate parts, when in fact they are a one piece inverted U.
This has been cropped from an image of 86 333 downloaded from the web.
First, I trimmed a few mm off the tops of the expansion link brackets.
After gluing them in place, I added a length of " square section" plastic across the tops of the brackets. I have limited raw materials at home so I'm having to improvise and used 5 lengths of 20 tho laminated together. Once the glue had fully set, the curve at the top was filed through.
Then the outer face is filed to the required profile. The two superfluous location holes above the curve have been filled with polyfiller. Again I'm having to use what I've got.
To modify the lifting link brackets, the infill is first cut out. This was then place on the plastic card to mark the perimeter for the webbing which was then scored ready for removal from the sheet. Before that however, the aperture was marked, cut out and filed to shape as it's easier to hold the sheet of plastic.
Here the webbing has been glued into the brackets and the flange around the expansion link bracket added. I've cut it short on the inside to avoid fouling the rear of the slidebar which locates in the vacant slot.
After further tidying up, I'll add the rivet and bolt detail and finally the hood which curves over the top. The mould pin dimples have been rubbed down to disguise them and don't look too bad to the naked eye. The dimples are very shallow and I did not think the polyfiller would be up adhering to the plastic during rubbing down.
Finally I've had a bit of a dabble with the Knorr compressor. I started assembling it as per the instructions with the lubricator on top at the front. However, I think this is mainly relevant to the BR 52 and other larger prototypes and it should in fact be on the inner edge at the rear. It is also different to the one on the 86 so needs modifying.
Here's a view from the rear. I have since removed the lubricator, modified it to suit the BR 86 and relocated it in the correct place. Unfortunately I overlooked to take a photo but will post one later. The top and bottom parts are not glued yet as some adjustment of the alignment is needed. The valve gizmo at the rear is 6 separate pieces and to make it more robust, I drilled and pinned them together with 0.5 mm brass rod, rather than just relying on super glue. The methylene chloride plastic weld doesn't glue the resin by the way.
Cheers,
Peter
P A D
Western Thunderer
The extra detail on the motion bracket has been completed with the addition of the nut fastenings, hood and lubricators. The Eduard set only provides parts for the outer lubricator on each side so a representation was added to the inner one from plasticard.

The rivet detail at the bottom is from short lengths of 0.5mm brass rod glued into holes drilled in the bracket, then snipped, filed and rounded with a nail polisher.

Ar the rear of the main brack bolts and rivets have also been added along with the fixing bolts for the lifting link brackets and their bearings. As can been seen, some clumsy git managed to break the main bracket! Nuff said.

As far as I can tell there were at least 4 variants on the forward tank support. I've decided to go with the one with "square" ends, so the the kit part was modified to thr required profile.

Underneath the frames some missing tie bars have been added.

And after some modification, so have the guard irons. Below on the right is an original and on the left a reprofiled one with 4 bolt fixings. The strengthening rib on the inner facd of the irons has also been removed.

And fitted to the frames.

Here you can see the cylinder base plate in position plus some additional bolt details to the rear where the truck spacer is.

And the same for the rear truck spacer.

I made up the air tanks ready for fitting the photo etch details and here they are trial fitted to the frames, with boiler above.

Here we see the main cylinder parts assembled.

It's not visible in these shots but the plated over covers on the cylinder shoulders come with a hole in the plates. I plugged the holes with short lengths of spruce, glued in place then rubbed flush. I've seen some builds where the covers have been cut off, discarded and replaced with squares of plasticard and resin bolts, but that seems a long way round.

Cheers,
Peter
The rivet detail at the bottom is from short lengths of 0.5mm brass rod glued into holes drilled in the bracket, then snipped, filed and rounded with a nail polisher.
Ar the rear of the main brack bolts and rivets have also been added along with the fixing bolts for the lifting link brackets and their bearings. As can been seen, some clumsy git managed to break the main bracket! Nuff said.
As far as I can tell there were at least 4 variants on the forward tank support. I've decided to go with the one with "square" ends, so the the kit part was modified to thr required profile.
Underneath the frames some missing tie bars have been added.
And after some modification, so have the guard irons. Below on the right is an original and on the left a reprofiled one with 4 bolt fixings. The strengthening rib on the inner facd of the irons has also been removed.
And fitted to the frames.
Here you can see the cylinder base plate in position plus some additional bolt details to the rear where the truck spacer is.
And the same for the rear truck spacer.
I made up the air tanks ready for fitting the photo etch details and here they are trial fitted to the frames, with boiler above.
Here we see the main cylinder parts assembled.
It's not visible in these shots but the plated over covers on the cylinder shoulders come with a hole in the plates. I plugged the holes with short lengths of spruce, glued in place then rubbed flush. I've seen some builds where the covers have been cut off, discarded and replaced with squares of plasticard and resin bolts, but that seems a long way round.
Cheers,
Peter
P A D
Western Thunderer
Here's the completed Knorr compressor after modifying the lubricator.

And from the rear. There's lots more pipework to add later in the build when it is in place on the smokebox side.

And from above. On the lubricator drawing there is a handle on the end of the rod, which is missing in views of the preserved locos. It may be that it was detachable and not left in place during service, but I'll troll through my reference photos to check that.

The kit provides both smokebox door options, although the appearance of each varied over time. I'm going with the early version as per the one on 86 049, albeit with the later pair of small grabrails either side rather than the long horizontal original one.

And after modifying and fitting the door.

I also made a start on decorating the preheater.

On the other side, the lifting handle has been added.

There are still lots more etched parts to be added to this area, but the additions made so far make a big difference.
Cheers,
Peter
And from the rear. There's lots more pipework to add later in the build when it is in place on the smokebox side.
And from above. On the lubricator drawing there is a handle on the end of the rod, which is missing in views of the preserved locos. It may be that it was detachable and not left in place during service, but I'll troll through my reference photos to check that.
The kit provides both smokebox door options, although the appearance of each varied over time. I'm going with the early version as per the one on 86 049, albeit with the later pair of small grabrails either side rather than the long horizontal original one.
And after modifying and fitting the door.
I also made a start on decorating the preheater.
On the other side, the lifting handle has been added.
There are still lots more etched parts to be added to this area, but the additions made so far make a big difference.
Cheers,
Peter
michael080
Western Thunderer
Peter,
I re-read the thread to see what machine you plan to build. You are right with your plans for the smokebox if this will become a DR machine. Interestingly, the west German DB had all central smokebox locking wheels removed.
This is my Weinert (H0) BR86 578, a DB machine that operated close to my home
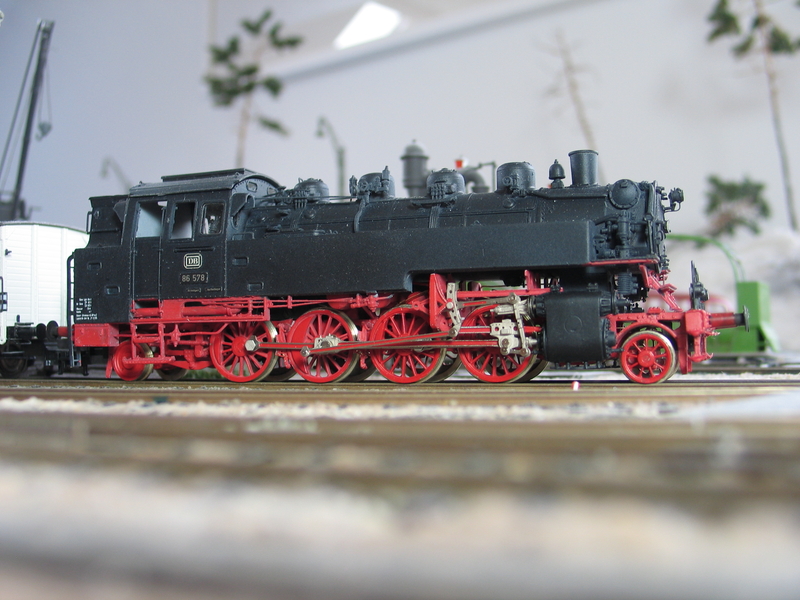
I am looking forward to see more of your build. The Trumpeter kit seems to be quite good.
Michael
I re-read the thread to see what machine you plan to build. You are right with your plans for the smokebox if this will become a DR machine. Interestingly, the west German DB had all central smokebox locking wheels removed.
This is my Weinert (H0) BR86 578, a DB machine that operated close to my home
I am looking forward to see more of your build. The Trumpeter kit seems to be quite good.
Michael
P A D
Western Thunderer
Hi Michael,
Yes, my intention is that it will represent a Deutsche Reichsbahn machine post WW2. I just prefer the appearance of the pre war company name, albeit post war, they were then in the DDR. DB on the cab side does not look so appealing to me but if they had gone for a plate with Deutsche Bundesbahn, that would have been better.
Not sure where I read it (Wikipedia perhaps) , but I understand that the DDR kept the original DR name for the railway, as it allowed them running rights into West Berlin stations and as such be a bit of a thorn in the side of the Allied powers who controlled it. Had the railway been renamed and become a new entity they would not have been able to do that, so despite what they considered to be Nazi connotations in the pre war name, they had to keep it.
86 049 is a good option and I may go for that. However, I'm not being too anal about it as at some point in service, 049 recieved rather crude flat covers to the steam dome and top feed dome, which as far as I know it still carries in preservation. I won't be modelling those as they look .
Thanks for the photo of 86 578. From what I've seen on the internet, I believe the Weinert models are the best available in H0 for the 86. There are some super ones in Spur 0 and Spur 1 as well and should I ever win the lottery (which I won't as I win a pound every week by not buying a ticket), then one of those will be winging it's way to Leeds! A man needs his dreams, especially in these hard times.")
This afternoon I modified the expansion link by adding the central slide for the radius rod, as well as adding the nut and bolt fastenings. A representation of the fluting on the radius rod was also added from 10 thou plastic card.

And added some of the photo etch decorations to the air tanks.

Here they are placed in the frames. I need to work out where they were piped up to later in the build.

Keep well.
Cheers,
Peter
Yes, my intention is that it will represent a Deutsche Reichsbahn machine post WW2. I just prefer the appearance of the pre war company name, albeit post war, they were then in the DDR. DB on the cab side does not look so appealing to me but if they had gone for a plate with Deutsche Bundesbahn, that would have been better.
Not sure where I read it (Wikipedia perhaps) , but I understand that the DDR kept the original DR name for the railway, as it allowed them running rights into West Berlin stations and as such be a bit of a thorn in the side of the Allied powers who controlled it. Had the railway been renamed and become a new entity they would not have been able to do that, so despite what they considered to be Nazi connotations in the pre war name, they had to keep it.
86 049 is a good option and I may go for that. However, I'm not being too anal about it as at some point in service, 049 recieved rather crude flat covers to the steam dome and top feed dome, which as far as I know it still carries in preservation. I won't be modelling those as they look
.Thanks for the photo of 86 578. From what I've seen on the internet, I believe the Weinert models are the best available in H0 for the 86. There are some super ones in Spur 0 and Spur 1 as well and should I ever win the lottery (which I won't as I win a pound every week by not buying a ticket), then one of those will be winging it's way to Leeds! A man needs his dreams, especially in these hard times.
This afternoon I modified the expansion link by adding the central slide for the radius rod, as well as adding the nut and bolt fastenings. A representation of the fluting on the radius rod was also added from 10 thou plastic card.
And added some of the photo etch decorations to the air tanks.
Here they are placed in the frames. I need to work out where they were piped up to later in the build.
Keep well.
Cheers,
Peter
P A D
Western Thunderer
I wasn't happy with the overhang of the added central piece on the expansion links, so a bit more fettling was the order of the day. I aught to have used a thicker piece of plastic, but was concerned that I would be unable to spring them into mountings and in any case, a thicker piece would not fit through the gap in the radius rod.

Some further photo etch parts were added to the air tanks along with some scratch up valves. Fortunately I have a 25 watt iron at home so was able to solder the handle to the brass rod used for the valve.
Here are the air tanks placed on the frames. I had to improvise with the lifting link shaft as I have limited raw materials at home, so utilised a cocktail stick. The reversing crank is 30 thou plastic super glued to the shaft before it was sprung into the mounts and glued.

On the other side I've added the return crank (30 thou plastic) and spring (0.4 mm copper wire wrapped around 0.5 mm brass rod). The brass rod has been left in place to make it more robust.

And a view from above.

And with the air tanks in place.

Next, I made a start on improving the appearance of the ashpan, which as it comes is devoid of any detail. Here's the front damper and pivot.

And the rear damper.

Underneather representations of the ash pan doors and pivots have been added.

The pivot rods will be trimmed once I've made and fitted all the lever work.

I'm not sure how much will bd visible when the wheels are on, but what else is there to do?

As far as I can tell, all the pipe work apart from one pipe to the small air tank, is hidden above the lower edge of the side tanks so won't be added if that's the case.


Cheers,
Peter
Some further photo etch parts were added to the air tanks along with some scratch up valves. Fortunately I have a 25 watt iron at home so was able to solder the handle to the brass rod used for the valve.
Here are the air tanks placed on the frames. I had to improvise with the lifting link shaft as I have limited raw materials at home, so utilised a cocktail stick. The reversing crank is 30 thou plastic super glued to the shaft before it was sprung into the mounts and glued.
On the other side I've added the return crank (30 thou plastic) and spring (0.4 mm copper wire wrapped around 0.5 mm brass rod). The brass rod has been left in place to make it more robust.
And a view from above.
And with the air tanks in place.
Next, I made a start on improving the appearance of the ashpan, which as it comes is devoid of any detail. Here's the front damper and pivot.
And the rear damper.
Underneather representations of the ash pan doors and pivots have been added.
The pivot rods will be trimmed once I've made and fitted all the lever work.
I'm not sure how much will bd visible when the wheels are on, but what else is there to do?
As far as I can tell, all the pipe work apart from one pipe to the small air tank, is hidden above the lower edge of the side tanks so won't be added if that's the case.
Cheers,
Peter
P A D
Western Thunderer
Always fancied one of these myself too, just nowhere to put it when it's finished!
Not sure I'd go to quite so much detail though. Nuts
JB.
Some guy on here built an L1 with working brake gear, an opening smokebox door with tube plate etc, the whole nine yards! So I think you would go nuts.
I've seen a build somewhere, where a guy build it as a sectioned model like Ellerman Lines at the NRM. Now that was mad!
Cheers,
Peter
Scale7JB
Western Thunderer
Some guy on here built an L1 with working brake gear, an opening smokebox door with tube plate etc, the whole nine yards! So I think you would go nuts.
I've seen a build somewhere, where a guy build it as a sectioned model like Ellerman Lines at the NRM. Now that was mad!
Cheers,
Peter
)")

P A D
Western Thunderer
The ashpan is done for now with the operating levers for the dampers and as doors added. I don't have any brass or plastic strip so had to cut them from 20 thou plasticard. They are a bit chunky but should be OK when obscured behind the frames and wheels etc.


Here are a couple of views attached to the firebox and placed in the frames.

Some of this will still be visible on the completed model, but the front damper lever on the other side is hidden by the bar frame.

Cheers,
Peter
Here are a couple of views attached to the firebox and placed in the frames.
Some of this will still be visible on the completed model, but the front damper lever on the other side is hidden by the bar frame.
Cheers,
Peter
P A D
Western Thunderer
Back on the boiler for a while, the cleats and cover handleshave been added to the preheater along with further rivet strips.

The etched base for the bell has been fitted and the location hole in the bell drilled out a little as it was sitting too high.

Here I've added the base for the generator and begun detailing the domes.

I added the etched detail to the sand and steam domes before making a start on the replacement resin parts. In this view the various hinges, fastenings and grab rails are in place and the safety valves added to the rear dome. The resin sand valves are prepped up ready for fitting followed by the erched wing nut fastenings.

Here's a view with the domes located.

And t'other side. Recesses have been added either side of the rear dome for the pipework. It's not easy to see in these images, but I've twisted the wing nut out of line as when the etch is folded they all line up, which never be the case on the
real thing.

This image is from the Eduard web site and shows the safety valves and sand valves supplied in the kit. They have got the hinge on the rear dome at the front when it should be to the rear between the safety valves.

Note the grab rails on the forward dome. The instructions suggest there should also be two on the safety valve dome but that is incorrect and iny case, there are only two on fret. In each case as representation of the locking sneck was made from copper wire flattened in a pair of pliers.

Cheers,
Peter
The etched base for the bell has been fitted and the location hole in the bell drilled out a little as it was sitting too high.
Here I've added the base for the generator and begun detailing the domes.
I added the etched detail to the sand and steam domes before making a start on the replacement resin parts. In this view the various hinges, fastenings and grab rails are in place and the safety valves added to the rear dome. The resin sand valves are prepped up ready for fitting followed by the erched wing nut fastenings.
Here's a view with the domes located.
And t'other side. Recesses have been added either side of the rear dome for the pipework. It's not easy to see in these images, but I've twisted the wing nut out of line as when the etch is folded they all line up, which never be the case on the
real thing.
This image is from the Eduard web site and shows the safety valves and sand valves supplied in the kit. They have got the hinge on the rear dome at the front when it should be to the rear between the safety valves.
Note the grab rails on the forward dome. The instructions suggest there should also be two on the safety valve dome but that is incorrect and iny case, there are only two on fret. In each case as representation of the locking sneck was made from copper wire flattened in a pair of pliers.
Cheers,
Peter
simond
Western Thunderer
Peter,
presumably the brass details are fitted using cyanoacrylate “superglue”.
It’s pretty obvious that you’re not getting any anywhere it shouldn’t be.
Apart from midnight deals at the crossroads, can you offer some guidance for the more ham-fisted?
What type of glue, & how is it applied? (And if it does go pear-shaped, what’s the recovery plan?)
The model looks excellent, I’m enjoying the build.
Cheers - keep well!
Simon