Scratch Building Darent in 16mm

Hobbyhorse

Western Thunderer
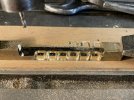
I’ve been looking forward to making the lubricator as it’s the most challenging part I’ve ever made.
It’s size has given me the opportunity to model it as closely as possible to the full size one, it’s certainly pushed the boundaries which the amount of small but detailed parts needed.
Using a mixture of milled and turned parts it has kept me busy for a couple of weeks.
I’ve only got one more bit to add, which is the manual drive arm connected to the main drive shaft.
Simon
t4riksf.jpg
yqAzFVm.jpg
x3CI6Ud.jpg
gk2phu6.jpg
FYUlvCK.jpg
cnblyY8.jpg
 

Attachments

  • udlzAXw.jpg
    udlzAXw.jpg
    1.1 MB · Views: 13

Greengiant

Western Thunderer
Very nice Simon, I have known the real thing for many years during the rebuild, that has certainly captured the look.
How will you be powering the loco, DCC, RC, something else?
Martin
 

Hobbyhorse

Western Thunderer
This week I’ve completed detailing the side rods, which has given an opportunity to assemble a lot of the chassis parts that I have made but not added to the chassis.
4aWRZcP.jpg
This created quite a lot of work to get the bits to fit and work, manly the valve gear. A few issues did crop up which took a bit of thinking to resolve, firstly the motor/gearbox which has the valve gear attached, this fits from the underside of the chassis but as the rear derailing bar is fitted, the motor has to be detached from the gearbox to fit it in. Another issue was the reversing rod which is fixed to the cab floor, and should also be fixed to the weight shaft, but to enable the cab to be removed from the chassis, I’ve fitted a half collar to the arm off the reverser rod that clips over the weight shaft.
j6I0TTC.jpg
Next was a period of running on the beach to settle things in on both models, and all is running nicely now.
Short video shows them running.
G6BVPjA.jpg

Although I’m building these models to sit in a showcase and was never intending running them, talking to a couple of like minded friends on Zoom has sown the idea for a small cameo type layout.
So time to dust off the drawing board to see what’s feasible.


Simon
 
Last edited:

Hobbyhorse

Western Thunderer
Can’t believe it’s been over 6 months since the last update, although I’ve been busy on other projects it’s time to get on with Darent.
The plan is to complete all the details below footplate level and the injectors and then look at the electrical bits and bobs.
Starting with the injectors and water valves, which are mostly parts produced on the lathe and milling machine. The plan is to have these removable which will certainly help when the time comes to painting, and as they connect with the clack valves, saddle tank and the overflow goes through the running plate some thinking is needed ensure the fitting doesn’t get to complicated and risky when removing them with out any damage, that’s ongoing. Anyway lots of bit made and assembled.

I’m considering using a couple of boards from a previous project to give space for a small layout, so looking at track plan and options for track construction at the moment.

Simon
TPanIDa.jpg
bGXGXie.jpg
SWo36sF.jpg
gZp4aIs.jpg
qfwIUIt.jpg
4ojNrC9.jpg
 

Hobbyhorse

Western Thunderer
Good day yesterday in the workshop, made all the bits for the cylinder drain cocks and the securing rings. 6 drain cocks needed per loco, 4 for the cylinders and 2 for the valve chests.
With the securing rings as these are a bit vulnerable the loops to the rod are assembled with silver solder.
The couplings are a bit distinctive on the loco, I made some patterns a few years ago a had some castings done, for the front a frame inside secures the coupling as per the full size loco, the rear won’t have it as space is needed for a servo used with coupling.
With lots of bits made it’s time to get them onto the locos.

Simon

JsfweRN.jpg
FSNI7D8.jpg
kMg9YlQ.jpg
aXqmPip.jpg
azmAsF7.jpg
 

Hobbyhorse

Western Thunderer
The next stage is fitting the recently made bits starting with the drain cocks.
Each model has 6 drain cocks, 4 for the cylinders and 2 on the valve chests.
All have 1mm pegs to help fitting, the cylinder one solder easily to the cladding, but the drain one are glued as the valve chests are solid thick brass.
Spent a bit of time making up the various links, operating rods and brackets, and forming the copper wires, with the assembly fairly straightforward, the front support bracket aren’t fixed too the buffer beam, this allows the cylinders to be removable.
Other bits fitting included the securing rings and the cylinder front covers which I'd made a while ago.

One of the early decisions was to have hands free coupling with the link and pins, and did quite a bit of development work with this, but having time to consider this at became apparent that the automation mechanism only needs fitting to one end only, and you can see that the front end hasn’t the space needed for the servo and linkages, so the additional holes need filling which was more time consuming than I thought, but are now done.

Simon

f4iltXE.jpg
VVkR6f2.jpg
kSnHbB3.jpg
VwgjMw1.jpg
4DVoRDS.jpg
Qvhw5ge.jpg
EWU9RvM.jpg
 

Hobbyhorse

Western Thunderer
Fitting the injectors turned out to be a bit tricky as these need to be removable. So with all the copper piping formed the first job was to fix the clack valve to the boiler, next the injector and overflow pipe hole positions are marked and drilled into the plate work. With these fixed onto the position the various pipes are added, with the clacks the pipe just locate without being fixed, and the overflow pipe is fixed to the plate work but locates into the injector body. The water feed pipe from the tank again just locates into the tank fitting. This assembly is a bit delicate and requires quite a lot of care when positioning the boiler into place, it's easy to deform the pipes and bits can drop off easily but I'm pleased overall with the progress.

Simon

BD9Jgrq.jpg
YA0S0NR.jpg
TSa6Csd.jpg
kaEHGb5.jpg
FWHtP9s.jpg
R530DWV.jpg
 

Hobbyhorse

Western Thunderer
Not done much on the Darent models recently as I'm working on my 7mm stuff, but here is a couple of videos, first one gives an idea of the shunting with the couplings( not very good quality) and the second at our 7mm group meeting.
It was good to be able to run the pair on a large layout, and although 7mm most of the layout was accessible. Sharing something different with the group certainly provoked some amusement and interesting conversations.
With my layout plan coming along, having some castings done from my patterns for the baseplates and clips, and some rail on order things are progressing.

Simon

Coupling Testing

Darent on Bucks Hill

EDM5TiS.jpg
WX3kKcc.jpg
 

Hobbyhorse

Western Thunderer
I've add some photos as a comparisons between the prototype and the models.
So what's the plan going forward with the models. I've created a list of bits to make, so will work through these and will then strip down both models to add the bits, and get ready for painting.

At a recent meeting I took along the models to give them a run, and they sparked quite a lot of interest. We had quite a long discussion about the scale and the possibility's it has, but looking at the fine scale side and not the garden rail as it's a bit chunky for their liking.
Talking about my plans for the small layout it looks like I'm going to have some help, possibly expanding it a bit with some novel ideas around control, fiddle yard, presentation and a host of other bits. Anyway must not get carried away as lots to do on the models, but looks like lots of tea and biccies will be consumed looking into the ideas.

Simon

55222220482_7206802fa8_b.jpg

54837266212_88d4bc8caf_b.jpg

54838356304_d822335693_b.jpg

55223520305_56c2a9d07e_b.jpg
 

Paul_H

Western Thunderer
What superb models, fantastic fine scale engineering.

I can understand why some might find the short chimney, cabless variant a bit 'odd'. I don't think the prototype would win many beauty contests. That doesn't stop it being interesting or an accurate model.
 
Top