Mike G's Workspace.

Mike Garwood

Western Thunderer
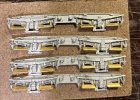
The first of 3 sets of bogies has been completed. In hind sight I should have measured the legs before having the steps etched. Still these actually look like 9ft pressed steel bogies.I should add that the castings are from MJT.
The only fly on the ointment is the springs in the centre of the bogie. The casting is rather deep and I think there may be more mutilation ahead to get them to fit Justin's lovely sprung bogies.
GWR 9 ft Pressed steel bogie etch2.jpg

I swapped the tip over on my iron and used a 1mm piece. As Phil O suggested I tinned the legs before using 70 degree to solder the legs in place. It's a lengthy process with these 4 taking over and hour and a half to complete. To my eye it's been worth the effort.

This is what the prototype looks like:

GWR 9 ft Pressed steel bogie real.jpg

On to the next set...

Stay safe

Mike
 

Mike Garwood

Western Thunderer
I have been hugely impressed by The xTool f1 ultra fiber and diode kit. Well the utube videos show it in a very good light, put it that way. Its seems multi purpose. The down side is its from China. Which means that if things go sideways there's going to be a problem...forever the pessimist.

Has anyone any experience of a European/ British made similar lasers? I'm looking for something that will cut 0.3 / 0.5 mm NS and brass. Plus be able to work it's way thru 3 mm wood. I think you can guess where this is going.

many thanks

Mike
 

simond

Western Thunderer
Mike,

metal cutting is a whole other ball game. I’d be very surprised if any hobby-level lasers can do it.

Trotec offer a 120W CO2 / Fibre combo with gas assist but that will only cut foil. Most metal cutting lasers are 1kW or more and rather pricy (and probably the size of your garage!). 100kW plus seems quite typical. Metal conducts heat, so if you want to melt it, you’ve got to have lots of power.

I had some lovely parts from Model Engineers Laser, but do beware, everything is very annealed and the metal is dead soft. I’m not inclined to get brass again, though I might try steel. Otherwise I think I’d tend to machine with my trusty cheapo CNC.

(which didn’t go pear-shaped but appeared to. I purchased a new GRBL controller for a massive twenty quid, so I now have a spare)

hth
Simon
 

Phil O

Western Thunderer
Hi Mike, Simon,

Check out the Bexhill West aka. James Walters video on YouTube, he reviewed a laser cutter, not sure what type or power it was, but he cut nickelsilver too make loco parts and a rail crane. Sorry I can't do links on my tablet.
 

simond

Western Thunderer
thanks Phil, I’ll go look. Bexhill is a treasure trove of useful stuff. I’ll post a link assuming I can find it.

(actually, I’m surprised you can’t, can you not highlight the address bar, when it says “cut” or “copy”, do that, then go the your post, and simply paste it? It works on my iPad and iPhone, and I assume Android is similar?)
 

timbowales

Western Thunderer
thanks Phil, I’ll go look. Bexhill is a treasure trove of useful stuff. I’ll post a link assuming I can find it.

(actually, I’m surprised you can’t, can you not highlight the address bar, when it says “cut” or “copy”, do that, then go the your post, and simply paste it? It works on my iPad and iPhone, and I assume Android is similar?)
Ooh, Simon! Google and Apple the same, you are joking
 

simond

Western Thunderer
Yep.

. (It’s the “share” button on YouTube )

At a price, £3600, I think. Not my budget!

but he does cut thin sheet metal, that said, rather slowly, 22 passes? And I guess it is very annealed, as I found with the stuff I purchased.

I recall seeing this before, and being horrified by his fingers so close to the beam. Shades of “Mr Bond, I’ve been expecting you…”
 

Dangerous Davies

Western Thunderer
Mike, there were two 6 kW lasers left on M2 at the Orb. They would cut metal with no problem but they would be a bit bulky for home and as they were class IV a little bit risky.
Cheers
Dave
 

Mike Garwood

Western Thunderer
This weekend, I was fortunate to be invited to Ian Penberth's layout Coombe St Stephens. This is still under construction. I was joined by Newport Rod, who brought with him a Hall built by the late John Hayes. It really is a stunning piece of work.

I have moved the Hawksworth coach forward and I'll write that up in the near future.


Stay safe

Mike
 

Nick Rogers

Western Thunderer
Greetings Mike,

Happy New Year to you. Lovely footage of Nanhoran Hall and your coaching stock. I am looking forward to following your modelling this year.

Best wishes,
 

45609

Active Member
Yes, John certainly built marvellous models that both looked and worked superbly.
Indeed they do Dave. I had the privilege of fitting a decoder to that loco for Rodney. There was a bit of head scratching to figure out how the rear of the body was secured to the chassis. I eventually found it under a completely removable footplate and backhead assembly that John had devised. Brilliant I thought. Perfect for detailing and painting the interior of the cab.

Cheers…Morgan
 

Mike Garwood

Western Thunderer
Work on the remaining coach has commenced. This is the rape and pillage of a Hornby Hawksworth brake third. First things first, I cut out the sides and discarded the chassis. I was careful not to obliterate the rivet detail just below the cant rail of the roof.
I started with building the sides, hinges, handrails etc. Next job was to attach a 3 mm stretch of brass at 90 degrees to the sides being flush with the top edge. I should mention that the Comet sides are 2 mm longer than the width of the ends...that begs some questions.

GWR D133 sides 2.jpg

I take no glory in this approach to improving RTR coaches. I pinched this idea from the man himself, Larry Goddard. Who I consider to be one of the finest 4 mm coach builders. I miss Larry's write ups of his exceptional work.
This is what it looks like after the soldering.

GWR D133 sides 1.jpg

The next step, turn the job upside down and run a line of solder from underneath, while keeping firm pressure on the strip and - more importantly - not hanging around with the soldering iron. This made the strip sit right at the very edge of the side, which is exactly what I wanted. This means that I'll be able to glue the roof and sides on with some precision.
Since then, I've started and finished the chassis. This has received the extra 2 support channels that run underneath, to be fair Hornby had taken care of that detail on their chassis. The Comet chassis may be a tad too long, but a P4 modelling file will take care of that.

GWR D133 sides 3.jpg

I still have to glue in a small floor at both ends, this will allow the chassis to be tied into the body. I have to admit this has been great fun so far. I'm sure there will come a point were it will not be fun, but for the moment...

Stay safe

Mike
 

Mike Garwood

Western Thunderer
Yesterday evening I took advantage of some quiet time. The rest of the weekend having been a bit stressful. My Grandson, Benjamin 20 months old, had been taken to hospital last Thursday, with an infected big toe. After an 8 hour wait and an X ray, antibiotics given and sent home. 22:00 hours on Friday evening, a phone call from the Hospital, informing that Ben needed to go back as his X-ray had been re examined and now he had a bone disease in his big toe. Instant panic mode came on and we all held our breath fearing the worst. As usual there were the inevitable cock ups with treatment and appointment which meant the poor boy wasn't seen for another 8 hours! The long short and the tall of it was Ben was in for the night. And the stress was beginning to tell on his Mum & Dad (not surprising that). I have to say I have been appalled at the mismanagement of Ben's treatment. Anyway they were all home late Sunday PM. And treatment is ongoing for the next 4 weeks.

Apologies for the rant.

So back to the coach. During Sunday evening I glued on the sides to the roof. I used Gorilla contact glue...excellent stuff. And this is how I made sure the roof didn't move/ bow while curing.

GWR D133 sides on.jpg

Next job - after it was all dry - to get the chassis to fit the now completed body. Some filing (the chassis was a couple of mil too long) and some soldering (buffer beams) and it fitted snugly under the part floor that I'd created with 2mm thick plastic card. Cut to the shape of the ends and glued in place using Poly Weld - vicious stuff. I had allowed a millimeter for the floor level to be correct to the coach chassis, so that you don't get to see the bends of the sides of the chassis that the sides rest against. Getting that straight was down to number one eyeball...and luck.

GWR D133 almost finished 1.jpg


GWR D133 almost finished 2.jpg


GWR D133 almost finished 3.jpg

A certain amount of filling was needed between sides and roof, but not as much as I expected. The real PIA was cleaning off the glue over spills onto the band of rivet detail directly under the roof. That took ages, and very frustrating.
There are still some jobs to do to complete. Couplings, coach bellows and a damn good wash, then back to the bogie castings and fitting all those steps! It's been terrific fun.

And yes I shall fix the drooping steps at the end of the guards section.

Stay safe

Mike
 
Top