
You are using an out of date browser. It may not display this or other websites correctly.
You should upgrade or use an alternative browser.
You should upgrade or use an alternative browser.


JimG
Western Thunderer
Is it going to be the same height all around the garden?
John,
The lawn area is a few inches higher than the path/patio around the house, so the layout will be a bit closer to the grass when I venture out there.
 But it will be as level as I can make it all round.
The rain overnight has meant that I can check out how smoothly I laid the roofing felt. It's almost impossible to see lumps and bumps when the felt is dry, but a thin covering of water shows up any bumps - and there were only one or two small ones which seem to have stayed down when pushed.
Jim.

Phill Dyson
Western Thunderer
Are you sure that plywood will be OK in the great outdoors?
JimG
Western Thunderer
Are you sure that plywood will be OK in the great outdoors?
Phill,
I hope so.
I think the plywood stands a good chance of survival for a good many years and could well see me out. It's got a double coat of wood protector all round and roofing felt and adhesive on the top. The garden is also quite sheltered so the layout will never really receive the full effect of poor weather. The one niggling worry I have is when I have to screw anything down and the screws will effectively breach the felt and the protective coats. It could be that the ingress of moisture around a screw might be minimal and cause no problems and I hope that is the situation, but I will be watching out for problems where screws are used.Jim.
Phill Dyson
Western Thunderer
Time will tell Jim, ply does tend to have a nasty habit of de-laminating with water ingress, but I hope you will not suffer this 

Dog Star
Western Thunderer
How about a bead of something around the hole before placing the object to be fixed down? And maybe a blob of the sticky stuff in the hole before placing the screw?... The one niggling worry I have is when I have to screw anything down and the screws will effectively breach the felt and the protective coats. ...
By "something" I am thinking of the "felt glue/sealer" which is used to seal a lap joint between sheets of roofing felt.
regards, Graham
JimG
Western Thunderer
Time will tell Jim, ply does tend to have a nasty habit of de-laminating with water ingress, but I hope you will not suffer this
Phill,
I had a good chat with the people at Lathams about the life expectancy of plywood in outside weather and their experience was that most water ingress which caused delamination was through the edges and that these should be well sealed. So all the sides have had four coats of protective, the edges getting a coat each time when the surfaces were given their two coats. The other cause of delamination would be if the plywood was subjected to a lot of time in standing water on surfaces or edges, which is unlikely to happen with the table design of the structure. And the felt and its adhesive should protect the top of the boards from standing puddles during/after rain. I've kept the joints in the felt to the minimum that I could to minimise the possibility of water getting in through the joins and stay between the felt and the board top.
With the boards just being outside my back door, they will be in full view every time I'm in and out of the house so they shouldn't be "out of sight and out of mind" and I should be able to see problems starting, if they do.
Jim.
JimG
Western Thunderer
How about a bead of something around the hole before placing the object to be fixed down? And maybe a blob of the sticky stuff in the hole before placing the screw?
By "something" I am thinking of the "felt glue/sealer" which is used to seal a lap joint between sheets of roofing felt.
Graham,
I'm also thinking of sticking things down to the felt - like the track - using dabs of the felt adhesive, or some other adhesive. This is where it might be difficult to seal around screws. I'm using Cliff Barker's track bases which have a screw hole lug in the corner of the sleeper and the spacer, so it might be difficult to do any good sealing there. However, I should be getting the track bits and pieces by the end of the week, so I could have a few experiments with the bits and pieces of plywood and felt I have left over.
Jim.
Phill Dyson
Western Thunderer
You could let the roofing felt overhang the edges of the boards by a good few inches & let them dangle down, this would not look very pleasing but it would encourage rain water to run well away from those baseboard edges.
Phill
Phill
JimG
Western Thunderer
It does occur to me that's useful information, but not helpful! What about fixing track and all other items to treated plywood bases using screws etc, then using adhesives, maybe silicone type stuff that doesn't harden, to attach the plywood to the roofing felt? The important thing is to protect the integrity of the table surface. You may have to replace the odd bit of plywood, but that's easier that any significant work on the table. Thinking along these lines might get you to better base materials and adhesives than I'm suggesting.
Graham,
I'll try some adhesive experiments when I get some track built over the next few weeks. I'm actually contemplating building the track on battens of styrene strip stuck to the underside of the Cliff Barker sleeper units - a bit like the old Bassett-Lowke track I saw in their catalogues many years ago.. I'm doing this because I'm building interlaced sleeper turnouts and these can become a bit of a handful when built off the baseboards since they can be extremely floppy in all directions between the heel of the switch and the crossing nose. I'm also looking at building universal pointwork on the continuous section using movable crossing noses, so I want a fairly firm base on these turnouts so that I can interconnect the crossing nose with the switch blades. To avoid height problems with plain track, the plain track will also be battened as well. This battening of the plain track means that I can build off the baseboards and carry all the curves designed in Templot into the garden. I'm reckoning that the battening will be well hidden by ballast.
As for adhesives to stick the track down, I have plenty of the felt adhesive to try but I find it not so easy to handle, so I might look at other alternatives - like Mastic in a tube.
Jim.

Simon
Flying Squad
Two thoughts.
Re fixing track, I'd be inclined to glue it all down and not use any pins. Gripfix or similar would do, being a bit gap filling and flexible. I started off using this method, but more recently have just let the track "float" but with odd spot gluing to maintain top/cant/line, I have used epoxy or superglue but then I'm sticking to either concrete or creosoted timber.
However, it is really the ballasting that finally fixes all my track together, using SBR dropped over a dry ballast, much as in small scale land. I'd have thought this would be a worthwhile method for you, especially given that you are interested in how the track looks and also suffer from ScaleOne32 leanings.
Track itself, I'd strongly recommend cutting off all Cliff's webbing/spacing mouldings (which include the pinhole) as they are visually intrusive and also mean you can't change the sleeper spacing at joints etc.
I have done exactly as you have suggested when building point work, having built them directly on to Templot prints, timbers stuck with smeared PVA, I then solvent on a webbing of strips of thin (20 thou?) Plastikard underneath the sleeper bases. Although this seems really insubstantial it works very effectively at keeping everything in place and as it will all be hidden by your ballast (sorry!) you can apply it all over the base of your formation.
Another reason for ballasting will be that you will be able to visually lose the myriad of wires that you will have installed for track power, although this is one aspect that might call for making holes to reach the underside of boards. Although I don't have your plywood penetration problems with my concrete I nonetheless drill wiring access holes in the middle of the four foot which in your case would make them relatively easy to seal.
The ballasting with SBR would provide a waterproof "cap" to it all too.
Ballasting also makes the track MUCH easier to clean when garden debris etc gets on top of it and makes any track cleaning easier as the whole formation is very rugged.
Finally, I would use the stainless rail rather than n/s as it is great for track power and has a lower coefficient of linear wotsit. it does all look a bit silver but Hydrocloric Acid will be your friend.
Sorry about the essay, but the above is all based on my experience with Cliff's track in the great outdoors.
Great work by the way!
Simon
Re fixing track, I'd be inclined to glue it all down and not use any pins. Gripfix or similar would do, being a bit gap filling and flexible. I started off using this method, but more recently have just let the track "float" but with odd spot gluing to maintain top/cant/line, I have used epoxy or superglue but then I'm sticking to either concrete or creosoted timber.
However, it is really the ballasting that finally fixes all my track together, using SBR dropped over a dry ballast, much as in small scale land. I'd have thought this would be a worthwhile method for you, especially given that you are interested in how the track looks and also suffer from ScaleOne32 leanings.
Track itself, I'd strongly recommend cutting off all Cliff's webbing/spacing mouldings (which include the pinhole) as they are visually intrusive and also mean you can't change the sleeper spacing at joints etc.
I have done exactly as you have suggested when building point work, having built them directly on to Templot prints, timbers stuck with smeared PVA, I then solvent on a webbing of strips of thin (20 thou?) Plastikard underneath the sleeper bases. Although this seems really insubstantial it works very effectively at keeping everything in place and as it will all be hidden by your ballast (sorry!) you can apply it all over the base of your formation.
Another reason for ballasting will be that you will be able to visually lose the myriad of wires that you will have installed for track power, although this is one aspect that might call for making holes to reach the underside of boards. Although I don't have your plywood penetration problems with my concrete I nonetheless drill wiring access holes in the middle of the four foot which in your case would make them relatively easy to seal.
The ballasting with SBR would provide a waterproof "cap" to it all too.
Ballasting also makes the track MUCH easier to clean when garden debris etc gets on top of it and makes any track cleaning easier as the whole formation is very rugged.
Finally, I would use the stainless rail rather than n/s as it is great for track power and has a lower coefficient of linear wotsit. it does all look a bit silver but Hydrocloric Acid will be your friend.
Sorry about the essay, but the above is all based on my experience with Cliff's track in the great outdoors.
Great work by the way!
Simon
Last edited:
JimG
Western Thunderer
Simon,
Many thanks for all these details of your track construction which is confirming my intentions to glue the track down.
I had wondered about the spacers built into Cliff Barker's sleeper units. I had seen them on the yard of his G3 track I got earlier on this year and could see the advantages for anyone wanting to get pretty good looking track laid quickly. But I hadn't investigated how easily they could be hidden and that they would have to be modified or dispensed with if I wanted smaller sleeper pitches than the spacers provided. I just spent a lot of yesterday modifying my Templot turnout templates to use interlaced sleepers where I want to use Cliff's sleeper units and it's pretty obvious that the spacers will have to go. I had first thought of shortening the spacers so that interlaced sleepers would fit between each other but that would have required a great amount of fiddling and I came to the realisation that the battens would do the same job and a lot quicker. I also think that the sleeper spacing will be less than I would be looking for in representing Caledonian plain track - I'm aiming at their nineteen sleepers in a 48ft panel which I suspect is a wider pitch than Cliff's spacers set. So the spacers will go.
Thanks for the suggestion about power feeds in the four foot way. I've been getting pretty fixed on feeding cables across the baseboard surface from the edges to avoid drilling holes in the baseboard tops but it now becomes pretty obvious that I could use some form of electrical waterproof gland fitting in a hole in the ply/felt to get access through the board that could be damp-proofed. I'm getting too old and fixed in my ways.
I have ordered the stainless steel rail and I'm thinking ahead and contemplating using his six foot lengths in the "country" area of the layout with electrically bonded joints to cut down on the number of feeds to the rails.
I might get all the track bits by the weekend so I might get some track-laying started. I've also had to set up a method of printing out the 1:32 scale templates. My printer won't do banner printing, but it will do custom sizes up to 600mm x 300mm so I've invested in a 110 metre roll of 300mm wide paper and have set up a jig to cut it into 600mm lengths so that I cut down the number of individual sheets per template or area of the track plan. I haven't even started counting how many A4 sheets I might have needed.
Jim.
Many thanks for all these details of your track construction which is confirming my intentions to glue the track down.
I had wondered about the spacers built into Cliff Barker's sleeper units. I had seen them on the yard of his G3 track I got earlier on this year and could see the advantages for anyone wanting to get pretty good looking track laid quickly. But I hadn't investigated how easily they could be hidden and that they would have to be modified or dispensed with if I wanted smaller sleeper pitches than the spacers provided. I just spent a lot of yesterday modifying my Templot turnout templates to use interlaced sleepers where I want to use Cliff's sleeper units and it's pretty obvious that the spacers will have to go. I had first thought of shortening the spacers so that interlaced sleepers would fit between each other but that would have required a great amount of fiddling and I came to the realisation that the battens would do the same job and a lot quicker.
I also think that the sleeper spacing will be less than I would be looking for in representing Caledonian plain track - I'm aiming at their nineteen sleepers in a 48ft panel which I suspect is a wider pitch than Cliff's spacers set. So the spacers will go. Thanks for the suggestion about power feeds in the four foot way. I've been getting pretty fixed on feeding cables across the baseboard surface from the edges to avoid drilling holes in the baseboard tops but it now becomes pretty obvious that I could use some form of electrical waterproof gland fitting in a hole in the ply/felt to get access through the board that could be damp-proofed. I'm getting too old and fixed in my ways.
I have ordered the stainless steel rail and I'm thinking ahead and contemplating using his six foot lengths in the "country" area of the layout with electrically bonded joints to cut down on the number of feeds to the rails.
I might get all the track bits by the weekend so I might get some track-laying started. I've also had to set up a method of printing out the 1:32 scale templates. My printer won't do banner printing, but it will do custom sizes up to 600mm x 300mm so I've invested in a 110 metre roll of 300mm wide paper and have set up a jig to cut it into 600mm lengths so that I cut down the number of individual sheets per template or area of the track plan. I haven't even started counting how many A4 sheets I might have needed.
Jim.
Phill Dyson
Western Thunderer
Any problems that arise from de-lamination will only be made worse by ballasting......
......
Last edited:
Phill Dyson
Western Thunderer
If I were you Jim I would put another layer of roofing felt on but let it overlap the boards by about 6 inches & dangle down off all edges of the boards .....this will prevent water being drawn into the board edges by capillary action. If you also seal all joints with bitumen & glue the track rather than penetrate with track pins as has been suggested your boards should then be weatherproof. ...there is nothing more disheartening than seeing the harsh British weather undo all your hard work!
Hope this helps & you spend as many years as I have enjoying the wonderful world of outdoor model railways.
All the best
Phill
Hope this helps & you spend as many years as I have enjoying the wonderful world of outdoor model railways.
All the best
Phill
JimG
Western Thunderer
Hi Jim, just seen your comments on waterproof glands. They're usually made to go through smooth plastic boxes and tighten on the smooth surface to make a rainproof seal. The hole that the wire goes through is sealed by squeezing a gromett round the cable. Everything sticks out rather a lot. I'm wondering if what you need is something simpler like an oversized plastic top hat bearing where the flange is sealed onto the felt with silicone or mastic and the tube simply projects a centimetre or so belpw the baseboard preventing any water getting back up to the underside of the board.
Graham,
After I had posted that message it dawned on me that mineral felt wouldn't give a very smooth sealing surface.
I'll have a look around for something resembling your suggestion.If I were you Jim I would put another layer of roofing felt on but let it overlap the boards by about 6 inches & dangle down off all edges of the boards .....this will prevent water being drawn into the board edges by capillary action. If you also seal all joints with bitumen & glue the track rather than penetrate with track pins as has been suggested your boards should then be weatherproof. ...there is nothing more disheartening than seeing the harsh British weather undo all your hard work!
Phill,
I've actually got about 1 1/2" of felt overhanging most of the wall side of the boards (except at the buttresses) and I have about 3" overhanging at the front edge which I had stapled under the front of the plywood. I will dig these staples out and let the front edge hang down to provide a dripping edge. I also have thoughts of providing a cover over the station boards to provide some protection for structures if I get round to placing some - like buildings and, even, signals. So this cover could provide more protection for the supporting structure. When I venture out into the lawn area next year (hopefully) then I'll lay the felt with long skirts on each side of the boards.
I've just managed to persuade my printer to print the first 1:32 turnout template yesterday, after a bit of a fight with the printer driver. It's interlaced with a 7.5 angle crossing and a 12ft straight switch (roughly equivalent to a "B" switch) and it's about 31" long - looks a bit big to me.
It doesn't look as though I'll see my bits from Cliff Barker until next week - the MyHermes tracking site shows that it's still at his local depot this morning. 
Jim.
JimG
Western Thunderer
It's been just over two weeks since I posted anything and I don't seem to have much to show for all the work I've been doing.
In the garden, with our present spell of good weather, I've done a bit more clearing in preparation for the extension onto the lawn.

The north bound extension to the oval in the garden will go between the apple tree - just to the left and to the rear of the compost bin - and the wall on the right. This picture shows the original situation with a pretty impenetrable route past the apple tree and the trig point on the wall buttress on the extreme right.

...and after a bit of work, the way is cleared with the apple tree in full view and the next two buttresses on the wall revealed. The buttress with the trig point is now hidden on the right behind a large pile of prunings which will be burned in a few months' time when they have dried out. Note the missing copings on the wall which were displaced by the bushes. The stones had actually fallen - more likely had been pushed - to the inside and I have been able to dig them out of the undergrowth to be cleaned and replaced on the wall.
Inside, I had made a start on the track with a fair bit of experimenting on how I was going to build it. I wanted to be able to build it all off the baseboards in the house.
The first decision I made was to build the track on battens - like the Bassette-Lowke 0 gauge track of many years ago. This meant that I should be able to build everything to plan indoors and transfer it straight to the baseboards outside. I opted to make the battens of 3mm styrene strip. The decision came about after earlier discussions about wiring and I opted for the 3mm thickness so that I could run 2.5mm cable busses under the sleepers between the battens so that connections to rails would be a matter of a short lead between the busses and the rails, with no need to drill holes on the baseboards. DCC experts might have some comments about running busses so close under the rails.

A section of the Templot plan was printed out and stuck together to give a plan of a six foot length of plain track in the station throat - this to use as a guinea pig for track construction. The plan was then taped to a length of Contiboard. The longitudinal battens were stuck down on the plan on the outer ends of the sleepers and clear of the rails so that the rails were clearly shown for alignment

This picture shows the length of the Contiboard - just about seven feet long to comfortably accommodate the six foot length
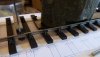
This close shot shows the detail more clearly with the styrene battens under the outer ends of the sleepers. The small square is used to make sure that the rail is exactly in position. I find it easy to get parallax errors when the rail is well off the plan - especially with the extra 3mm caused by the battens.
Then came a few days of frustration and experimentation. Initially I had used the MEK solvent supplied by Cliff Barker to stick the sleepers to the styrene battens. However this wasn't too successful with more than 50% of the joints not making properly and the other ones didn't stand up to much handling. I then dig around for alternatives to give better joints. I first tried some MEK which I had got some years ago when working with glass fibre. This stated that it was a 50% solution and the results were much worse than with Cliff Barker's MEK with no joints being made. I then dug out my bottle of C&L Butanone and tried that and the end results were also very poor. I then had a dig around on Google to see if there was any solution and the options were possibly Pipe Weld for PVC piping or the Plastruct Plastic Weld. I managed to get a 50ml tube of Pipe Weld in the local B&Q and tried that out and that seems to produce good results with almost 100% success. However, another thing I did was to roughen the surface of the styrene with a big glass fibre stick that I got from Brian Lewis many years ago - this was recommended by several sources. So I made the cardinal sin of changing two variable in a test. But I've got a result. I might also get some of the Plastruct Plastic Weld to see if it also works. Someone on Ebay offers a 100ml bottle of an equivalent complete with syringe for applicatoion, so that might be worth a try. The fumes from the Pipe Weld are a bit strong so I would be interested to see if the Plastic Weld might be a bit better in this respect.

And a big jump to the completed six foot panel. In true Templot fashion, there ain't a straight line anywhere. It's actually a big reverse curve with a ~70ft radius one closest to camera and a ~150ft radius one at the other end with big dollops of transition in between. I've also changed my method of construction and feed sleepers onto both rails and put them down on the styrene battens. Laying just one rail first, then inserting the second rail after the sleepers were stuck down, was actually a bit more difficult since forcing the second rail through all the chairs takes quite a bit of force as you get more chairs engaged.
Other things going on have been making some track gauges, making fixtures to machine Slater's wheels down to ScaleOne32 standards and machining up bases for crossing noses on pointwork. I also did a good bit of business at the S scale Autumn meeting - I traded a Mike Williams G3 wagon kit and a yard of G3 track for two 1:32 wagon kits so I've got to get at least one of the kits built to use for testing of pointwork.
Jim.
In the garden, with our present spell of good weather, I've done a bit more clearing in preparation for the extension onto the lawn.
The north bound extension to the oval in the garden will go between the apple tree - just to the left and to the rear of the compost bin - and the wall on the right. This picture shows the original situation with a pretty impenetrable route past the apple tree and the trig point on the wall buttress on the extreme right.
...and after a bit of work, the way is cleared with the apple tree in full view and the next two buttresses on the wall revealed. The buttress with the trig point is now hidden on the right behind a large pile of prunings which will be burned in a few months' time when they have dried out. Note the missing copings on the wall which were displaced by the bushes. The stones had actually fallen - more likely had been pushed - to the inside and I have been able to dig them out of the undergrowth to be cleaned and replaced on the wall.
Inside, I had made a start on the track with a fair bit of experimenting on how I was going to build it. I wanted to be able to build it all off the baseboards in the house.
The first decision I made was to build the track on battens - like the Bassette-Lowke 0 gauge track of many years ago. This meant that I should be able to build everything to plan indoors and transfer it straight to the baseboards outside. I opted to make the battens of 3mm styrene strip. The decision came about after earlier discussions about wiring and I opted for the 3mm thickness so that I could run 2.5mm cable busses under the sleepers between the battens so that connections to rails would be a matter of a short lead between the busses and the rails, with no need to drill holes on the baseboards. DCC experts might have some comments about running busses so close under the rails.
A section of the Templot plan was printed out and stuck together to give a plan of a six foot length of plain track in the station throat - this to use as a guinea pig for track construction. The plan was then taped to a length of Contiboard. The longitudinal battens were stuck down on the plan on the outer ends of the sleepers and clear of the rails so that the rails were clearly shown for alignment
This picture shows the length of the Contiboard - just about seven feet long to comfortably accommodate the six foot length
This close shot shows the detail more clearly with the styrene battens under the outer ends of the sleepers. The small square is used to make sure that the rail is exactly in position. I find it easy to get parallax errors when the rail is well off the plan - especially with the extra 3mm caused by the battens.
Then came a few days of frustration and experimentation. Initially I had used the MEK solvent supplied by Cliff Barker to stick the sleepers to the styrene battens. However this wasn't too successful with more than 50% of the joints not making properly and the other ones didn't stand up to much handling. I then dig around for alternatives to give better joints. I first tried some MEK which I had got some years ago when working with glass fibre. This stated that it was a 50% solution and the results were much worse than with Cliff Barker's MEK with no joints being made. I then dug out my bottle of C&L Butanone and tried that and the end results were also very poor. I then had a dig around on Google to see if there was any solution and the options were possibly Pipe Weld for PVC piping or the Plastruct Plastic Weld. I managed to get a 50ml tube of Pipe Weld in the local B&Q and tried that out and that seems to produce good results with almost 100% success. However, another thing I did was to roughen the surface of the styrene with a big glass fibre stick that I got from Brian Lewis many years ago - this was recommended by several sources. So I made the cardinal sin of changing two variable in a test.
But I've got a result. I might also get some of the Plastruct Plastic Weld to see if it also works. Someone on Ebay offers a 100ml bottle of an equivalent complete with syringe for applicatoion, so that might be worth a try. The fumes from the Pipe Weld are a bit strong so I would be interested to see if the Plastic Weld might be a bit better in this respect.And a big jump to the completed six foot panel.
In true Templot fashion, there ain't a straight line anywhere. It's actually a big reverse curve with a ~70ft radius one closest to camera and a ~150ft radius one at the other end with big dollops of transition in between. I've also changed my method of construction and feed sleepers onto both rails and put them down on the styrene battens. Laying just one rail first, then inserting the second rail after the sleepers were stuck down, was actually a bit more difficult since forcing the second rail through all the chairs takes quite a bit of force as you get more chairs engaged.Other things going on have been making some track gauges, making fixtures to machine Slater's wheels down to ScaleOne32 standards and machining up bases for crossing noses on pointwork. I also did a good bit of business at the S scale Autumn meeting - I traded a Mike Williams G3 wagon kit and a yard of G3 track for two 1:32 wagon kits so I've got to get at least one of the kits built to use for testing of pointwork.
Jim.
Simon
Flying Squad
How wonderful to see someone with your skill and thought out approach to everything getting to grips with Cliff Barker components in a ScaleOne32 context
I like your slightly thicker (than mine) battens with the thought of running wiring in the "void" thus created, all very practical I think.
Based upon my experience it won't bother the DCC at all, people sometimes make DCC sound a lot more difficult than it actually is. Welding sleepers-wise, I use Acetone and find it works well.
The curve looks really good, I hope you'll be intoducing cant too
Brilliant work!
Simon
I like your slightly thicker (than mine) battens with the thought of running wiring in the "void" thus created, all very practical I think.
Based upon my experience it won't bother the DCC at all, people sometimes make DCC sound a lot more difficult than it actually is. Welding sleepers-wise, I use Acetone and find it works well.
The curve looks really good, I hope you'll be intoducing cant too
Brilliant work!
Simon